Releasing a Simulation Model to a Vault
Contents
- Defining the Simulation Model
- Model-Level Parameters
- Linking the Model File to a Vault
- Folder Type
- Item Naming Scheme
- Item Lifecycle Definition and Revision Naming
- Verifying the Link is Established
- Performing the Release
- Support for SIMetrix/SIMPLIS Models
- Re-releasing the Model Definition
- Streamlined Re-release Through File-less Editing
- Releasing Multiple Simulation Model Files
Parent article: Vault-Based Domain Models
From a designer's perspective, a vault-based component (Component Item) gathers together all information needed to represent that component across all design domains, within a single entity. It could therefore be thought of as a container in this respect. A 'bucket' into which all domain models and parametric information is stored.
In terms of its representation in the various domains, a vault-based component doesn't contain the domain models themselves, but rather links to these models. These links are specified on the design-side, as part of the source component definition – from which the released Component Item is generated. As such, before you can delve into the process of defining and releasing vault-based components, you must first ensure that all the domain models themselves have been created and released.
This article takes a look at the process of releasing a Simulation Model definition into the vault so that it can be used in the creation of one or more vault-based components.
Defining the Simulation Model
A simulation model definition within a SimModel file (*.SimModel) on the design-side is mapped to a Simulation Model Item on the release side. Each release of the file stores the model data into a new revision of that Item.
Firstly, create a new SimModel file (File » New » Library » SimModel File). The file will open as the active document in the SimModel editor. Both model definition and linkage to a target vault (and Item Revision therein) are handled from within this file.

Initial view within a newly-created Simulation Model file.
The information required to define the model in a SimModel file is as follows:
- Model Name – use this field to specify the name of the model. When released into a vault, this entry will be used as the target Simulation Model Item's Comment.
This must be the name, as it appears in any referenced model or subcircuit file.
When referencing an MDL file, the name must be that appearing in the .MODEL line of the model's definition. Consider a model for a diode with the following definition:
.MODEL 1N4002 D(IS=2.55E-9 RS=0.042 N=1.75 TT=5.76E-6 CJO=1.85E-11 + VJ=0.75 M=0.333 BV=100 IBV=1E-5 )
The model name here is 1N4002. This is the name that must be entered into the Model Name field.
When referencing a CKT file, the name must be that appearing in the .SUBCKT line of the model's definition. Consider a model for a fuse with the following definition:
.SUBCKT FUSE 1 2 PARAMS: CURRENT=1 RESISTANCE=1m SW1 1 2 3 0 SMOD OFF BNLV 3 0 V=(abs(v(1,2)))
.MODEL SMOD SW (VT=\{(CURRENT*RESISTANCE)\} RON=1g ROFF=\{RESISTANCE\})
.ENDS FUSE
The model name here is FUSE. This is the name that must be entered into the Model Name field.
- Kind – this drop-down gives access to a number of model categories containing the range of analog device models built-in to SPICE.
- Sub Kind – this drop-down lists all model types in a chosen category.
- Spice Prefix – the required prefix for this type of model. Automatically selected for all model Kind/Sub-Kind selections, unless Sub-Kind is set to
Generic Editor. - Model File – for a model that has been defined using a
.mdlor.cktfile, including an intermediary.mdlfile used to link to a Digital SimCode definition (in a.scbfile), use this field to browse to and nominate the required file. If using a SIMetrix or SIMPLIS model, browse to and nominate the required.lbfile (see Support for SIMetrix/SIMPLIS Models). - Description – enter a description of the model, for example its purpose. When released into a vault, this entry will be used as the target Simulation Model Item's Description.
- Netlist Template – displays the information that is entered into the XSpice netlist for a given component. For all of the predefined model kinds and sub-kinds, the Netlist Template is read-only. If, however, one of these predefined entries does not allow enough control over the information placed in the netlist, you can define your own template. To edit the Template, you need to select
Generic Editorin the Sub-Kind field – ensuring that the Kind field is first set toGeneral. For all other model sub-kinds, you can effectively change toGeneral/Generic Editorand edit the predefined template – massaging it to your own requirements. - Netlist Preview – read-only display of the text exactly as it will be written to the XSpice netlist file when a netlist is generated or a simulation is run.
- Model Preview – read-only display of the content of the referenced
.mdlor.cktfile. - Parameters – model-level parameters for the model (see Model-Level Parameters).
Once the definition of the model is ready, save the file with the same name as the model itself.
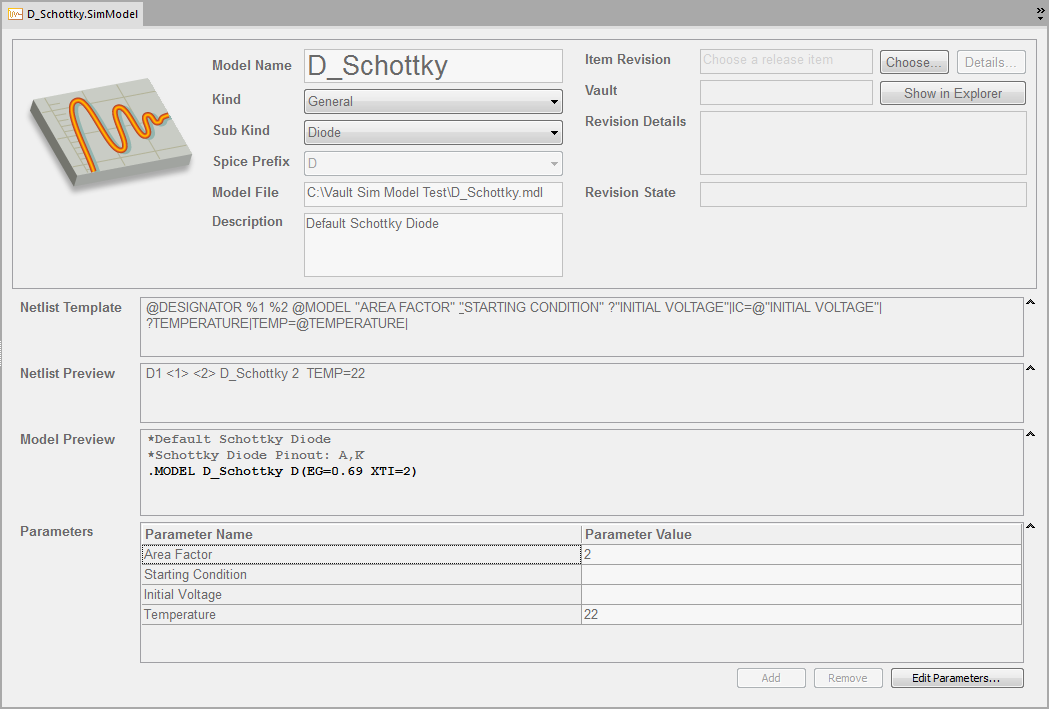
Example of a fully defined simulation model - for a standard Schottky Diode.
You can now proceed to release the model definition. To do so requires the following steps:
- Link the model to the required revision of a target Item in a target Altium Vault. The Item must be of type
altium-simulation-model, and the revision in which to release the simulation model data must be in thePlannedstate. - Release the model definition into that targeted Item-Revision.
Model-Level Parameters
Where applicable, model-level parameters can be defined directly within the SimModel file, since they are naturally part of a model's definition. The Parameters region of the document will automatically populate with parameters applicable to the chosen model Kind/Sub Kind. Parameter values can be edited in two ways:
- In-Place Editing – click on the Parameter Value field associated to a parameter in the list and enter the required value directly.
- Dialog-based Editing – click the Edit Parameters button, located below the Parameters region, to access the SimModel Parameters dialog. Parameters applicable to the chosen model Kind/Sub Kind will be presented. Edit the values for these as required. After clicking OK, the Parameters region will be updated with this information.
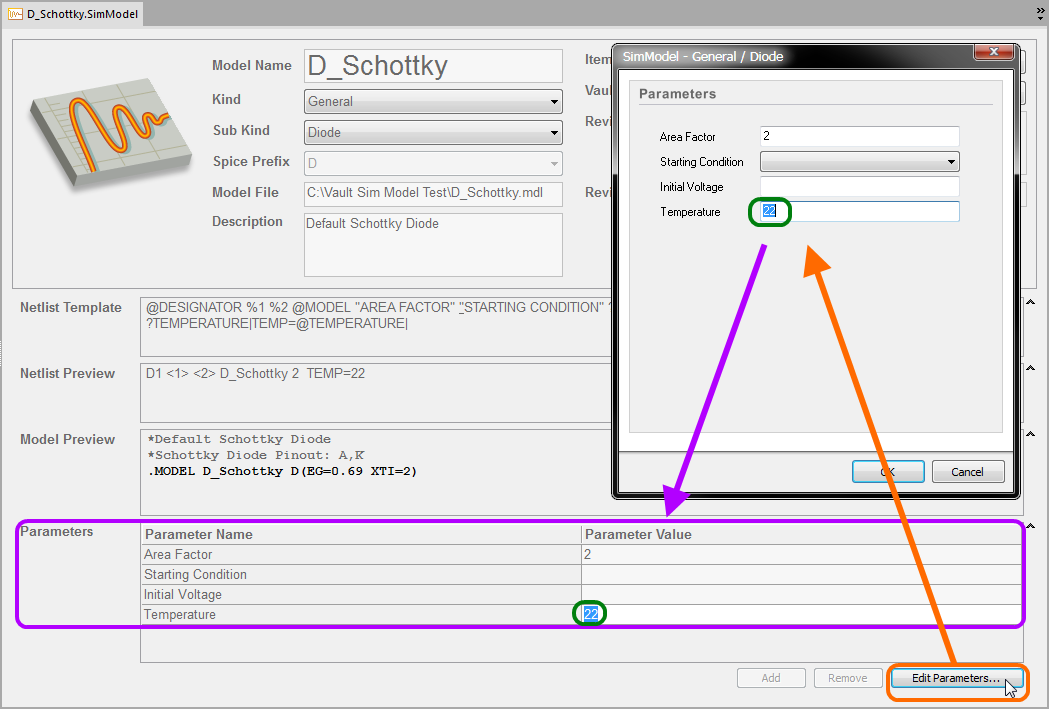
Define parameters for the model as part of its definition - either directly using in-place editing, or through the SimModel Parameters dialog.
Linking the Model File to a Vault
The link to the target vault and Item Revision therein, is stored as part of the SimModel file. Link information and related controls are provided on the right-hand side of the document view.
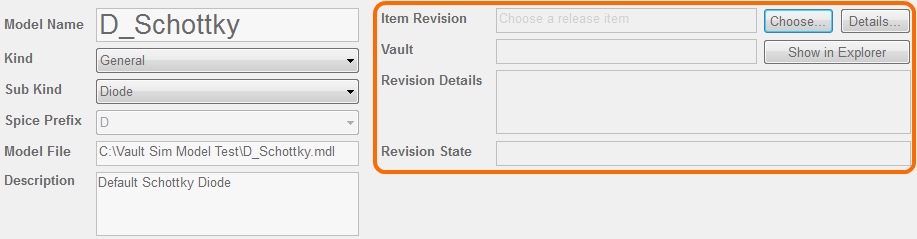
Controls for linking the simulation model definition to a Simulation Model Item in a target vault.
Clicking the Choose button to the right of the Item Revision field will give access to the Choose Item dialog – essentially a trimmed incarnation of the Vaults panel. The field at the top-left of the dialog indicates which vault you are currently exploring. To select a different vault, click the ![]() icon to the left of the vault name (or on the vault name itself) to access a menu of top-level vault management controls. This menu displays all vaults that you currently have an active connection to.
icon to the left of the vault name (or on the vault name itself) to access a menu of top-level vault management controls. This menu displays all vaults that you currently have an active connection to.
With the required target vault active, you can either drill down through its folder hierarchy to select the required existing Item, or create the folder and/or Item as required, on-the-fly. Ensure that the Item-Revision chosen – which will receive the released model data – is in a Planned state.

Manually linking the model definition to a planned revision of a Simulation Model Item, in the target vault.
Folder Type
Whether you have created a Simulation Model Item in the target vault beforehand, or are creating it in situ at the time of model linking, you will need to first create the folder in which that Item will reside. As part of folder creation, the folder's type can be specified. This has no bearing on the content of the folder – releasing simulation model definitions will always result in Simulation Model Items. It simply provides a visual 'clue' as to what is stored in a folder and can be beneficial when browsing a vault for particular content. To nominate a folder's use as a container for Simulation Model Items, set its Folder Type as altium-simulation-library.
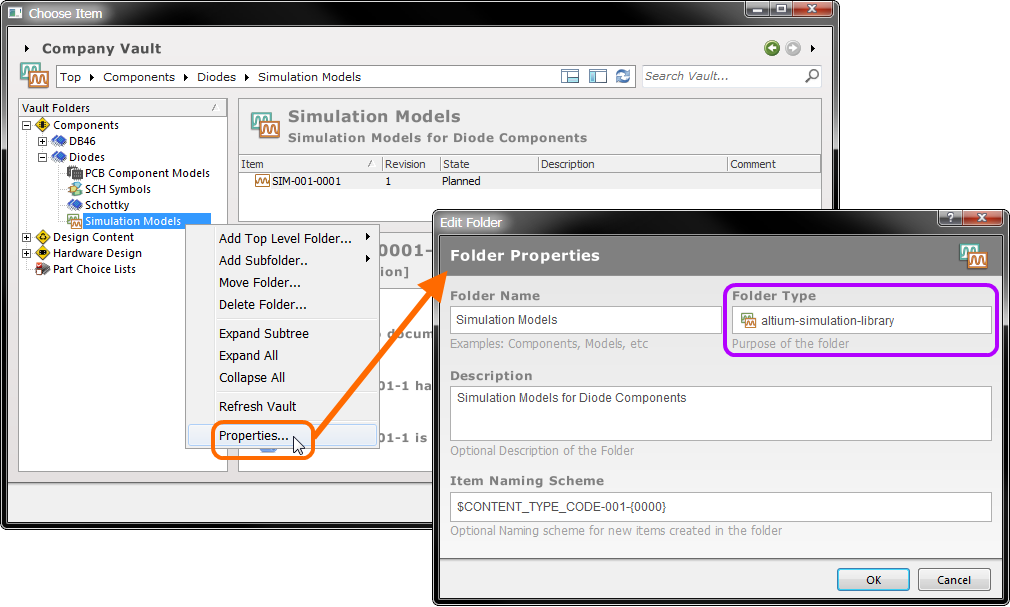
Specifying the folder type - its intended use - provides visual indication of the content contained within that folder while browsing the vault.
Item Naming Scheme
Another important aspect of the parent folder is the Item Naming Scheme employed for it. This defines the format of the unique ID for each Item created in that particular folder. Several default example schemes are available, utilizing the short-form code for either the folder type or the content type. Using a default naming scheme, the software will automatically assign the next available unique ID, based on that scheme, having scanned the entire vault and identifiers of existing Items. This can be a great time-saver when manually creating Simulation Model Items prior to release.
A custom scheme can also be defined for a folder, simply by typing it within the field, ensuring that the variable portion is enclosed in curly braces (e.g. SIMMODEL-001-{C000}).

The Item Naming Scheme of the parent folder is applied to the Unique ID for each Item
created within that folder.
Item Lifecycle Definition and Revision Naming
When defining the Simulation Model Item, to which the simulation model definition is linked, be sure to specify the type of lifecycle management to be used for the Item, and the naming scheme employed for its revisions, respectively. Once the simulation model definition has been released into the initial revision of the Item, these schemes cannot be changed for that particular Item.
Specify the required schemes in the Item Properties dialog, using the Lifecycle Definition and Revision Naming Scheme fields respectively.
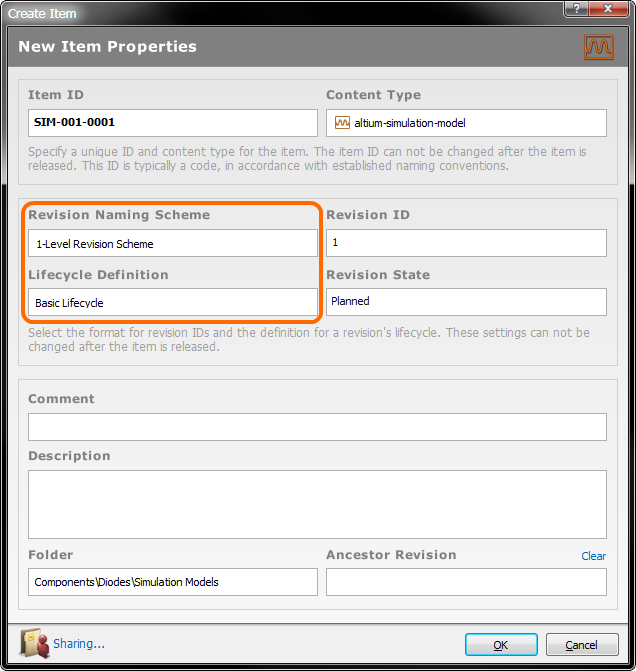
Selecting the Lifecycle Definition and Revision Naming schemes for a manually created Item.
Verifying the Link is Established
Once the required revision of the Simulation Model Item in the target vault is chosen, clicking OK in the Choose Item dialog will create the link between source model definition and target Item. Evidence of the link can be seen back in the SimModel file. Link information is stored in the SimModel file, so be sure to save the file!
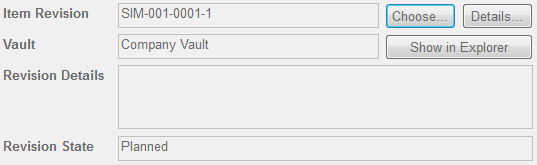
Evidence that the SimModel file is now linked to an Item in the vault.
Performing the Release
With the link to the target vault and Item-Revision in place, the process of releasing the simulation model definition into the vault can proceed. Select the File » Release To <TargetVaultName> command. When the data has been prepared to be added to the vault a confirmation dialog will appear. This dialog also includes a field to add any pertinent release notes. Click Yes to commit the simulation model definition to the vault.
After its release, information regarding the Item that the model definition is linked to is updated in the SimModel file – the Revision Details (which will now show the revision's comment and description) and the Revision State (which will now show Released, when using basic lifecycle management). Be sure to save the file. Click the Show in Explorer button to browse the released model directly in the vault using the Vaults panel.

Browsing the released Simulation Model Item in the vault, using the Vaults panel.
The released data stored in the vault consists of the model definition in the .SimModel file, as well as any referenced .mdl or .ckt file. For a modeled digital component, there will be the intermediate .mdl file, as well as the referenced Digital SimCode .scb file. In addition, model-level parameters can also be viewed as part of the model Item's preview. Click on a referenced file to view a preview of its content.
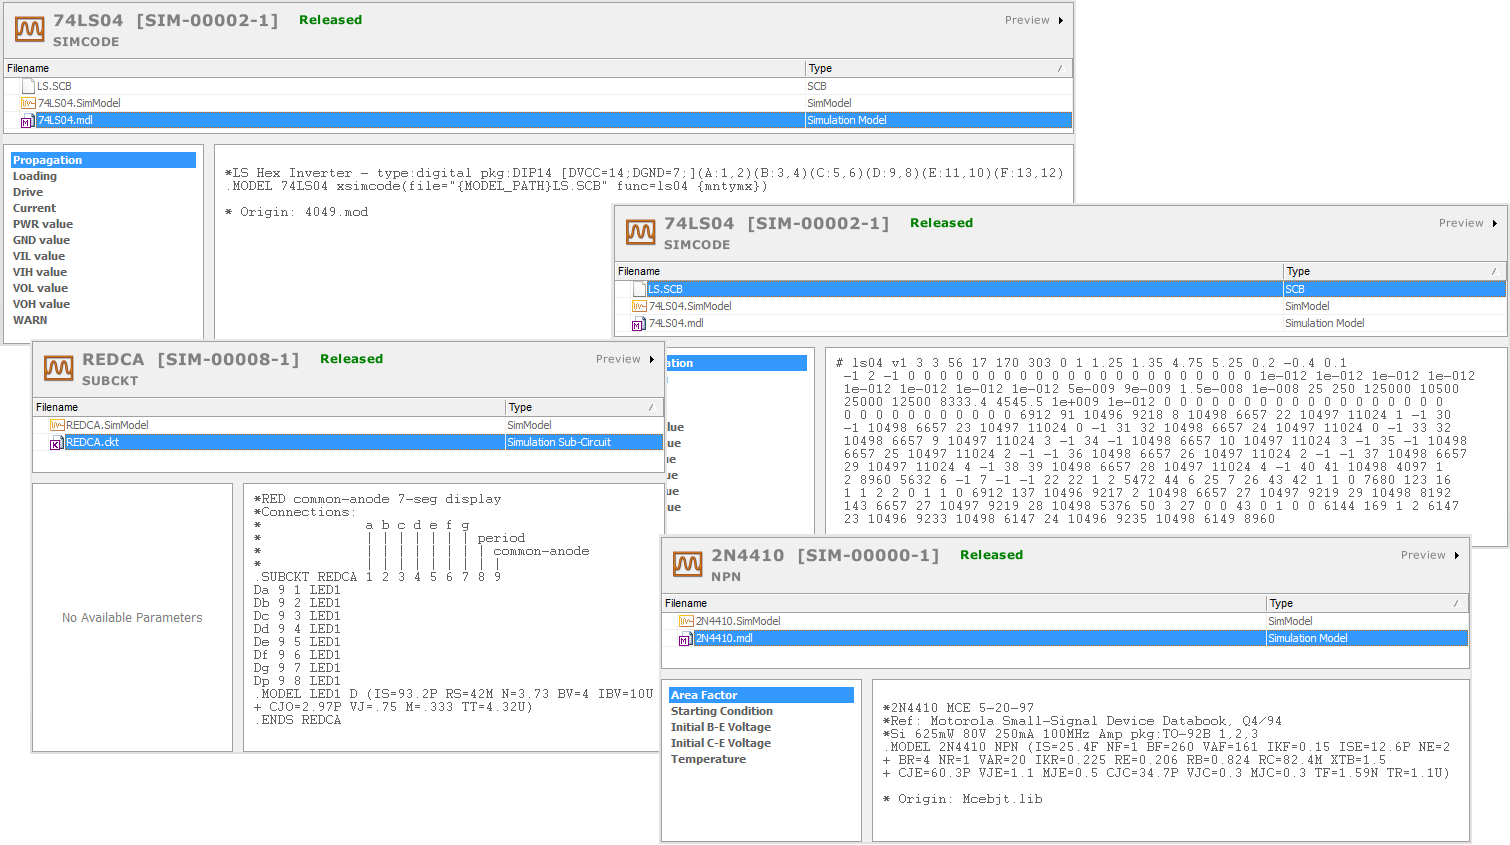
View the content of .mdl, .ckt and .scb files, referenced by simulation models, directly through the Vaults panel.
With the model released, it can now be used in the applicable component definition, ultimately making the released Component Item which references it, simulation-ready. For more information, see Adding a Simulation Model to a Component Definition.
Support for SIMetrix/SIMPLIS Models
Simulation model definitions referencing SIMetrix or SIMPLIS models can also be released to an Altium Vault. Two aspects to bear in mind when using these types of models are:
- The Model Name must have a prefix of either
SIMetrix_orSIMPLIS_respectively. This helps to distinguish between models targeted to these different simulators. - The Model File field must point to the underlying model file (
*.lb), in which the SIMetrix/SIMPLIS model is defined.
The released data stored in the vault consists of the model definition in the .SimModel file, as well as the referenced .lb file. As with all other referenced model files, the content of the .lb file can be viewed within the Vaults panel, along with any model-level parameters for the Simulation Model Item.

An example of a released SIMetrix-based simulation model.
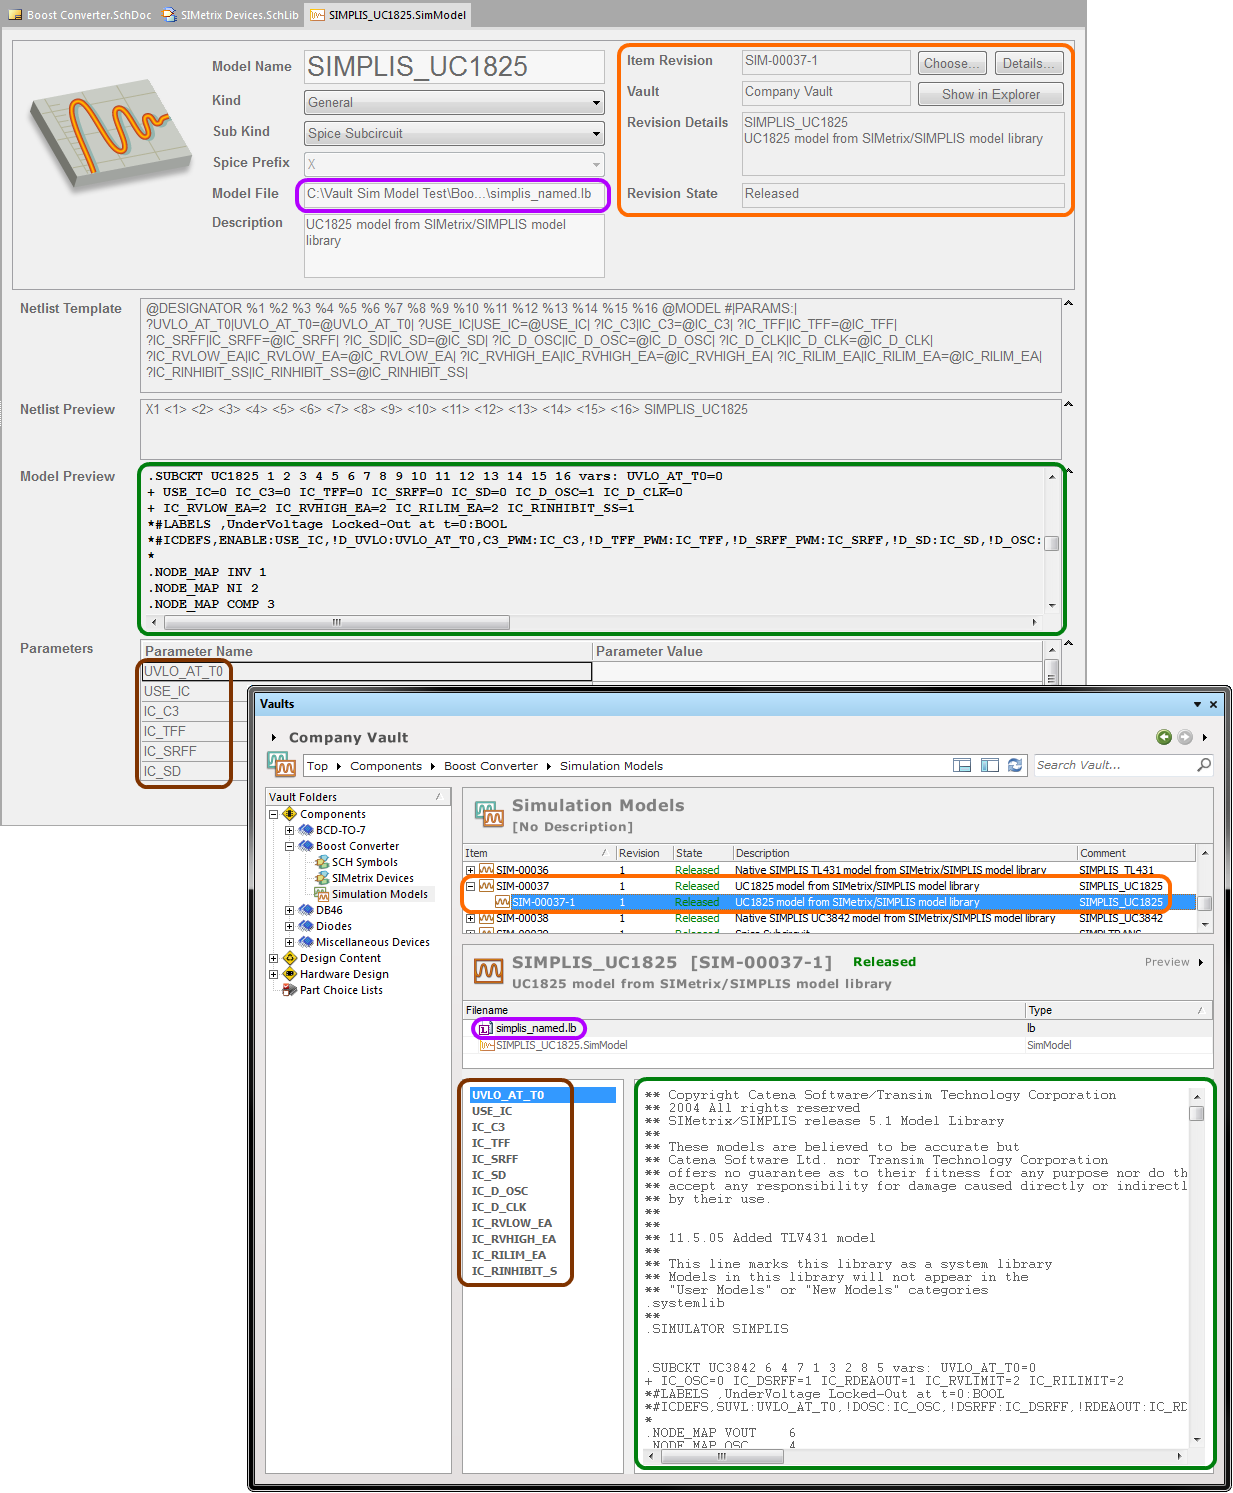
An example of a released SIMPLIS-based simulation model.
Re-releasing the Model Definition
With the source SimModel file linked to the vault and Simulation Model Item therein, re-releasing the simulation model defined in that file – to take into account any modifications – is a straightforward process:
- Make the changes to the model's definition as required.
- Create a new
Plannedrevision for the linked Simulation Model Item. This can be done from the Lifecycle view for the Item, in the Vaults panel, or from the detailed view for the Item. The latter can be accessed from the SimModel file by clicking the Details button (to the far right of the Item Revision field). - Choose this new Item Revision in the SimModel file.
- Save the SimModel file.
- Use the File » Release To <TargetVaultName> command.
Streamlined Re-release Through File-less Editing
Main article: File-less Editing in an Altium Vault
File-less editing frees you of the shackles of separate version-controlled source data. You can simply edit a supported Item type using a temporary editor loaded with the latest source direct from the vault itself. And once editing is complete, the entity is re-released into a subsequent planned revision of its parent Item, and the temporary editor closed. There are no files on your hard drive, no questioning whether you are working with the correct or latest source, and no having to maintain separate version control software. The Altium Vault handles it all, with the same great integrity you've come to expect, and in a manner that greatly expedites changes to your data.
Releasing Multiple Simulation Model Files
Main article: Batch Releasing to a Vault with the Release Manager
When migrating components from existing component management methodologies to the next-generation vault-based component model, releasing SimModel files each containing a single simulation model definition can be a tedious task – especially since release of a single SimModel file requires that file to be open and active in Altium Designer. This is also the case if changes have been made affecting simulation model definitions across an array of source SimModel files, that need to be re-released into a new revision of each target Simulation Model Item.
To facilitate the release of multiple SimModel files to a target vault simultaneously, Altium Designer provides a Release Manager (File » Release Manager). Use it to batch-release simulation model definitions stored across multiple SimModel files in a nominated source folder location.
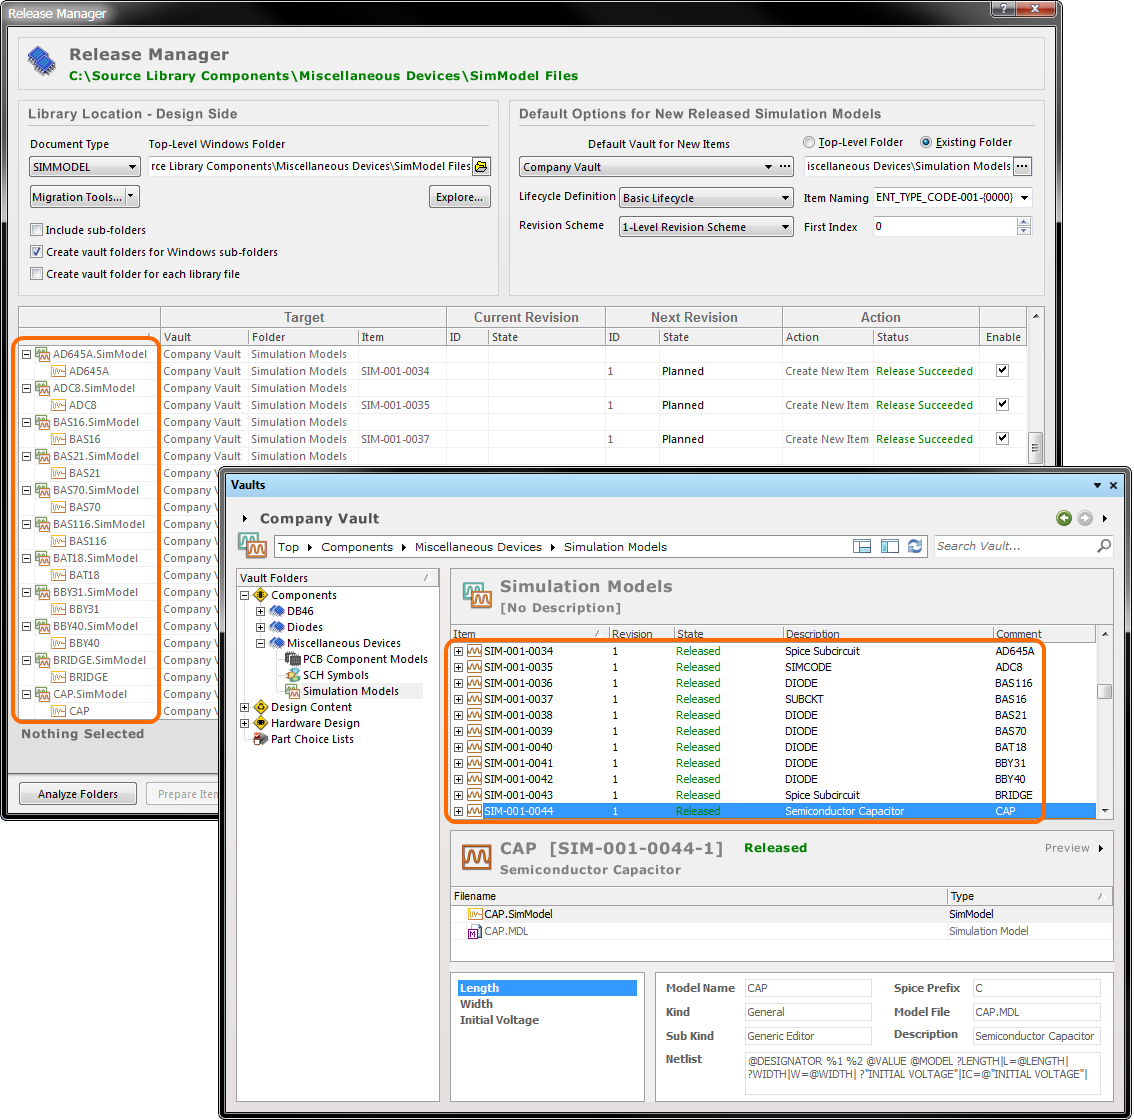
Batch-release simulation model definitions, stored in multiple SimModel files, using the Release Manager.