Batch Releasing to a Vault with the Release Manager
Contents
- Setting Up
- Design-Side Options
- Vault Options
- Performing the Release
- Folder Analysis
- Preparing Items and Documents for Release
- Releasing
- Streamlined Re-release Through File-less Editing
- Migration Tools
- Clear Vault Links in Documents
- Generate Component Libraries
- Split Component Libraries
- Generate SimModel Files
- Example Usage - Migration Process Flow
- IntLib Library Sources
Parent article: Component Management
Releasing single source data files to a target vault can be a tedious task – especially since release requires each file to be open and active in Altium Designer. This is the case if changes have been made affecting an array of source files, that need to be re-released into a new revision of each target Item.
To facilitate the release of multiple source files to a target vault, en masse, Altium Designer provides a Release Manager. This centralized release 'console' can be used to batch-release source files in a nominated source folder location.
You have full control over how your source data is released, in terms of where in the target vault corresponding Items are stored, and the naming scheme employed for the creation of those Items. You also control how revisions of those Items are named, and the lifecycle definition they will adhere to.
In addition, the Release Manager provides a range of migration tools, aimed at enabling you to quickly migrate your existing library components – stored in accordance with other component management methodologies – across to an Altium Vault.
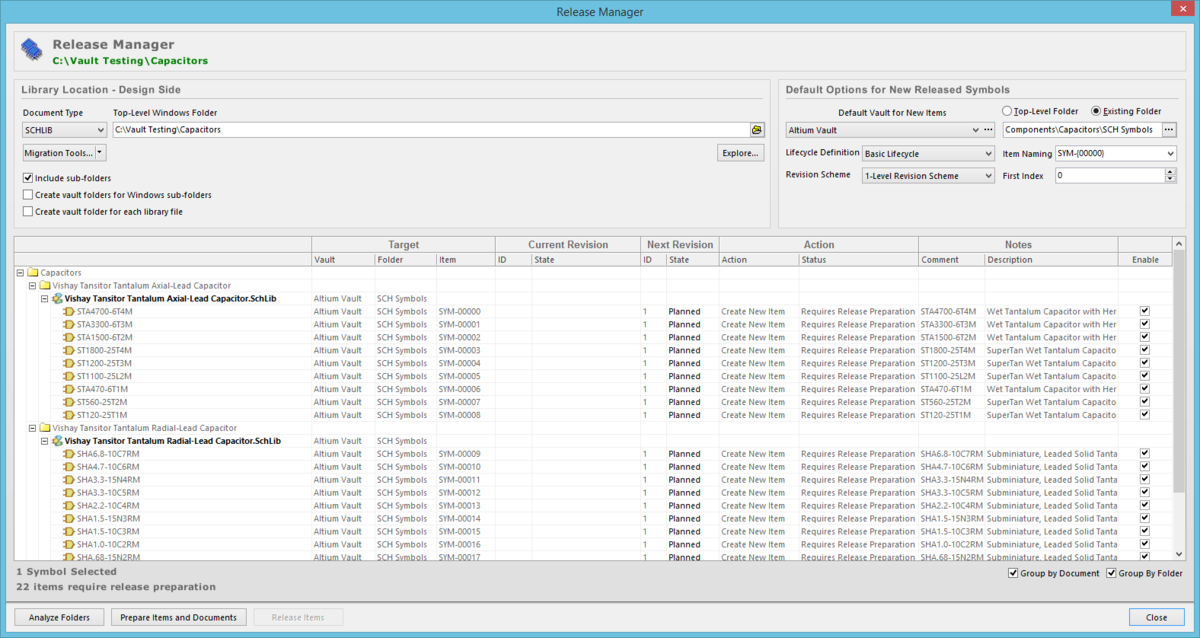
Example of the Component Release Manager in action!
Setting Up
The following sections take a look at the options available when setting up the Release Manager dialog in readiness to release your source data.
Design-Side Options
The top-left region of the Release Manager dialog deals with the design-side settings, essentially picking what to release and specifying where it resides.
The first thing to do is to choose the type of source data to release. This is done using the drop-down associated with the Document Type field. The following source document types can be released using the Release Manager dialog:
- CMPLIB - Component Library (*.CmpLib)
- OUTJOB - Output Job Configuration File (*.OutJob)
- PCBLIB - PCB Library Document (*.PcbLib)
- SCHDOC - Schematic Document (*.SchDoc)
- SCHDOT - Schematic Template Document (*.SchDot)
- SCHLIB - Schematic Library Document (*.SchLib)
- SIMMODEL - Simulation Model File (*.SimModel)
Having chosen the type of source data to release, you now need to specify where to find that data. Use the Top Level Windows Folder field to specify the parent folder under which all source files to be considered for release are stored.
A valid folder will be reflected, in green, in the status area above the region. If the folder path entered manually is incorrect, the status will display, in red, Folder Not Found.

Specify the parent folder containing the source documents you wish to release. The status area of the dialog will reflect the validity of the specified folder.
If your source files are stored in sub-folders of the nominated parent folder, ensure you enable the option to Include sub-folders. Clicking the Explore button will open the nominated top-level folder in Windows Explorer.
The remaining options in this region allow you to create a sub-folder structure within the target vault, based on the source. Enable either, or both of the following options, according to how you want your resulting Items stored in the vault:
- Create vault folders for Windows sub-folders – this option will mimic the source file storage structure, creating a corresponding folder in the vault for each new sub-folder found on the design side.
- Create vault folder for each library file – this option will create a distinct folder in the vault for each new distinct source document involved in a release.
Vault Options
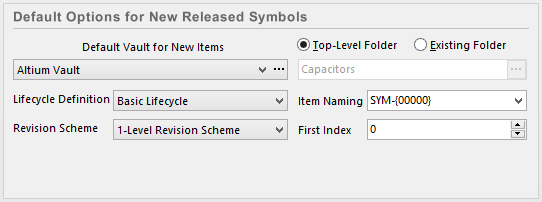
The top-right region of the Release Manager dialog deals with the vault-side settings, essentially specifying where newly created Items should be stored, how they should be identified, and the revision naming and lifecycle definition schemes employed.
Specify where and how newly released Items are to be created (in this case Schematic Symbol Items
created for released Schematic Symbols resident in source SchLibs).
The first thing to do is to choose the target Altium Vault in which to store release data. This is done using the drop-down associated to the Default Vault for New Items field. The drop-down lists all vaults that you currently have an active connection to.
Having chosen the target vault, you now need to specify which folder within that vault is to accommodate the released data. Use the field to the right of the nominated vault to do this. Two options for folder specification are available:
- Top-Level Folder – a top-level folder will be created in the vault, named as per the top-level Windows folder holding the design-side source files.
- Existing Folder – click the button to access the Choose Folder dialog. This dialog essentially provides you with a folder-specific view into the target vault. Either browse to, and select an existing folder in the vault, or create a new folder on-the-fly.
Specifying the target Altium Vault, and folder therein.
Use the remaining options in this region of the dialog to specify Item Naming, the Revision Scheme to be adhered to when naming Item Revisions, and the Lifecycle Definition employed for those revisions.
In terms of Item Naming, the following default example schemes are available, including some that utilize the short-form code for the folder type ($FOLDER_TYPE_CODE), some that use the short-form code for the content type ($CONTENT_TYPE_CODE), and some that use the component/model name specified in the source document, or the document filename itself ($COMPONENT_NAME)):
- <Content Type Code>-{00000} - e.g. SCHDOT-{00000} when releasing Schematic Templates.
- $COMPONENT_NAME
- $CONTENT_TYPE_CODE-001-{0000}
- $CONTENT_TYPE_CODE-$COMPONENT_NAME-001-{0000}
- $COMPONENT_NAME-$CONTENT_TYPE_CODE-001-{0000}
- $CONTENT_TYPE_CODE-001-{A000}
- $FOLDER_TYPE_CODE-001-{0000}
- $FOLDER_TYPE_CODE-001-{A000}
You can of course create your own scheme, simply by typing it within the applicable field, ensuring that the variable portion is enclosed in curly braces (e.g. SYMBOL-001-{J000}).
Use the associated First Index field to specify the base level Item – the starting point of the assigned Item ID range. If existing Items in the target vault already use the chosen Item Naming scheme, you can leave this index as 0, since the next available index in the scheme will automatically be used.
Performing the Release
With the required options set, the Release Manager has all it needs to proceed with the release. This process involves three distinct steps, as detailed in the following sections.
Folder Analysis
Firstly, the software needs to scan, or analyze both the source library folder(s) and the target folder(s) in the vault – to see how it needs to handle that content with respect to releasing, and in accordance with the specified options - for example whether to create new Items and/or to re-release to new revisions of existing linked Items. To do this, press the Analyze Folders button, at the bottom-left of the dialog.
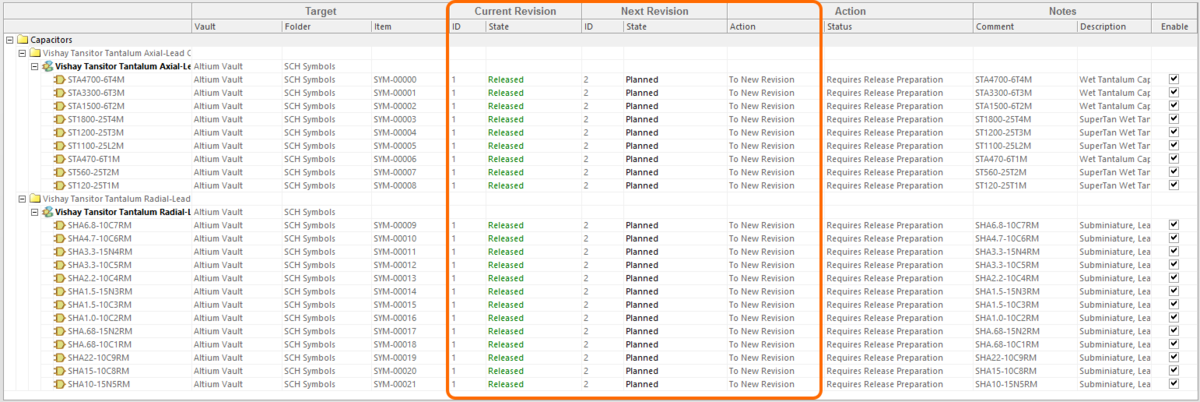
Analysis will proceed, with the content of all source documents found – of the chosen document type – listed in the main grid region of the dialog.

Example listing of content after analyzing source libraries. (Document Type set to SCHLIB).
Use the Group by Document and Group by Folder options below the grid to control how the data is presented in the grid as follows:
- Document=Disabled, Folder=Disabled – flattened listing of all source entities.
- Document=Enabled, Folder=Disabled – source entities grouped according to the parent document in which they reside.
- Document=Disabled, Folder=Enabled – source entities listed by the folder in which their parent files reside.
- Document=Enabled, Folder=Enabled – source entities listed both in terms of the folder in which their parent files reside, and further grouped according to the parent document in which they themselves reside.
The grid itself presents all information relating to the link between a source entity and its vault-based Item, as well as the actions that will be taken if the source entity is included in the release process. Considering a source entity's entry in the grid, the following information is presented:
- Target – this region of the entry provides information regarding the link to the Item, that is either already established (if released already) or will be established (if awaiting initial release). It consists of the target vault, the folder within that vault, and the ID of the Item itself.
- Current Revision – if the source entity has been released previously, this region of the entry provides information about the latest released revision, in terms of revision ID and lifecycle state.
- Next Revision – this region of the entry provides information about the next revision of the Item that will be created to receive data from a subsequent release of the source entity. It reflects the revision ID and the lifecycle state of that revision which, for a new release, will always be in the
Plannedstate. - Action – this region of the entry shows the action that will be taken by the Release Manager, for this particular source entity, as part of the release process. For an entity that has not yet been released, this entry will display
Create New Item. The associated Status field is used to indicate the next step to be taken in the process (e.g.Requires Release Preparation) and, once the release process is complete, reflects the result. - Notes – the only editable section for a source entity's entry, fields are provided in which to enter a Comment and Description for the revision of the Item that is created in the vault upon release. By default, these are automatically populated with information from the source entity, where available.
- Enable – this checkbox controls whether the source entity is included as part of the release process (checked) or excluded from the process (unchecked).
Preparing Items and Documents for Release
Before you can proceed to release to the target vault, the documents and corresponding Items for entities being released, must first be prepared. To do this, simply click the Prepare Items and Documents button, to the right of the Analyze Folders button.
On the vault side, any new folders that need to be created, will be created – in readiness to accept any new Items. The Items themselves will be created, with initial revisions in the Planned state. If re-releasing to an existing Item, the next planned revision will be created. This is important, so that these Item, and the unique IDs assigned to them, are essentially locked-down – so no-one else releasing to the vault can create Items with these same IDs, or release to the same revision of an existing Item, before this release process is finalized.
On the document side, the source documents are saved with the link information. This is the link to the target vault and folder, along with the Item naming, lifecycle definition and revision naming schemes. At the lowest level, each entity in a source file will store information that links it to the corresponding named-revision of the Item in the vault that will receive and store the release data for it.
Once the preparation phase is complete, the Action-Status field will display Ready To Release.
With the document prepared for release, the Release Items button becomes available – this indicates readiness to proceed with the release.
Releasing
To go ahead and release the source entities, click the Release Items button. The Confirm Release dialog will appear, allowing you to review the release actions either at a summary level, or at a more detailed level. If the release actions are correct, proceed to release by pressing OK.
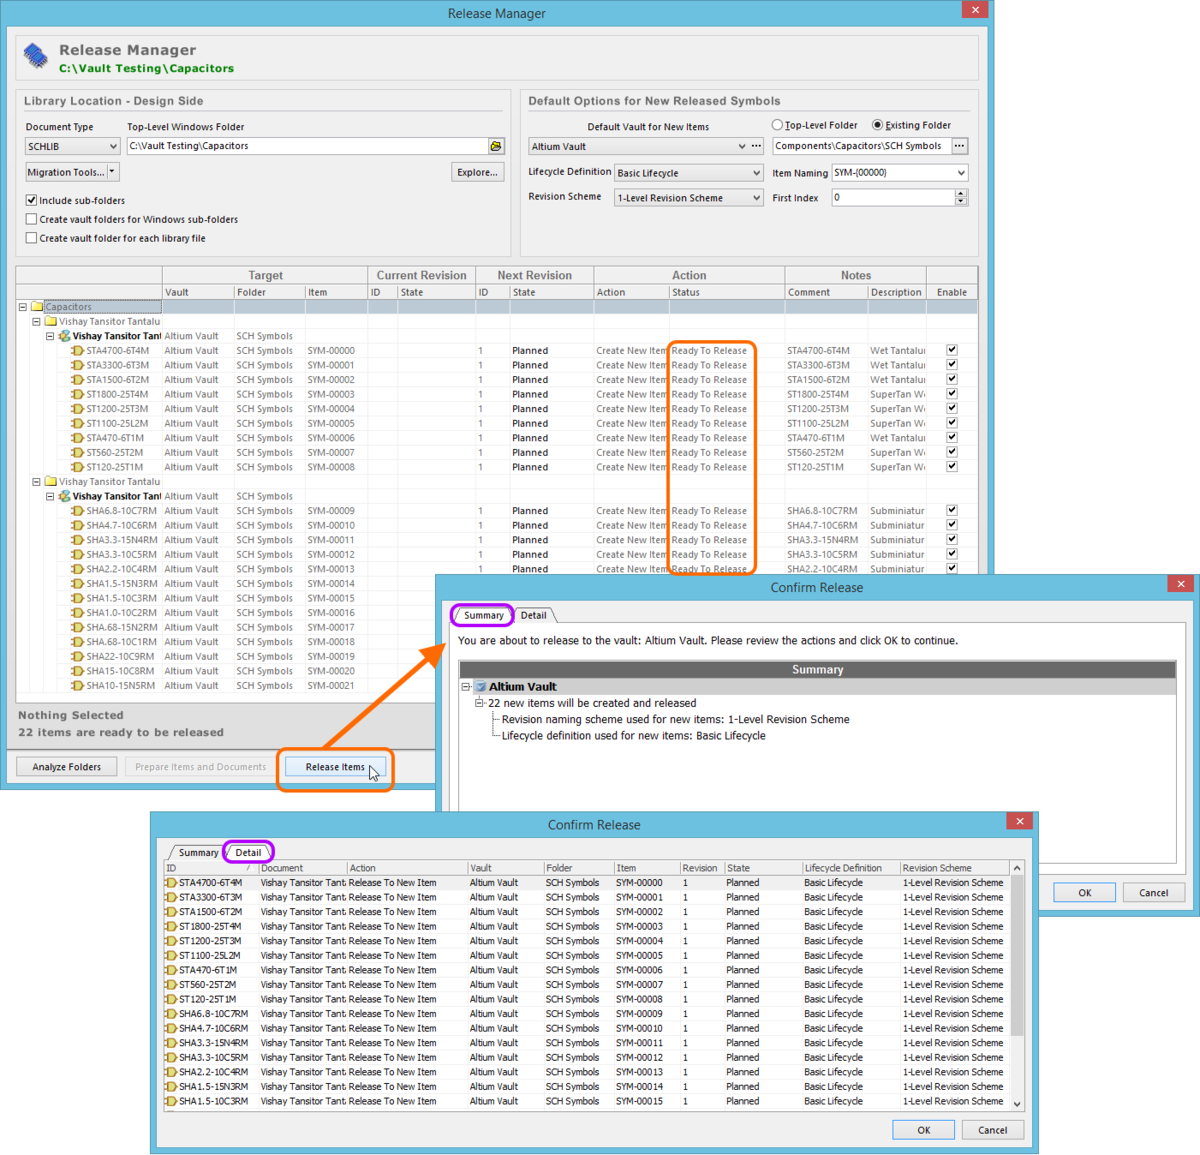
Review and confirm the actions that will be taken by the release process.
Back in the Release Manager dialog, the Action-Status field will display Release Running.... When the process completes, the Action-Status field will change to Release Succeeded – provided the release was successful. Use the Vaults panel to browse the released Items.
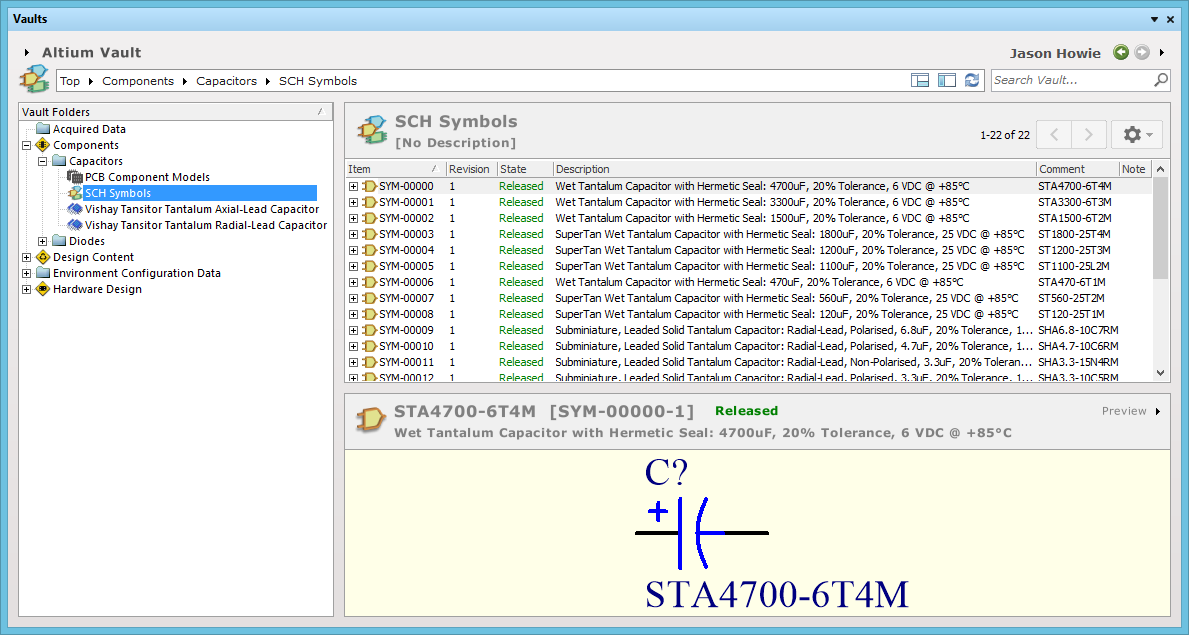
Use the Vaults panel to browse released Items directly in the target vault. In this example image, Schematic Symbol Items, holding the release data from the source schematic library symbols, are being viewed.
The following table lists, for each type of document supported by the Release Manager, where the link to a vault Item can be verified, from within the source document.
| Source Data Entity | Linked to... | Link Can Be Verified... |
|---|---|---|
| Component Definition | Component Item | within the definition of the component, in the source Component Library document. |
| Schematic Symbol | Schematic Symbol Item | in the Vault Links region of the Schematic Symbol Properties dialog, in the source Schematic Library document. |
| PCB 2D/3D Component Model | PCB Component Item | in the Footprint Link region of the PCB Library Component dialog, in the source PCB Library document. |
| Simulation Model | Simulation Model Item | within the source Simulation Model file. |
| Schematic Sheet | Schematic Sheet Item | in the Document Options dialog, in the source schematic document. |
| Schematic Template | Schematic Template Item | in the Document Options dialog, in the source schematic document. |
| Output Job Configuration File | Output Job Item | in the Link Document to Vault Item dialog, in the source Output Job Configuration file. |
Back in the Release Manager, pressing the Analyze Folders button again will present updated link and status information and ready the source entities for possible re-release. The action for an entity that is being re-released now appears as To New Revision.
Reanalyze the folders to update the link information and ready the manager for possible re-release of selected entities.
Note that all entries in the grid will be initially enabled for releasing by default. Use multi-select features and controls on the right-click menu to disable selected entries from re-release, as required. Re-release is then a matter of two clicks – one to Prepare Items and Documents and one to Release Items.
Streamlined Re-release Through File-less Editing
Main article: File-less Editing in an Altium Vault
While the Release Manager makes releasing a great many source entities a simple affair, it does require the source files to be retained, and maintained with any necessary design changes. If you'd rather not have to maintain the original source files, consider using the Release Manager to perform the intial batch release, then switch to using the file-less editing paradigm to address key individual Item changes thereafter.
File-less editing frees you of the shackles of separate version-controlled source data. You can simply edit a supported Item type using a temporary editor loaded with the latest source direct from the vault itself. And once editing is complete, the entity is re-released into a subsequent planned revision of its parent Item, and the temporary editor closed. There are no files on your hard drive, no questioning whether you are working with the correct or latest source, and no having to maintain separate version control software. The Altium Vault handles it all, with the same great integrity you've come to expect, and in a manner that greatly expedites changes to your data.
Migration Tools
The Release Manager provides a variety of migration-based tools, available from the menu associated to the Migration Tools button.
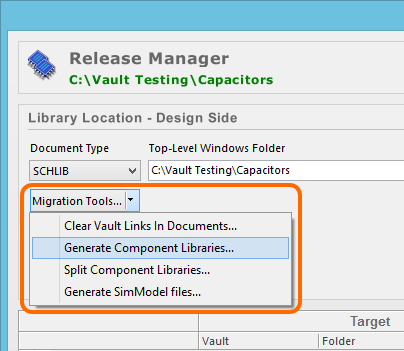
The Release Manager's Migration Tools.
These tools, discussed in more detail over the following sections, can be used to quickly migrate your existing library components across to an Altium Vault, so that you can get into the world of vault-based components and the benefit they offer as part of the wider Design Data Management System.
Clear Vault Links in Documents
For all currently loaded documents in the Release Manager, this tool enables you to clear the existing link between a source document (and entities therein) and a target vault folder (and mapped Items therein). In each case, the link will be severed and the document saved. If you have already released a source entity, this procedure will effectively cause that source entity, and its corresponding Item to lose knowledge of each other.
The Release Manager will present information as though the document(s) had never been released – with constituent entities assigned new Item IDs and set ready to release into initial planned revisions of newly created Items.
Generate Component Libraries
For all currently loaded SCHLIB documents in the Release Manager, this tool enables you to quickly create Component Libraries from those libraries. Each component definition is created based on a schematic component, with links to relevant Schematic Symbol and PCB Component Items, as well as parametric data.
The Generate Component Libraries dialog that appears provides all the controls necessary to get the source Component Libraries created just as required.
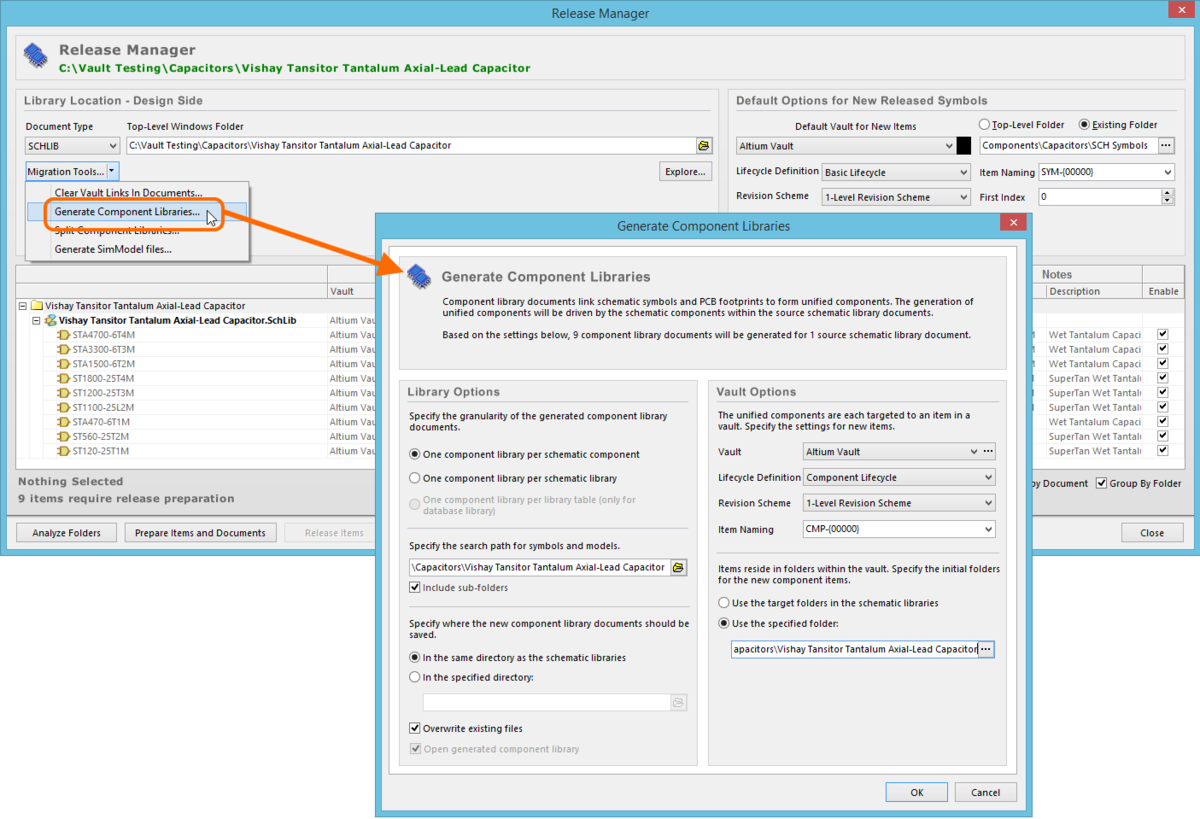
Control how component libraries are generated from the currently loaded schematic libraries, using the Generate Component Libraries dialog.
In the Library Options region of the dialog:
- First specify document granularity. It is recommended to generate a single Component Library (containing a single component definition) for each schematic component in a source Schematic Library. When storing source libraries under version control, management is far easier with one symbol per SCHLIB, one model per PCBLIB and one component definition per CMPLIB.
- Next specify where the models – to be referenced by component definitions within the generated Component Libraries – can be found. This is simply the source folder where the source Schematic and PCB libraries can be found.
- Finally, specify where the generated Component Library files are to be saved.
In the Vault Options region of the dialog:
- Specify the default settings for new Items that will be created in the vault to receive the release data from the component definitions – the Component Items. Choose the target vault, as well as required Item Naming, Lifecycle Definition and Revision Naming schemes to be applied/adhered to.
- Choose the initial folder in the target vault in which these new Component Items will be created. This is often a different folder to that in which the domain models themselves are stored, but it could be the same.
After defining all options as required, click OK. Generation will proceed and a confirmation dialog will appear when the process is complete. Then, to load those Component Libraries for release in the Release Manager, it's simply a case of switching the Document Type to CMPLIB, specifying the source folder if it is different to that used for the source schematic and PCB libraries, and clicking the Analyze Folders button.
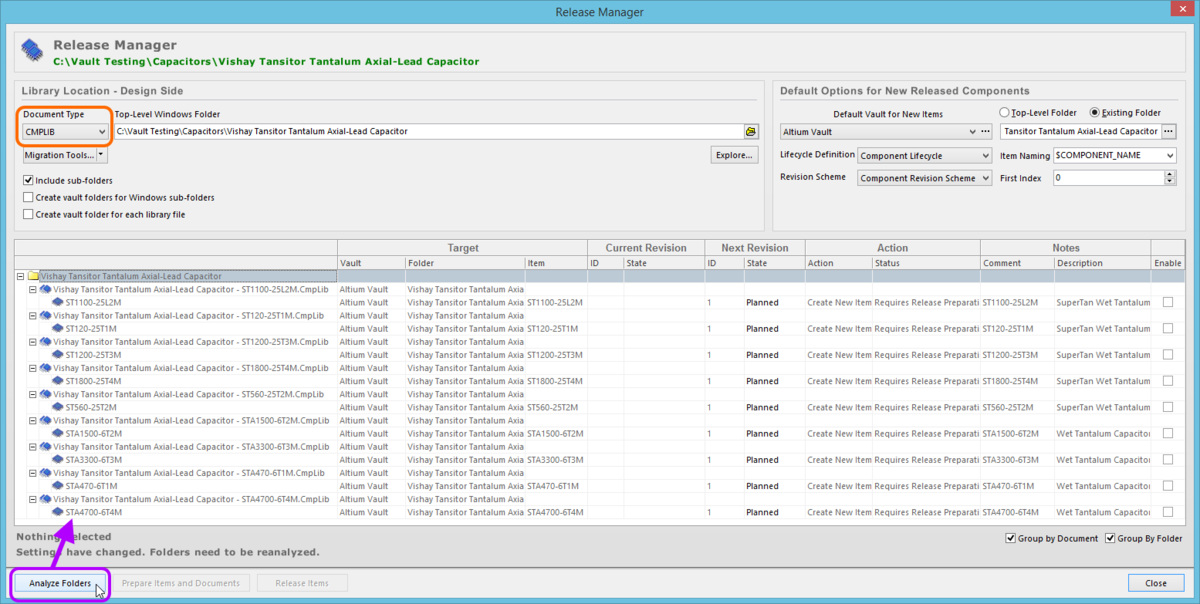
Generated source Component Libraries open in the Release Manager. Release of the constituent component definitions will result in the creation of Component Items in the vault - the vault-based components with which to design.
Release, as per other source entities, is simply a case of clicking the Prepare Items and Documents button followed, once preparation is complete, by the Release Items button. Once released, browse the fruits of your labor directly in the vault using the Vaults panel.
Split Component Libraries
Although a single library can contain multiple symbols, from a version control perspective it is best practice to have one symbol per library file. This allows you to check out and modify just the symbols you need to modify, without registering a version change to an entire, single source.
For all currently loaded SCHLIB or PCBLIB documents in the Release Manager, this tool enables you to quickly split those libraries into separate library files, with one component per file. In the Split Libraries dialog that appears, nominate a destination directory for the new libraries. For schematic libraries, you have the option to remove models and parameters – essentially creating libraries with symbol information only.
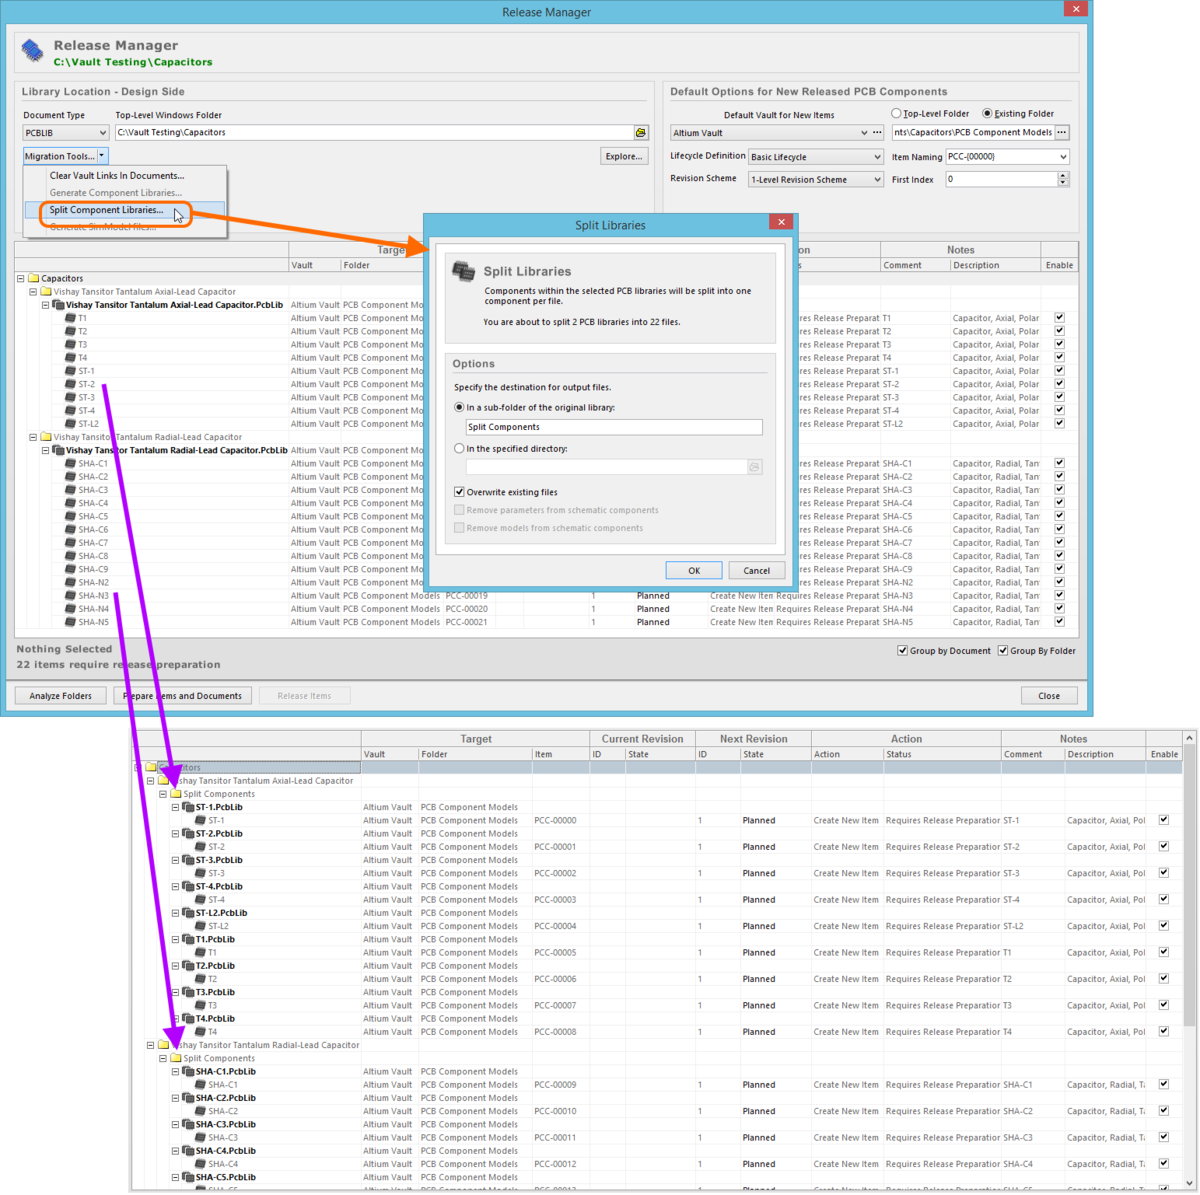
Example splitting of 2 PCB Library documents.
Generate SimModel Files
For all currently loaded SCHLIB documents in the Release Manager, this tool enables you to quickly create SimModel files from those libraries.
In the Generate SimModel Files dialog that appears, specify the destination for the generated files

Control how SimModel files are generated from the currently loaded schematic libraries, using the Generate SimModel Files dialog.
After defining all options as required, click OK. Generation will proceed and a confirmation dialog will appear when the process is complete. Then, to load those SimModel files for release in the Release Manager, it's simply a case of switching the Document Type to SIMMODEL, specifying the source folder if it is different to that used for the source schematic libraries, and clicking the Analyze Folders button.
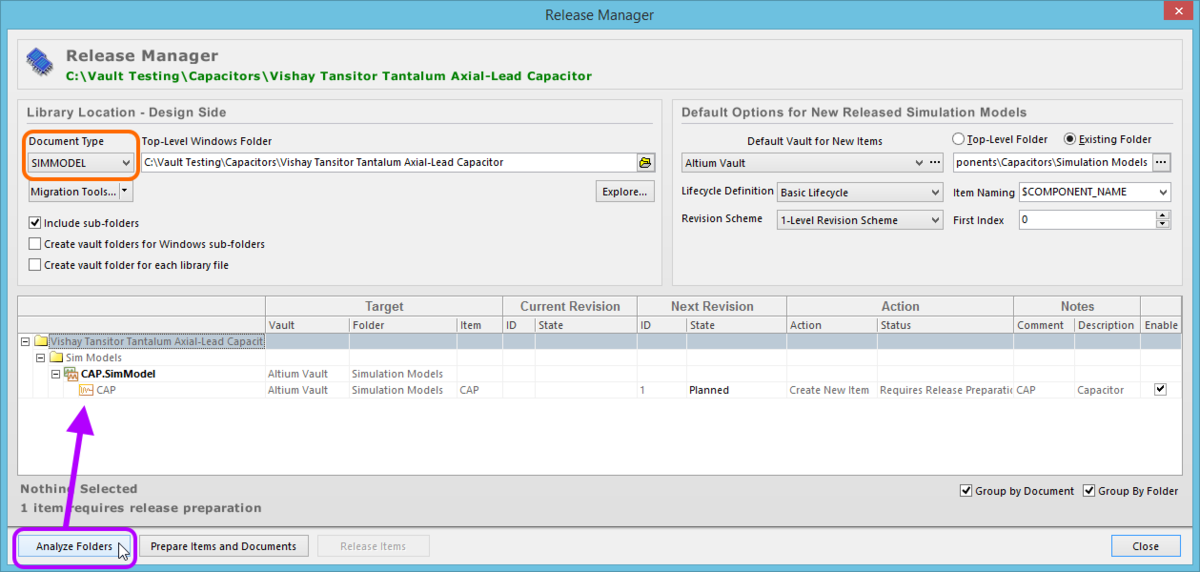
Generated source SimModel file open in the Release Manager. Release of the constituent simulation model definition will result in the creation of a Simulation Model Item in the vault.
Release, as per other source entities, is simply a case of clicking the Prepare Items and Documents button followed, once preparation is complete, by the Release Items button. Once released, browse the fruits of your labor directly in the vault using the Vaults panel.
Example Usage - Migration Process Flow
Related article: QuickGuide - Migrating to an Altium Vault
Undoubtedly, the starting point for many users will be the migration of current component libraries – managed using Altium's earlier component management methodologies – to arrive at a collection of vault-based components.
In terms of the way in which you use the Release manager to initially migrate your components to a vault, the general steps involved – a sort of 'migration process flow' as it were – are as follows:
- Open source SchLibs in the Release Manager, then release those libraries to the vault to create new Schematic Symbol Items.
- Open source PcbLibs in the Release Manager, then release those libraries to the vault to create new PCB Component Items.
- If your original components have simulation models defined - open again, the source SchLibs in the Release Manager. Use the Generate SimModel Files migration tool to create the source SimModel files (and their model definitions) directly from those source SchLibs.
- Open the newly-created source SimModel files in the Release Manager, then release those files to the vault to create new Simulation Model Items.
- Open again, the source SchLibs in the Release Manager. Now that the SchLibs, PcbLibs, and SimModels (if applicable) have been released, you can use the Generate Component Libraries migration tool to create the source CmpLibs (and their component definitions) directly from those source SchLibs.
- Open the newly-created source CmpLibs in the Release Manager, then release those libraries to the vault to create new Component Items.
After the components are migrated to the vault, you can simply open source libraries as needed to release any subsequent changes – to design-side source domain models or component definitions – into new revisions of linked Items in the vault. Alternatively, modify on-the-fly using file-less editing.
IntLib Library Sources
To migrate an existing Integrated Library (*.IntLib) to a vault, you need to obtain the source libraries used in the creation of that IntLib. You have two choices for obtaining these:
- Go to wherever the original libraries themselves have been stored.
- Extract the source libraries from the Integrated Library.
The second option carries with it the highest integrity, since the compilation of the source library package into the resultant Integrated Library administers strict validation and verification, to ensure that the schematic components are not missing any information, including linked PCB models! Of course, if you are sure that the original source libraries are in tip-top shape, then you can use those – the choice is yours.