Using a Private Server License
Contents
- Installing the Private License Server Software
- Stopping and Starting the Service
- Initial Server Configuration
- License Activation
- Configuring the Portal
- Selecting the License to Activate
- Backing up Your License Files
- Manually Adding Licenses to a Private License Server
- Setting up a Server on a Computer with no Internet Connectivity
- Configuring License Usage
- Client Access
- Examining License Usage
- Private License Server Legacy Features
Altium Designer's Private Server licensing offers you floating license capability through implementation of your own dedicated Private License Server. Your administrator sets up this central server (also referred to as a network license, or local license server) to access and use Private Server licenses. Once a license is in use on the server, that server can then serve the license to multiple local computers. Users on the local network do not need to sign in to their Altium accounts to acquire the seats from the Private License Server.
Installing the Private License Server Software
Related articles: Configuring the Private License Server on Windows 7, Windows Server 2008 and above, Upgrading a Private License Server

A Private License Server is installed on the target machine as a Windows Service. The Private License Server used to be called the Floating License Server.
- For Altium Designer 10 and later, the Private License Server installer is downloaded from the AltiumLive Downloads area (for older versions it was also supplied on DVD). The download file will be named something like:
PLS_14.0.0.33.exe (numbers will change for each new release of the Private License Server)
- Run the download executable.
- The Altium Designer Private License Server Setup wizard will appear – follow the instructions on the pages of the wizard to install the software.
Install the Private License Server using the setup wizard
- Upon completion of the installation, the server software (service) will be running and the icon will appear in the Windows System Tray. If it is not, launch the service by selecting Altium Designer Private License Server from the Windows Start menu, as shown below.
The License Server can be started via the Windows Start menu
- Right-click on the icon to display the context menu, if the License Server is not currently running, select the Start security service command.
- Once the service has been started, it can be configured by right-clicking on the icon and selecting Settings, to open the Licensing dialog. The following section details how to configure the License Server.
Stopping and Starting the Service
As well as the icon's right-click menu, the service can be started and stopped in the Windows Services console. Access the console from the Windows Control Panel by double-clicking on the Administrative Tools entry, then double-clicking on the Services entry. Locate and click on the entry Altium Designer Private License Server to access the applicable controls.

Access controls for the service through the Windows Services console.
Initial Server Configuration
Related article: Adding a Secondary (Redundant) Private License Server
All setting up of the Private License Server is performed within the Licensing dialog.
- To open the dialog, either by double-clicking on the icon in the Windows System Tray, or by right-clicking on the icon and choosing Settings from the menu that appears.
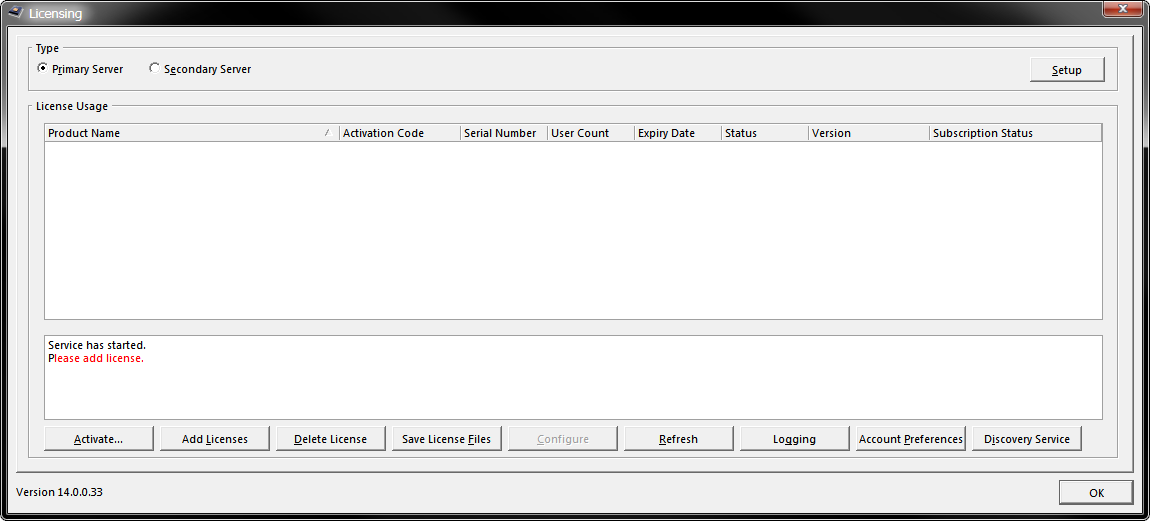
The Licensing dialog - 'command central' for configuration of a Private License Server.
- Before activation of your Private Server license you must select which type of server – Primary or Secondary – is being set up. This is because the process of activation actually encodes the license files associated to the license. So, for example, if you configure a Primary server and backup the license files, those files can only be used with a Primary server ('Primary-encoded' license files). Similarly, for a Secondary server, you would need to activate the license on the secondary host computer, to obtain 'Secondary-encoded' license files. Choose the server type in the top region of the Licensing dialog.
- Click the Setup button to the far right to access the respective Server Setup dialog. Typically, the Primary server is set up and configured first, with setup performed in the Primary Server Setup dialog.
Example initial configuration of a Primary server - use the Primary Server Setup dialog to enter the required port, or leave at the default.
- Enter the required Port number, or leave at the default if you are unsure. The Secondary Server Details are populated at a later stage if, and when, a Secondary server is set up.
Once the server has been initially configured, you can proceed with activation of your license(s).
License Activation
The 'heart' of a Private License Server is the license(s) that it makes available for use by computers on the network which it serves. The license type that is 'hosted' by a Private License Server, is the Private Server license. The first step in configuring the server is to activate your Private Server license(s) – during this process Altium stores information about where the Private License Server is installed and the licenses that have been activated at that site
Configuring the Portal
When you sign in to your account, you do so through an Altium portal. On the Altium side, a portal is simply a secure connection through to a specific Altium Account Management Server. The following portals (servers) are available.
For Altium Designer 14 this is:
- portal2.altium.com
For Altium Designer 10, 12 & 13 these are:
- portal2.altium.com
- portal2.altium.eu
- portal2.altium.com.cn
For S09 licenses and earlier, these are:
- portal1.altium.com
- portal1.altium.eu
- portal1.altium.com.cn
You can specify which portal to use for your Primary connection when accessing your account, and also two Backup portals – used, in order, should the Primary portal be unavailable for whatever reason. This is performed within the Altium Portal Preferences dialog, click the Account Preferences button to open the dialog. Where available, enter a portal address directly in a field to assign which portal to use for Primary, Backup 1 and Backup 2 respectively.
Select the required Portal, and enter the User Name and Password if you want them stored.
Note that you can also enter the User Name and Password here, which is then used in the Account Sign in stage described below. Leave these fields blank if you do not with the retain this information in the Licensing dialog.
If the connection to the Altium Account Management Server fails it might be also possible that your IT is blocking the connection. For information about the open Ports that Altium need please contact the Altium Support. Alternatively, if you are a Group Administrator for your Altium Account, you can use the AltiumLive Dashboard. See the section Manually Adding Licenses to a Private License Server.
Selecting the License to Activate
To activate your Private Server license, click on the Activate button, at the bottom left of the Licensing dialog. Activation requires that you be signed-in to your Altium account through the secure Altium portal. The Account Sign In dialog will appear, in which you have to enter your Altium SupportCenter Account credentials. This detail will appear automatically if you have already entered it into the Altium Portal Preferences dialog.
Activation of your Private Server license(s) requires you be signed-in to your Altium account.
You will be signed in to your account and the Activate Licenses dialog will appear. This dialog lists all Private Server licenses available for use with your Private License Server.
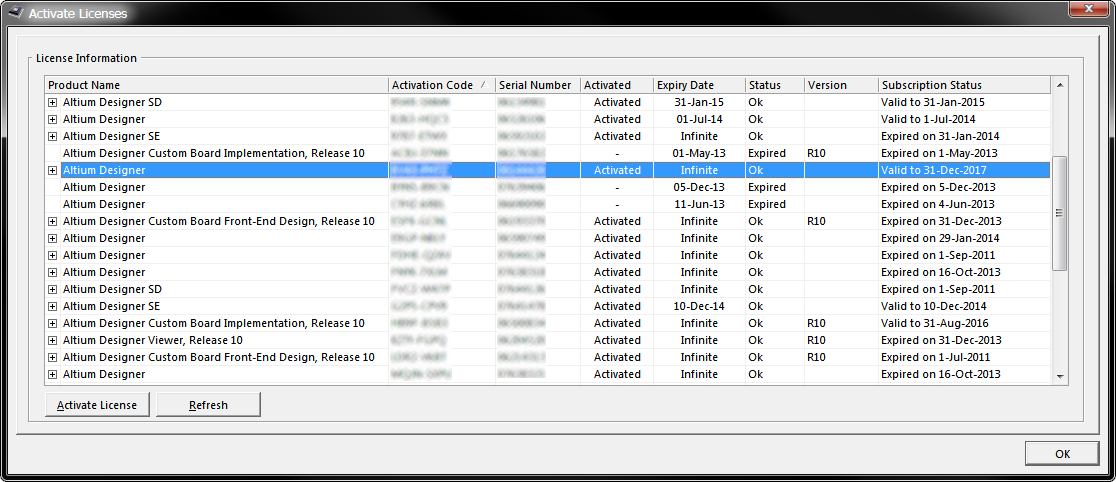
The Activate Licenses dialog lists all Private Server licenses available to you.
For each Private Server license, the following information is presented:
- Product Name – what is being licensed. The name typically reflects a feature set and release.
- Activation Code – the activation code for the license.
- Serial Number - the serial number associated with this license.
- Activated – reflects the activation state of the license. While not activated, the entry will display
-. After activation, the entry will change toActivated. When in use on the private server, the entry will displayUsed by me. - Expiry Date – the date at which the license will no longer be considered valid.
- Status – the current state of the license. This entry can be one of the following states:
- OK – license is in-date and seat allocation has not been exceeded.
- Expired – license expiry date has been reached.
- No Seats Left – license is still OK, but all seats are currently being used.
- Version – the version of the license. For example, an Altium Designer Summer 09 release Private Server license will display
S09in this field.
To activate a license, click on its entry and click on the Activate License button. Once activated, the Activated field will change to Used by me.
Once you have finished activating the required license(s), click OK. You will be signed out of your account and returned to the Licensing dialog. The activated license(s) will be automatically added, appearing in the License Usage region of the dialog.
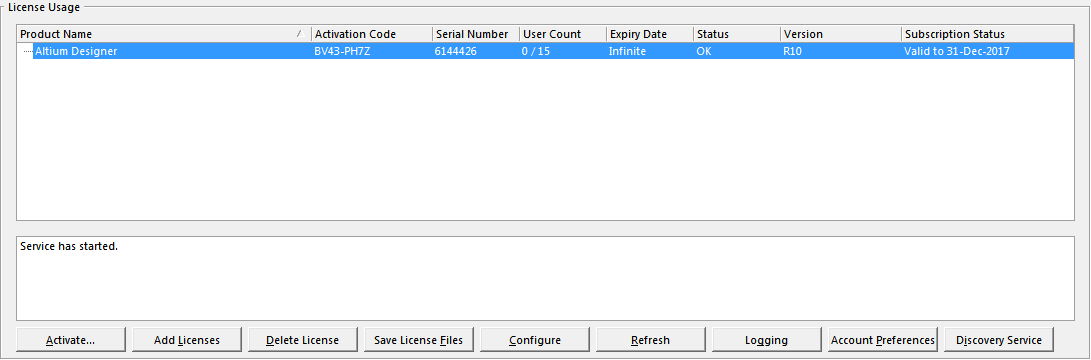
Once activated, Private Server licenses are added automatically to the Private License Server.
The information displayed for each license is similar to that presented during activation, with two exceptions:
- There is no Activated entry – a license is, by inclusion in this list, activated. Rather there is a User Count field, showing how many 'clients' can use the license.
- The Version field displays the versions of Altium Designer client software that can be served by the license.
Backing up Your License Files
Backing-up the license files (*.alf) associated with a Private Server license means you will not have to go online – sign-in to your account and reactivate – should you accidentally delete a license file from the server. You can simply add the license files back in to your server.
To create a back-up, simply select the license in the License Usage region of the Licensing dialog and then click on the Save License Files button. Use the subsequent dialog to determine where to save the files.
One or more .alf files will be saved, one for each of the versions of Altium Designer client software supported by the license.
Manually Adding Licenses to a Private License Server
Activation of a Private Server license automatically adds the license files (*.alf) associated to that license to the server. However, you can also manually add a license to your server, that you have previously backed-up. You could do this for example when 'relocating' the server to a different machine that is not connected to the internet, or recovering from accidental deletion of your license.
To add a backed-up license file (or files), simply click on the Add Licenses button, in the Licensing dialog and then browse to, and open, the required file(s) using the subsequent dialog.
Removing a Private Server License
To remove a Private Server license from your Private License Server – essentially deleting the license file – simply select the license in the License Usage region of the Licensing dialog, then click on the Delete License button. A confirmation dialog will appear – click Yes to proceed.
All license files associated to the selected license will be deleted. If there are no licenses left in use by the server, the text Please add license message will appear in the Licensing dialog.
Setting up a Server on a Computer with no Internet Connectivity
In accordance with the EULA, a Private Server license can be used on two computers, configured to be Primary and Secondary (redundant) servers, respectively. The same license can not be used with two Primary-configured servers.
The ability to backup Private Server license files – and their inherent portability – is the very method by which you can setup a Private License Server on a computer that is not connected to the internet. The steps to achieve this are as follows:
- Install the Private License Server on a computer that IS connected to the internet. Configure the server type and activate the license.
- Save the four license files.
- Install the Private License Server on the target computer that IS NOT connected to the internet. Configure the server type to be the same as that on the 'activating' computer. Copy your saved license files to this computer and add them to the server (using the Add Licenses button in the Licensing dialog).
- Delete the license on the original 'activating' computer. The Private License Server software can be uninstalled also, should you wish, but it is the deletion of the license that is required to abide by the EULA.
Configuring License Usage
Main article: Private Server Licenses - Configuring Usage
All configuration of a Private License Server, in terms of how the added licenses are actually used, is performed within the Security dialog. This includes adding users, creating groups and assigning users to groups.
Configuration is carried out on a license-by-license basis. Each license is configured in turn, by selecting its entry in the License Usage area of the Licensing dialog and clicking the Configure button (which will only become available once a valid Private Server license file has been added to the server). The Security dialog will open, as shown below.
Configure license usage using the Security dialog.
By default there is a single group called All Users, with one user added. The user name is set to the wildcard character *, which means any user on the network is a valid member of this group. If you intend to control which users have access, or to assign your users to groups, remove this user.
For more information on configuring Groups and assigning Users, refer to the article Private Server Licenses - Configuring Usage.
Client Access
Once a Primary Private License Server has been configured, local computers running installations of Altium Designer can access and use the license(s) hosted by that server. The Altium Designer installation on such a computer is referred to as a 'client' of the server.
Access to a license on the server is made from the License Management page within Altium Designer. Click on the Setup private license server option, located in the Available Licenses region of the page. The Private License Server Setup dialog will appear, as shown below. All available Primary and Secondary servers on the network to which the client computer is connected are detected and listed. Choose the required server and click OK.
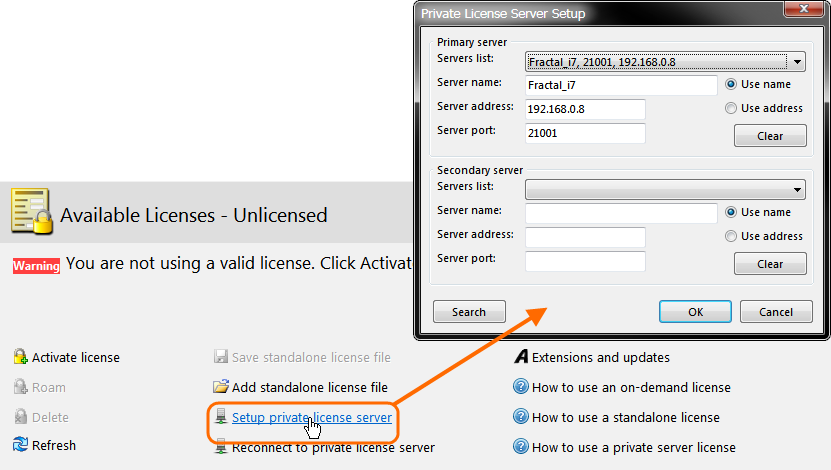
Choose to connect from a list of Private License Servers detected on the network.
The Private Server licenses configured on the server, and available for you to use, will be listed in a grid, within the Available Licenses region of the page. To use a license, click on that license in the grid, then click on the Use option, in the area below the grid.
The Used field for the license will change to Used by me and the User Count field will update to reflect that a seat of that license is taken. In addition, the 'banner' for the Available Licenses region will change from Available Licenses - Unlicensed to Available Licenses - Licensed to AccountName – reflecting the account to which the license is associated.
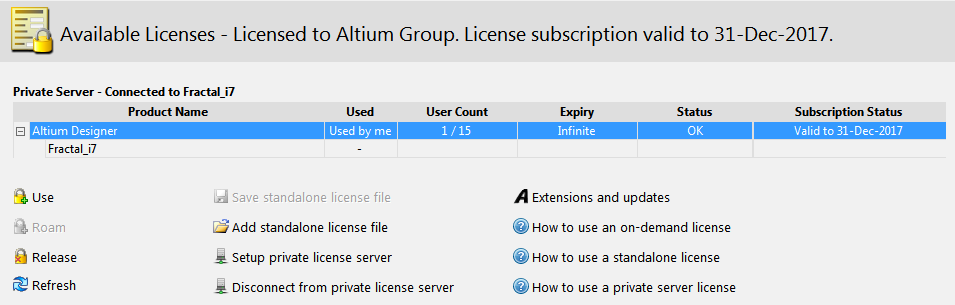
The Available Licenses region will update to reflect your use of a seat of the selected Private Server license.
License management tips:
- To release your license, select the license in the grid and click on the Release option, in the area below the grid.
- To disconnect from the server, click on the Disconnect from private license server option. Subsequently clicking on the Reconnect to private license server option will reconnect you to that same server again.
- To connect to a different Private License Server, release all licenses you are using for the current server, then click on the Setup private license server option. Use the Private License Server Setup dialog to select from any other available Private License Servers that have been detected.
Examining License Usage
Main article: Private Server Licenses - Examining Usage
From the server side, current license usage can be checked in a number of ways:
- By expanding the entry for a particular license, in the License Usage region of the Licensing dialog.
- By selecting a particular license in the Licensing dialog and clicking the Configure button – in the subsequent Security dialog, those users currently using an instance of that license will have a tick displayed in their associated check box.
- By enabling the creation of a detailed license activity log (click the Logging button in the Licensing dialog). Log files are created on a weekly basis, and you can specify the period of time over which to keep the generated log files.
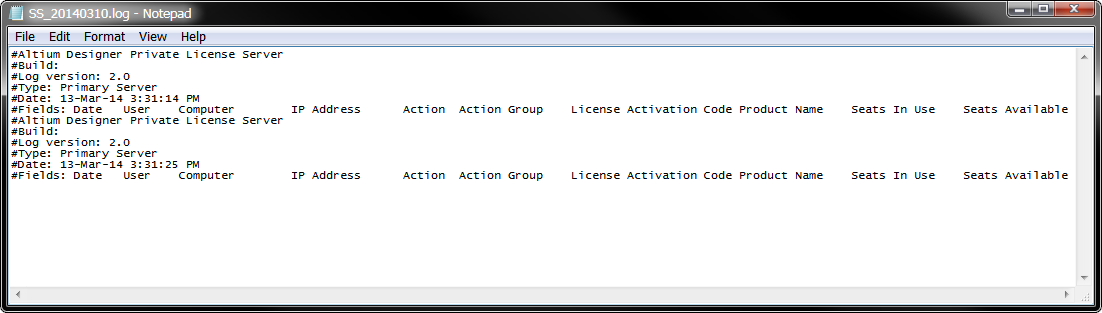
Real-time logging of license usage.
Private License Server Legacy Features
Earlier versions of the Private License Server, also known as a Floating License Server offered the following abilities:
- It was possible to convert a Private Server license to a multi-seat On-Demand license, allowing you to discover the benefits that On-Demand licensing provides. This was arranged through your local Altium Sales & Support Center, or Reseller.
- For legacy information on setting up a Floating License Server – used with Altium Designer prior to the Summer 09 release – see License Service Setup Guide.