Working with the Vaults Panel
Contents
- Changing the Working Vault
- Folder Content Paging
- Moving Folders and Items
- Deleting a Folder
- Toggling Displayed Content
- Searching for Content
- Drag & Drop Placement
- ...from Search Results
- Batch Download of Items
- Batch Lifecycle State Changes
- Clickable URLs
- Support for Multi-Part Components
- Previewing
- Placing
- Quickly Exploring to Downloaded Content
Parent page: Altium Vault
Altium Designer's Vaults panel provides a direct interface to your connected Altium Vaults, and is therefore an integral part of the Design Data Management system. From the Vaults panel you can perform many activities, including:
- Create and manage the organizational structure used in the vault.
- Create any number of Items, each representative of a design-side object.
- Review and manage the lifecycle of Item revisions.
- Interrogate the usage of a particular Item revision (Where-Used).
- Browse and manage supply chain information for Component Items.
For full detail of the Vaults panel, including its access, features and controls, refer to the Vaults page, in the Altium Designer Resource Reference. This article simply pulls together some tips, tricks and cool functionality that may otherwise be missed amongst the feature rich environment of the panel. Think of this page more as a 'crib sheet', presenting a collection of features that can really enhance your productivity when working with the Vaults panel.
The Vaults panel provides the user interface to an Altium Vault, directly from within Altium Designer.
Changing the Working Vault
The Vaults panel can only interface to one vault at a time. The field at the top-left of the panel indicates the currently open vault – the vault whose content you will be able to browse and modify. To select a different vault, click the ![]() icon to the left of the vault name (or on the vault name itself), and choose a different vault from those currently connected.
icon to the left of the vault name (or on the vault name itself), and choose a different vault from those currently connected.

Access controls for changing the working vault.
Folder Content Paging
When you click on any folder within the Vault Folders structure region of the Vaults panel, the content of that folder will be split over a number of pages, where applicable to do so. This greatly decreases the folder's load time. Controls for browsing through the pages are presented at the top-right corner of the Item listing, as illustrated in the subsequent image, and described thereafter.
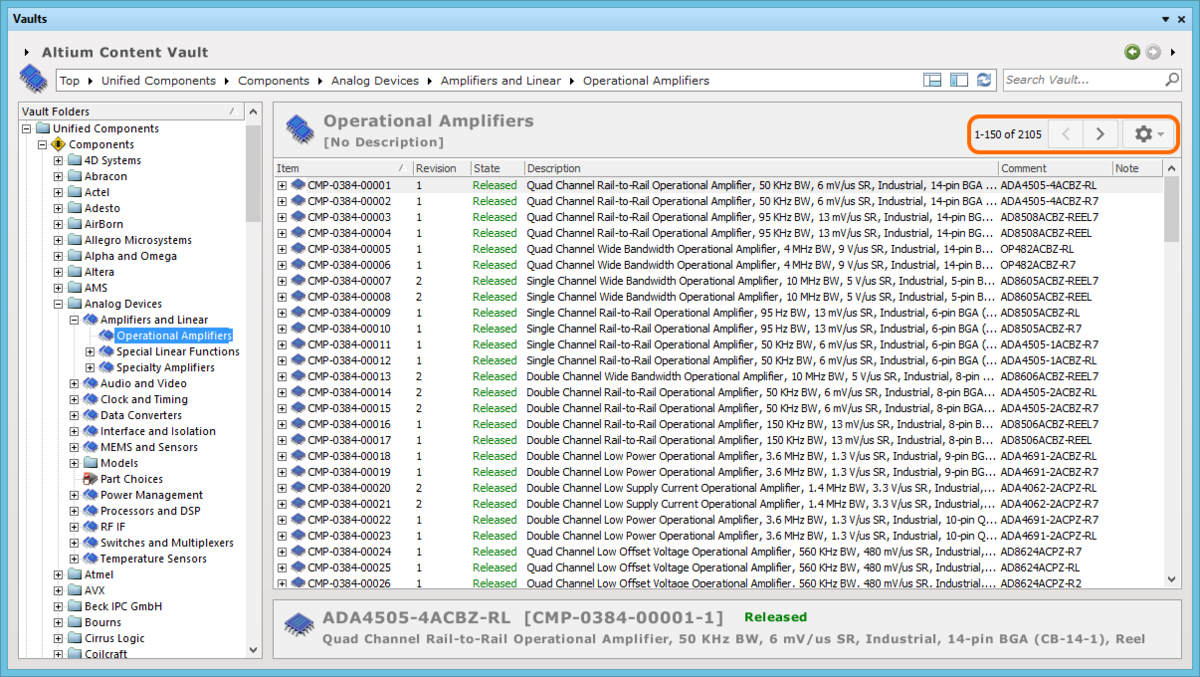
Paging of folder content speeds access to that folder, especially if it contains a sizeable number of Items.
The following controls are available for browsing through the paged-content of a target folder:
| Control | Description |
|---|---|
| The current Items being viewed, out of the total number of Items in this folder. | |
| Page Back - click once to step back to the previous page of folder content. Click repeatedly to step back sequentially through previous pages of content. | |
| Page Forward - click once to step forward to the next page of folder content. Click repeatedly to step forward sequentially through subsequent pages of content. | |
| Setup menu - click this control and use the Load all pages option on the associated menu to switch from folder paging (option disabled) to single content view (option enabled), the latter showing all Items in the chosen folder as a single-page list. |
Moving Folders and Items
One or more vault folders, or Items within a folder, can be quickly moved using the drag and drop technique:
- Folders - simply select the folder(s) to be moved (using standard Ctrl+click, or Shift+click techniques), then click, drag, and drop the selected folder(s) onto a different folder in the structure. Upon dropping, the folder(s) will become sub-folders of that target folder, slotted in alphabetically. Folders can also be moved to be top-level folders within the vault structure.
- Items - simply select the Item(s) to be moved (using standard Ctrl+click, Shift+click, or Ctrl+A techniques), then click, drag, and drop the selected Item(s) onto a different folder in the structure.
Quickly organize your vault folders and Items using drag and drop functionality.
Deleting a Folder
Vault data is valuable and cannot be recovered once it is deleted. For this reason you must first delete all included Items before you can delete the containing folder. Once that is done, you can delete the empty folder using the right-click Delete Folder command.
Further streamlining the organization of your vault folder structure, support is provided for deleting multiple empty folders in a single action:
- Selected Folder Deletion - simply select the empty folders (using standard Ctrl+click, or Shift+click techniques), then right-click on the selection and choose the Delete Folders command.
- Recursive Folder Deletion - delete a tree of empty folders using the right-click Delete Folder command at the parent folder level. Both the parent and all descendant child sub-folders will be included in the deletion.
Toggling Displayed Content
Use the following controls, located at the right-hand end of the Address Bar, to configure what information is presented in the panel:
![]() - click to Hide/Display the Revision Details region of the panel.
- click to Hide/Display the Revision Details region of the panel.
![]() - click to Hide/Display the Vault Folders region of the panel.
- click to Hide/Display the Vault Folders region of the panel.
Tailor the presentation of information in the Vaults panel to suit your working preferences.
Searching for Content
Main article: Searching in a Vault
Over time your Vault will grow to contain a large amount of data, which could include many thousands of components, managed sheets and completed designs. There are two approaches to finding an Item in a Vault, either by browsing through the folder structure to locate the Item, or by searching. The Vaults panel includes a powerful search facility, with functionality including Grouping, Column-based filtering, and a powerful Filter panel.
To perform a search in a Vault, enter the search string in the Search field at the upper right of the panel, and press Enter, or click the Search button (![]() ).
).

Enter the search string in the Search field and press Enter, or click the Search button.
Drag & Drop Placement
Placing components and managed sheets from an Altium Vault is streamlined with the ability to drag & drop revisions of these Item types onto the active schematic document, directly from the Vaults panel.
Simply browse a connected vault for the required Item to be placed. Placement involves a specific revision of that Item, so be sure to expand the main Item entry to list all of its available revisions. Then simply click on the required revision and drag an instance of it onto the schematic sheet.
Drag the required revision of a Component Item from the Vaults panel...and drop it onto the active schematic document.
Drag the required revision of a Managed Sheet Item from the Vaults panel...and drop it onto the active schematic document.
...from Search Results
Related article: Searching in a Vault
The Vaults panel also supports the ability to drag & drop revisions of these Item types onto the active schematic document, directly from the Search Results window. Simply conduct a search, click on the required entry in the results listing, and drag an instance of it onto the schematic sheet.
Drag the required Item from the Search Results window of the Vaults panel...and drop it onto the active schematic document.
Batch Download of Items
Main article: Batch Download of Items from a Vault
The Vaults panel supports the ability to select multiple Items in an Altium Vault, and have the source entities for those Items downloaded, en masse, into a newly created, and linked, single source library, or folder, as applicable. The following Item types are supported by this feature:
- Schematic Symbol Items – with the symbols for the selected Items downloaded into a linked Schematic Library (
*.SchLib). - PCB Component Items – with the 2D/3D component models for the selected Items downloaded into a linked PCB Library (
*.PcbLib). - Component Items – with the component definitions for the selected Items downloaded into a linked Component Library (
*.CmpLib). - Simulation Model Items – with the released data applicable to each Item in the selection (
*.SimModel,*.mdl,*.ckt,*.scb) downloaded to a separate sub-folder.
Batch Lifecycle State Changes
All of the design Items stored in your Altium Vault have a Lifecycle state. The Lifecycle state is used to reflect the readiness of that Item for use, for example an Item might be New From Design, In Production, or Deprecated. The Lifecycle state of multiple Items can be changed in a single batch process.
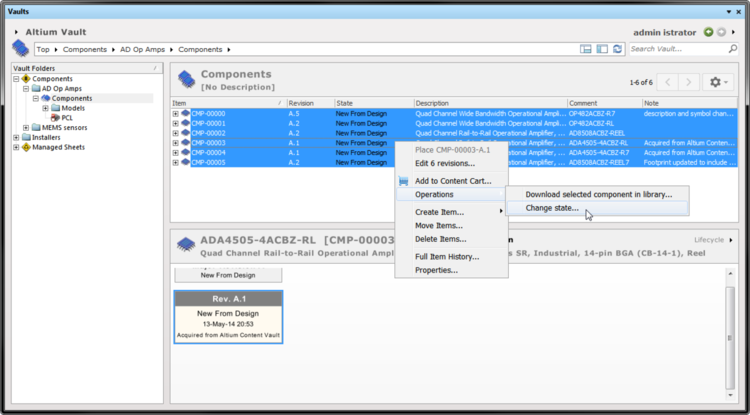
The Lifecycle state can be changed in a single editing action for multiple Items, if required.
To perform a batch change:
- Select the required Items.
- Right-click and select Operations » Change state from the right-click menu.
- The Batch state change dialog will open. If required the Next State can be changed. Note that multi-select is supported in this column.
- Once the Next State has been set, click Process to change the Lifecycle state of all of the Items.
- A Confirm dialog will appear, enter a comment if required (this is stored as part of the Item History) and click Yes to complete the batch Lifecycle state change.

Use the Batch state change dialog to change the Lifecycle state of multiple Items at the same time.
Clickable URLs
Main article: Clickable URLs in the Vaults Panel
Further improving the usability of Altium Vaults, the Vaults panel supports clickable URLs. This functionality allows you to:
- Click on a Component Item's ComponentLink parameter whose value is a URL, opening the target page in an external Web Browser.
- Click on a URL in the supply chain data for a Component Item, opening the target page in an external Web Browser.
- Click on a source document in the Design Snapshot region – from the Preview aspect view for a released board design (blank or assembled board) – to open that document (Read-Only) in Altium Designer.
- Click on a generated output document in the Released Documents region – from the Preview aspect view for a released board design (blank or assembled board) – to open that document.
Support for Multi-Part Components
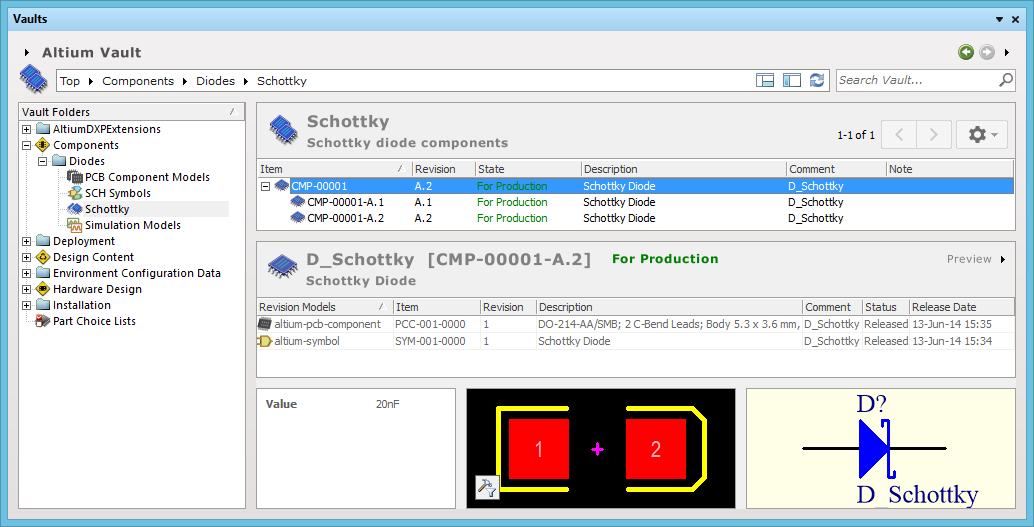
When viewing the symbol for a multi-part Component Item, the Preview aspect view will present each part – each with its own distinct symbol graphic – as a separate tab. In addition, the Place menu will present a sub-menu of all applicable parts that can be placed for that Component Item.
Previewing
Browse to the multi-part Component Item of interest, in the Altium Vault, and ensure the aspect viewing mode is set to Preview. Each distinct part's symbol can be browsed in the symbol viewing region. Simply click on a tab along the bottom to switch between parts.

Browsing the parts of a multi-part Component Item, at the component-level.
Double-click on the entry for the child Schematic Symbol Item to browse the constituent parts for the component at the symbol-level. Again, ensure the aspect viewing mode is set to Preview.
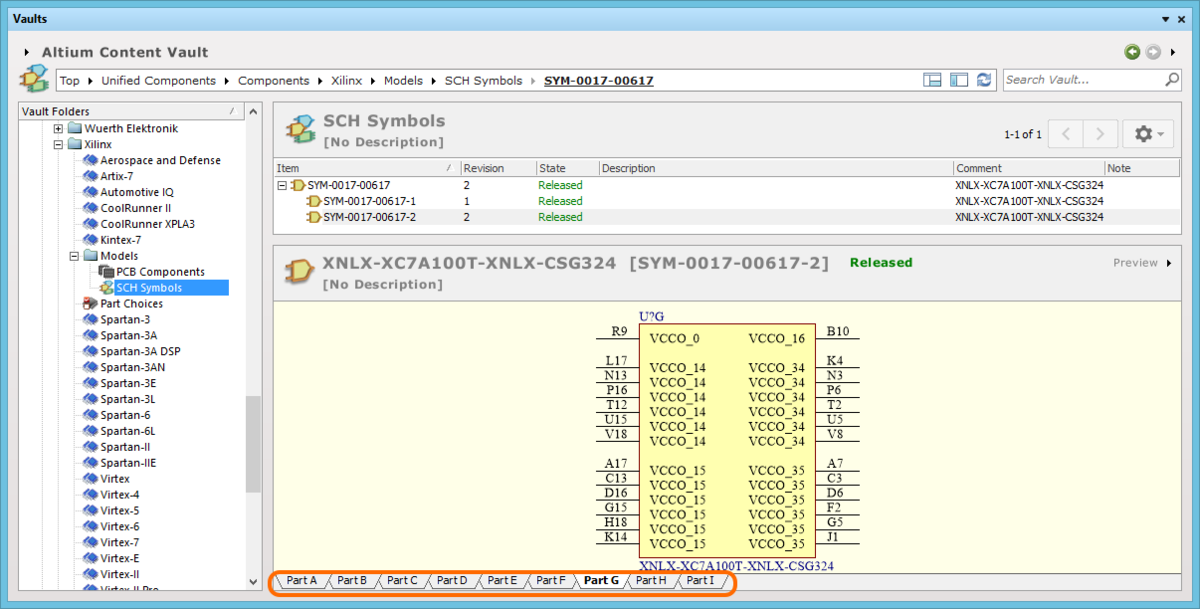
Browsing the parts of a multi-part Component Item, at the child symbol-level.
Placing
When placing a revision of a multi-part Component Item onto a schematic sheet, right-clicking on the revision's entry and hovering over the Place command on the menu, will present a sub-menu containing all parts for that component. Simply select the required part to place.

A placement sub-menu offers all parts in the multi-part Component Item.
Quickly Exploring to Downloaded Content
The Vaults panel supports the ability to quickly navigate to content you have downloaded from an Altium Vault. Simply download content in the usual way, then, in the subsequent Download from Vault dialog that appears to confirm the download, click the Explore button.
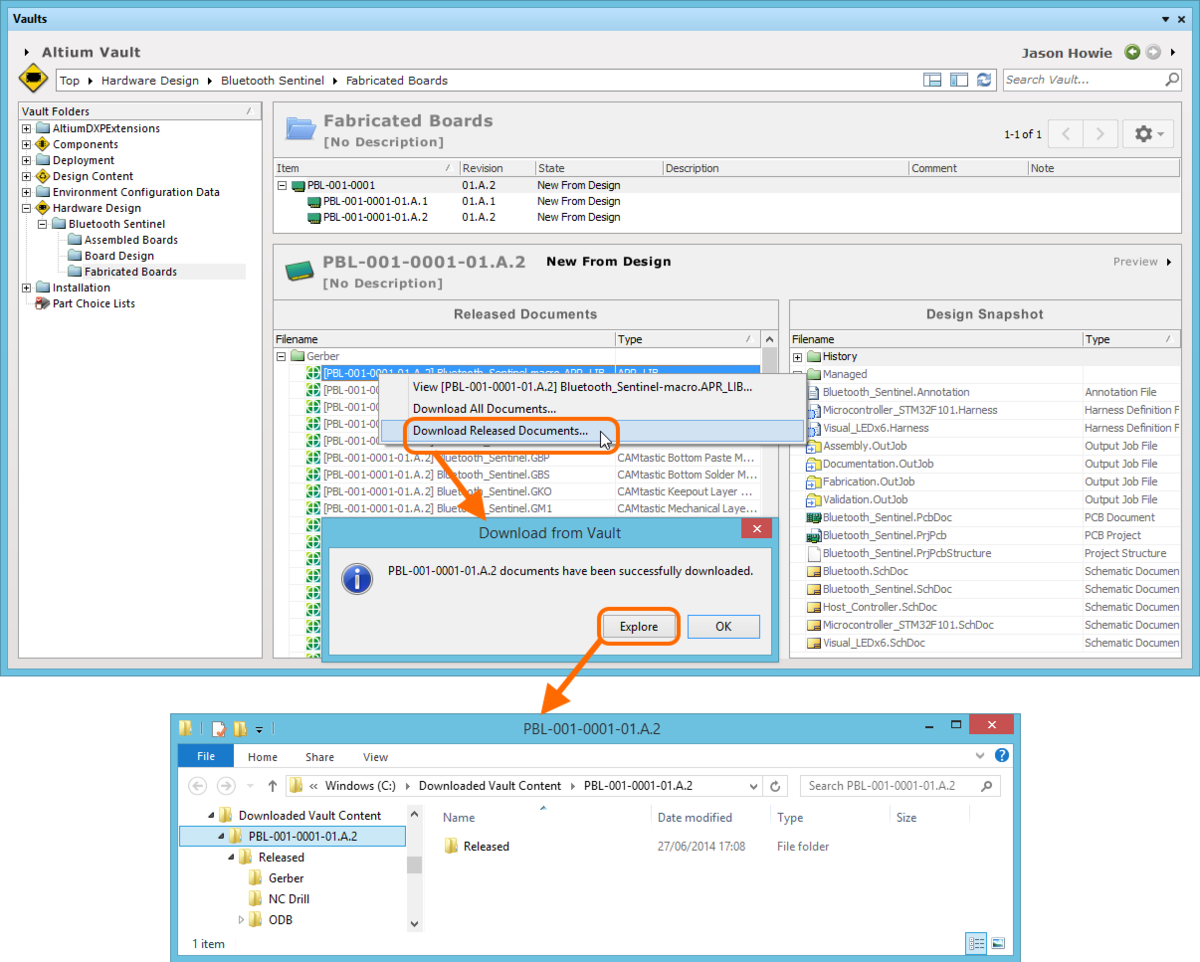
Quickly explore to the content you download from an Altium Vault.