Placing Vault-Based Components
Contents
Parent article: Vault-Based Components
As component definitions get released into your company's Altium Vault, you will have controlled access to a growing set of vault components. You are now able to go ahead and place required components onto schematic sheets within a design.
Placement of vault components can be performed either from the Vaults panel, or from the Libraries panel - the latter giving a sense of familiarity to those designers having used non-vault component management methodologies.
Prior to Placement...
Placing a vault-based component truly is simplicity itself. But before you do anything, first ensure that the schematic sheet that is to receive the component is open in Altium Designer and is the active document. If documents are open across multiple windows, ensure also that the window containing that active schematic document has focus.
Placement from the Vaults Panel
To place from the Vaults panel:
- Browse or search for the Component Item you wish to place.
- Right-click on the specific revision of the component required (typically the latest, in which case just right-click directly on the top-level Item entry).
- Choose the Place command.
The component will float attached to the cursor – just pick a ball-park spot on the active schematic sheet and click to effect placement. You can fine tune and nudge it into its final location at a later stage.
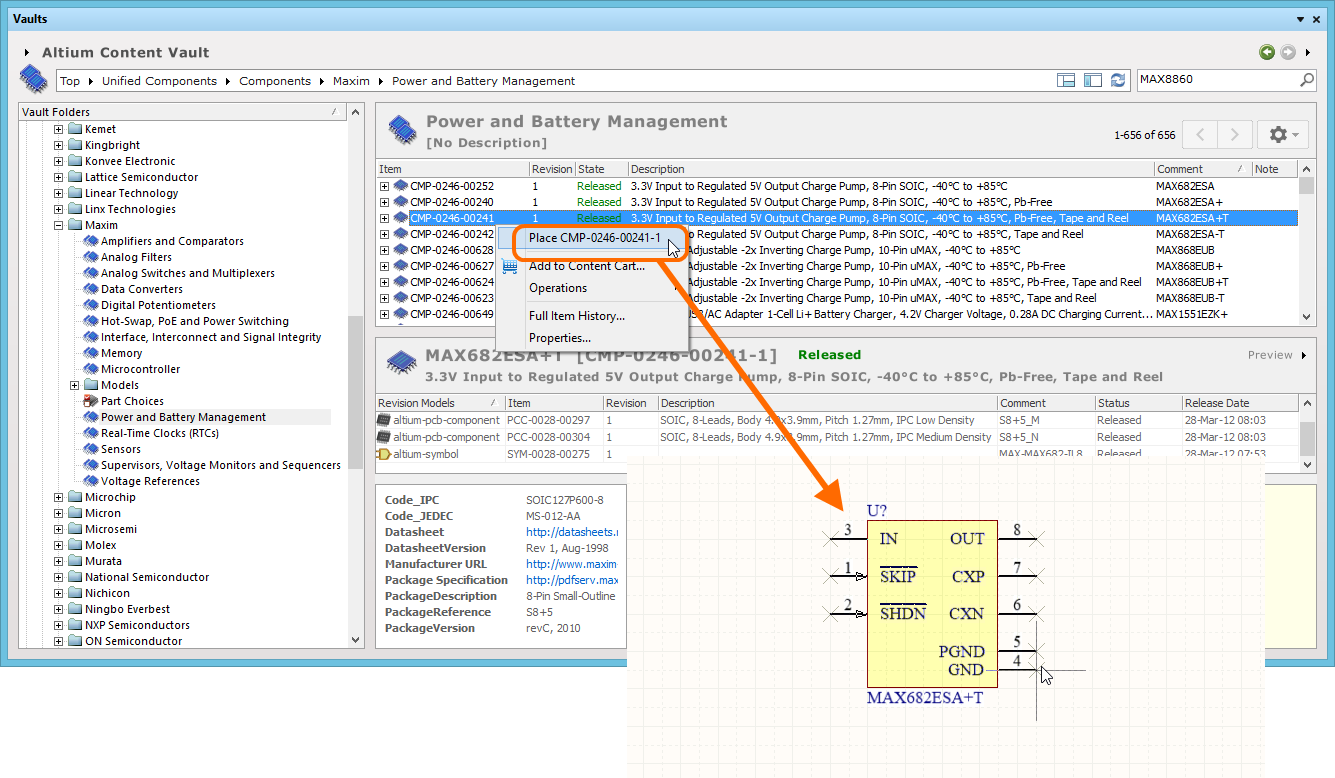
Place a vault-based component from the Vaults panel, using the dedicated Place command.
Drag and Drop from the Vaults Panel
For more express placement of your components from the Vaults panel, Altium Designer provides the ability to drag & drop revisions of Component Items directly onto the active schematic document. This provides similar and familiar functionality, long enjoyed by the Libraries panel when using non-vault component management methodologies.
Simply browse a connected vault for the required Component Item to be placed. Placement involves a specific revision of that Item, so be sure to expand the main Item entry to list all of its available revisions. Then simply click on the required revision and drag an instance of it onto the schematic sheet.

Drag the required revision of a Component Item from the Vaults panel...and drop it onto the active schematic document.
Placement from the Libraries Panel
Altium Designer supports access to, and placement of vault components from, the Libraries panel. This gives a reassuring sense of familiarity for those designers who have regularly used the Libraries panel to search for, browse, and place components from any other library format - such as model libraries, integrated libraries, and database libraries.
With this support, not only can you access the components in any Vault folder, you can also bundle any number of Vault folders to present as a single 'library' within the Libraries panel.
Making Your Vault Components Accessible
The process of adding Vault folders into the Libraries panel begins in the same way that any library is made available in Altium Designer, by clicking the ![]() button in the Libraries panel to open the Available Libraries dialog (or by running the Design » Add/Remove Library command).
button in the Libraries panel to open the Available Libraries dialog (or by running the Design » Add/Remove Library command).
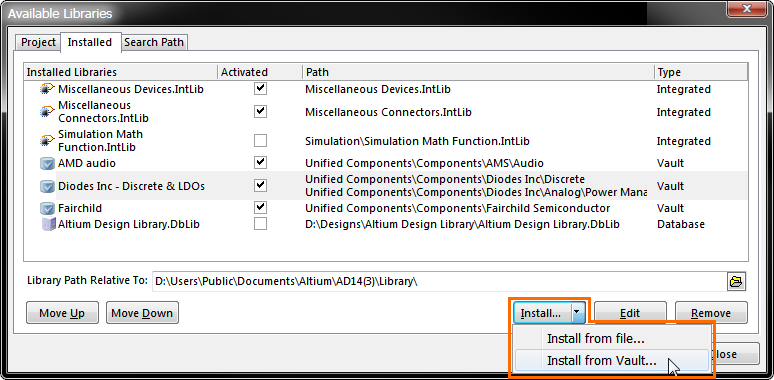
Vault folders can be installed like all other Altium Designer libraries, in the Available Libraries dialog.
To install Vault folders into the Libraries panel, ensure the Installed tab of the Available Libraries dialog is the active tab. Then click the Install button and select Install from Vault (as shown in the image above), which will open the Vault Library dialog, as shown below.
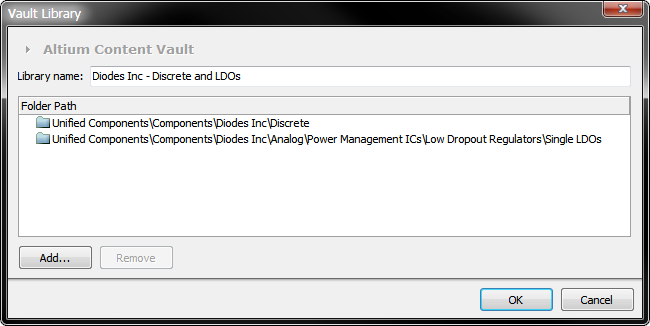
The Vault Library dialog is used to map Vault folders to the Library name you want displayed in the Libraries panel.
This dialog is used to:
- Define a name for this 'Vault library' — this is a name that you are giving to a specific set of Vault folders, so make it meaningful to you. Enter the name into the Library name field at the top of the dialog. This name only exists in the Libraries panel, you are not modifying the Vault contents in any way.
- Define the path to each Vault folder you want included in this 'library' — click the Add button to add each folder you want included in your 'library'. Multiple folders can be added, and if you select a parent folder, the components in all child sub-folders will be included too.
Once you have defined a name and added the required folders into the Vault Library dialog, click OK to return to the Available Libraries dialog. The image below shows how the Vault folders present, note that the Path region of the dialog includes a line for each folder you included in your 'Vault library'.

Vault libraries are listed along with all other installed libraries.
Browsing and Placing Vault Components
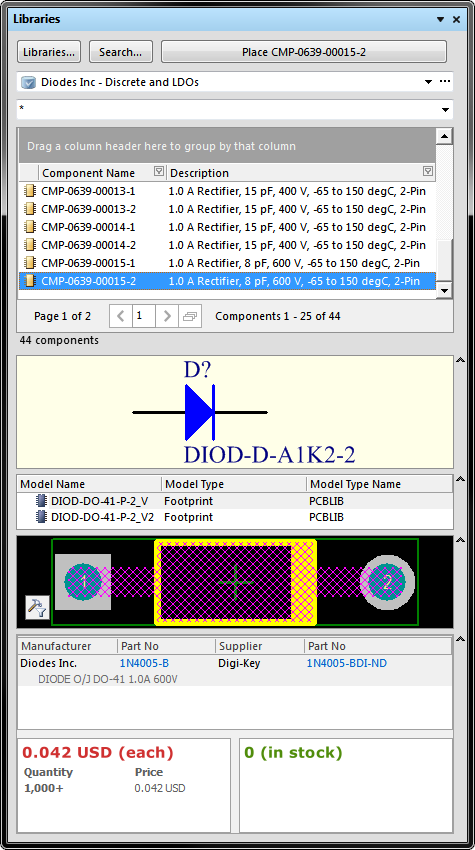
Once the required Vault folders have been mapped to a user-defined Library name and installed in the Available Libraries dialog, those folders - and the components they contain - can be browsed from the Libraries panel. Simply select the required library name from the listing of available libraries. Each revision of each Component Item is presented. Click on an Item Revision to display its referenced domain models, and supply chain information.
You can now place components from those Vault folders. Vault components are placed from the panel in the same way as any other library component:
- Select a component and use the Place button at the top-right of the panel (or the Place command from the right-click context menu).
- Click on, drag, and drop the component directly onto the active schematic sheet.
Vault components are accessed and placed from the Libraries panel in the same way as any other library component.
Vault contents are presented over multiple pages, with 25 components per page. This is done to reduce loading time, as a Vault folder can contain a very large number of components. Controls for moving through the pages are displayed below the list of components (as shown in the image above). Note the single list control ![]() , click this to present all components in a single list.
, click this to present all components in a single list.