Support for Free File Storage
Contents
Catering for expanded storage of design content, the Altium Vault 2.5 release sees support for the storage of free files. With relevant folder type and Item type support, Items can be created to accommodate one or more files of any format. This allows you to effectively take advantage of the vault's secure nature, and underlines the vault as being the perfect place to store anything, including your source binary files - from which releases into other vault Items are made - together in a single Item.
And facilitating the streamlined flow of data files, bi-directional drag-and-drop functionality is provided, enabling you to quickly move files between folders in your vault, and folders in your Windows Explorer.
Folder Type
When creating the folder in which to store a Binary File Item, you can specify the folder's type. This has no bearing on the content of the folder – uploading files will always result in Binary File Items. It simply provides a visual 'clue' as to what is stored in a folder and can be beneficial when browsing a vault for particular content. To nominate a folder's use as a container for Binary File Items, set its Folder Type as altium-binary-catalog.

Specifying the folder type - its intended use - gives a visual indication of the content of that folder when browsing the vault!
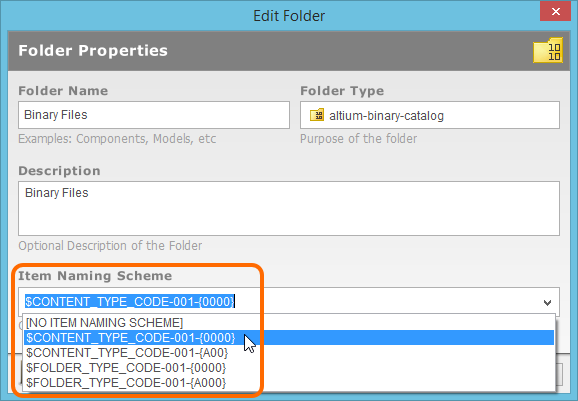
Item Naming Scheme
Another important aspect of the parent folder is the Item Naming Scheme employed for it. This defines the format of the unique ID for each Item created in that particular folder. Several default example schemes are available, utilizing the short-form code for either the folder type (ABC - Altium Binary Catalog) or the content type (ABF - Altium Binary File):
- $CONTENT_TYPE_CODE-001-{0000} - for example, ABF-001-0001.
- $CONTENT_TYPE_CODE-001-{A00} - for example, ABF-001-A01.
- $FOLDER_TYPE_CODE-001-{0000} - for example, ABC-001-0001.
- $FOLDER_TYPE_CODE-001-{A000} - for example, ABC-001-A001.
Using a default naming scheme, the software will automatically assign the next available unique ID, based on that scheme, having scanned the entire vault and identifiers of existing Items. This can be a great time-saver when manually creating Binary File Items prior to release.
A custom scheme can also be defined for a folder, simply by typing it within the field, ensuring that the variable portion is enclosed in curly braces (e.g. BINFILE-001-{B000}).
The Item Naming Scheme of the parent folder is applied to the Unique ID for each Item
created within that folder.
Item Type
When creating the target Binary File Item in which to store your files, ensure that its Content Type is set to altium-binary-file. If you are creating the Item in a Binary File Catalog type folder, this Item type will be available from the right-click context menu when creating the Item.
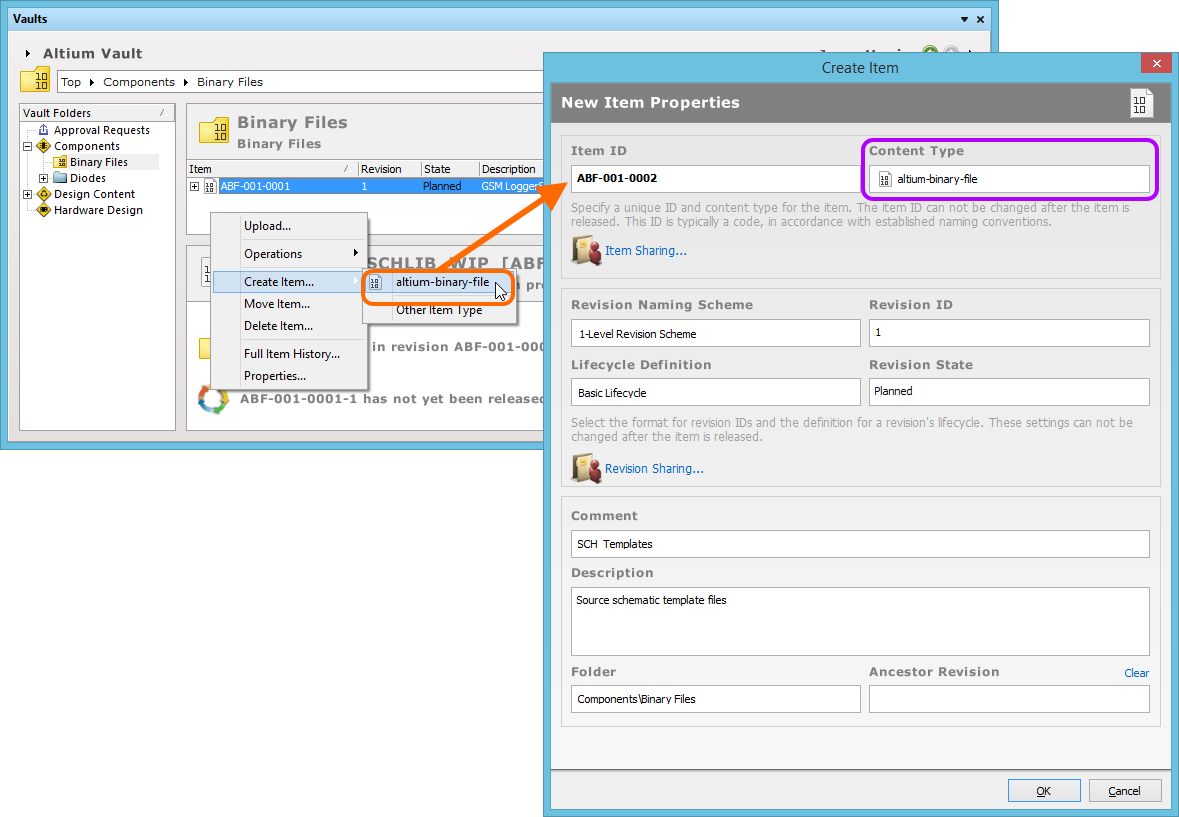
Creating a Binary File Item within a Binary File Catalog - the correct Content Type is available on the context menu.
Item Lifecycle Definition and Revision Naming
When defining the Binary File Item, to which the source file(s) are uploaded, be sure to specify the type of lifecycle management to be used for the Item, and the naming scheme employed for its revisions, respectively.
Specify the required schemes in the Item Properties dialog, using the Lifecycle Definition and Revision Naming Scheme fields respectively.
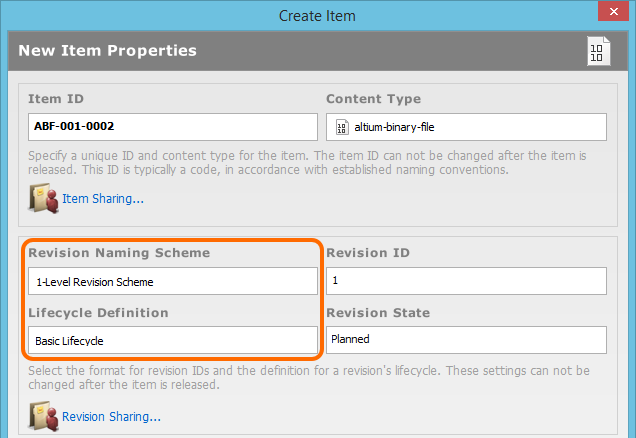
Selecting the Lifecycle Definition and Revision Naming schemes for a manually created Item.
Uploading Files
Getting your files into an Altium Vault is not a case of 'releasing' those files, in the traditional sense, but rather a case of 'uploading' them into a planned revision of a target Binary File Item. The vault can be thought of, in this case, as simply another storage medium (albeit more secure and offering features such as lifecycle management).
Uploading files into a Binary File Item can be performed in a couple of ways:
- By right-clicking on the Item in the Vaults panel, and choosing the Upload command from the context menu. The Release File dialog will appear. Add a Comment, Description, and any Release Notes as required, then define the source - the file(s) to be stored in the next planned revision of the Item. Source files can be added manually by clicking the Add button, and browsing for the required file(s) using the subsequent Add Files dialog. Alternatively, select the file(s), or folder(s) in Windows Explorer and drag and drop them onto the Sources area of the Release File dialog.
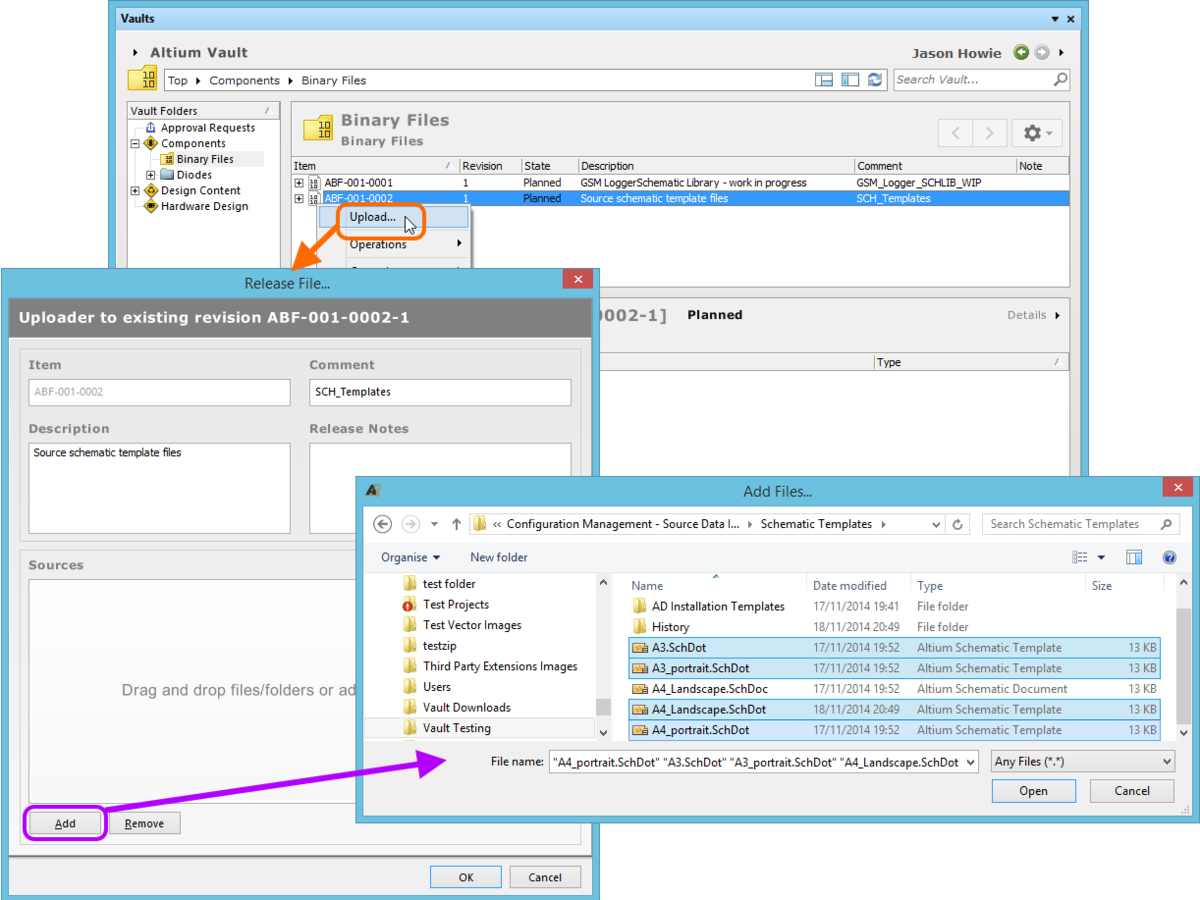
Manually specifying the files to be uploaded to the target Binary File Item.
The chosen file(s) will be added, and listed, in the Sources area of the dialog. If you need to adjust the content of the list, simply add additional files, or select and remove files (click the Remove button) as required.
Once the desired file list is ready, proceed with the upload by clicking the OK button. The uploaded fileset will be available in the Details aspect view for the Item Revision, in the Vaults panel.
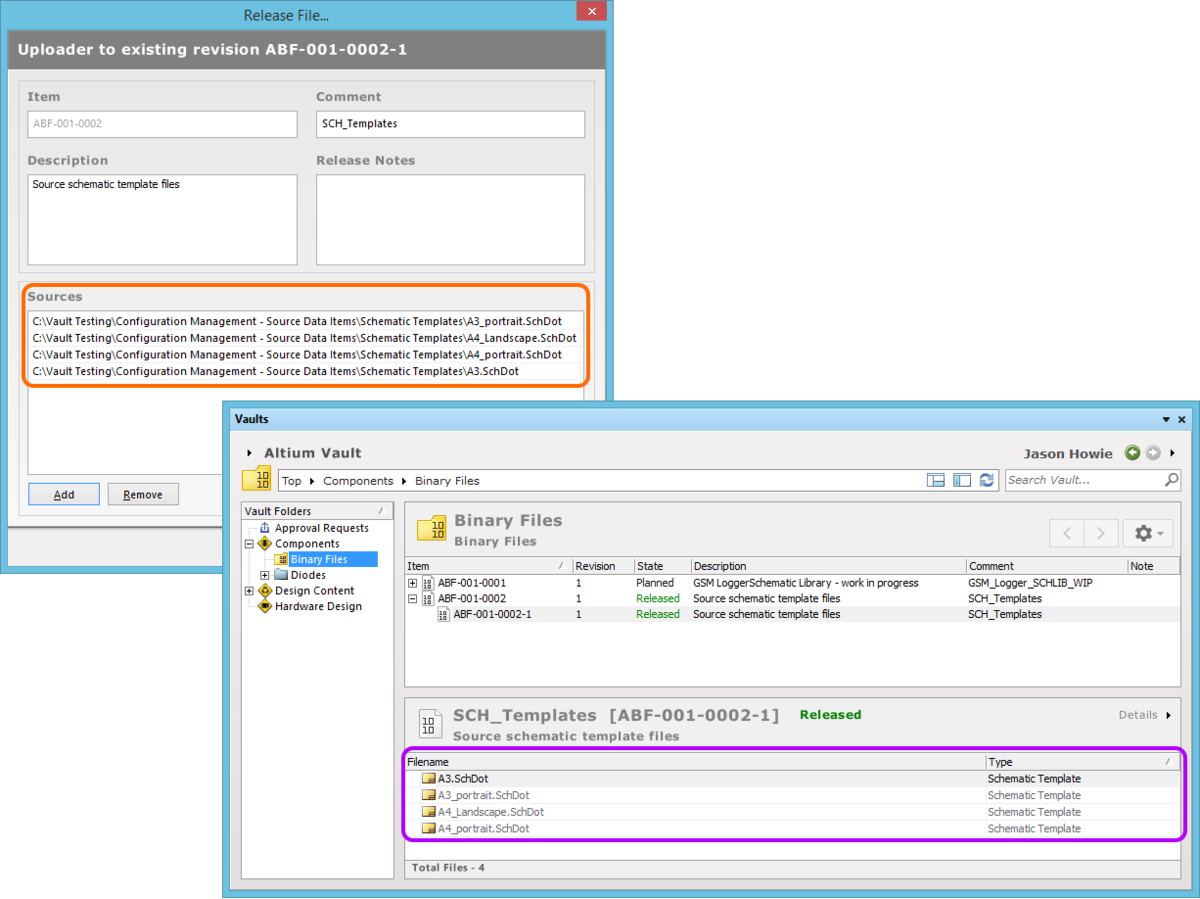
Uploaded files are listed in the Details aspect view for the Item Revision.
- By dragging the selected file(s) from a source folder in your Windows Explorer, and dropping onto the required target Binary File Item in the Vaults panel. The Release File dialog will appear, with the dragged file(s) listed in the Sources area. Add a Comment, Description, and any Release Notes as required. If you need to add additional files, this can be done by clicking the Add button, and browsing for the file(s), or by dragging and dropping file(s)/folder(s) onto the Sources area. If you need to remove files, simply select them in the list and click the Remove button.

Creating the list of files for upload is streamlined through support for drag and drop.
Once the desired file list is ready, proceed with the upload by clicking the OK button. The uploaded fileset will be available in the Details aspect view for the Item Revision, in the Vaults panel.
Downloading Files
Downloading the files stored in a Binary File Item can be performed from the Vaults panel in the following ways:
- By right-clicking on the required Item Revision and choosing the Operations » Download command from the context menu. All files stored in that revision will be downloaded into a sub-folder under the chosen directory, named using the Item Revision name. The files can be found in the Released folder therein.
- By selecting the required file(s) for the Item Revision, in its Details aspect view, right-clicking, and choosing the Download command from the context menu. Simply nominate the target folder to receive the file(s), in the subsequent Browse For Folder dialog.
- While holding Ctrl, click on the entry for the required Item Revision, then drag and drop to the target folder in your Windows Explorer. All files stored in that revision will be downloaded directly into that folder.
Downloading the files stored in a revision of a Binary File Item is streamlined through support for drag and drop. In this case, dragging the Item Revision
will download all files stored in that revision.
- Select the file(s) to be downloaded directly in the list of files stored in the Binary File Item - from its Details aspect view. Once selected, hold Ctrl, and click, drag and drop, into the target folder in your Windows Explorer. Only the selected file(s) will be downloaded.
An example of using drag and drop to download only selected files stored in a Binary File Item.
Opening a File
To open a file that is stored in a revision of a Binary File Item, simply select that file - in the Details aspect view for the revision - then right-click and choose the Open command from the context menu. The relevant application (or Altium Designer itself) will be used to present the file, where applicable to do so.