Releasing a Schematic Template to an Altium Vault
Contents
- Creating the Schematic Template
- Linking the Template to a Vault
- Folder Type
- Item Naming Scheme
- Item Lifecycle Definition and Revision Naming
- Verifying the Link is Established
- Performing the Release
- Re-releasing the Source Template
- Streamlined Re-release Through File-less Editing
- Releasing Multiple Schematic Templates
Parent article: Configuration Data Items
Altium's Design Data Management System caters for the ability to formally release a schematic template into a target Item (and revision thereof) in a target Altium Vault. Once the template has been released, and its lifecycle state set to a level that the organization views as ready for use at the design level, the template can be reused in future board-level design projects.
In addition, a released schematic template can be used as a configuration data item in one or more defined Environment Configurations. An environment configuration is used to constrain a designer's Altium Designer working environment to only use company-ratified design elements. Environment configurations are defined and stored within the Team Configuration Center - a service provided through an appropriately licensed Altium Vault installation, and the facilitator of this concept of Environment Configuration Management.
The following sections look at the process of releasing a schematic template into a target Altium Vault, so that it can be reused in the schematic documents of future designs.
Creating the Schematic Template
A defined schematic template on the design side is mapped to a Schematic Template Item in an Altium Vault. Each release of the template stores the data into a new revision of that Item.
Simply use Altium Designer's Schematic Editor to define the template as required.

Example schematic template defined ready for release to an Altium Vault.
You can now proceed to release the template. To do so requires the following steps:
- Link the template to the required revision of a target Item in a target Altium Vault. The Item must be of type
altium-schematic-template, and the revision in which to release the template data must be in thePlannedstate. - Release the template into that targeted Item-Revision.
Linking the Template to a Vault
Before any template data can be added to a vault, there must be an Item defined in the vault to 'hold' that data. The Item is created before releasing the template into the vault. The link to the target vault and Item Revision therein, is stored as part of the template (SchDoc or SchDot) file.
The first step is to link the sheet to the vault, using the File » Link Sheet to Vault command. The linkage is stored as part of the Document Options for the sheet, which is why the Document Options dialog will open, with the Link To Vault option enabled.
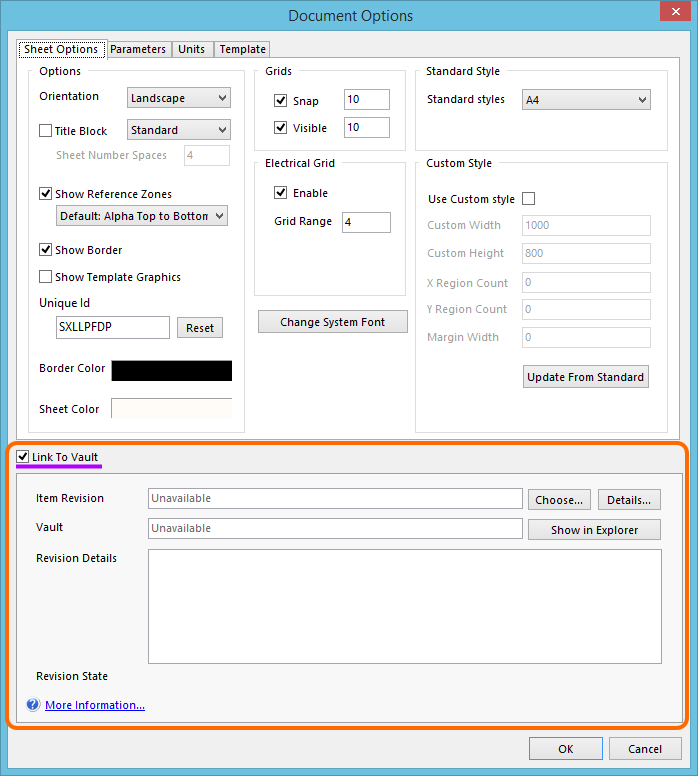
Controls for linking the template sheet to a Schematic Template Item in a target vault.
Clicking the Choose button to the right of the Item Revision field will give access to the Choose Item dialog – essentially a trimmed incarnation of the Vaults panel. The field at the top-left of the dialog indicates which vault you are currently exploring. To select a different vault, click the ![]() icon to the left of the vault name (or on the vault name itself) to access a menu of top-level vault management controls. This menu displays all vaults that you currently have an active connection to.
icon to the left of the vault name (or on the vault name itself) to access a menu of top-level vault management controls. This menu displays all vaults that you currently have an active connection to.
With the required target vault active, you can either drill down through its folder hierarchy to select the required existing Item, or create the folder and/or Item as required, on-the-fly. Ensure that the Item-Revision chosen – which will receive the released template data – is in the Planned state.

Manually linking the source template to a planned revision of a Schematic Template Item, in the target vault.
Folder Type
Whether you have created a Schematic Template Item in the target vault beforehand, or are creating it in situ at the time of sheet linking, you will need to first create the folder in which that Item will reside. As part of folder creation, the folder's type can be specified. This has no bearing on the content of the folder – releasing schematic templates will always result in Schematic Template Items. It simply provides a visual 'clue' as to what is stored in a folder and can be beneficial when browsing a vault for particular content. To nominate a folder's use as a container for Schematic Template Items, set its Folder Type as altium-schematic-template-catalog.
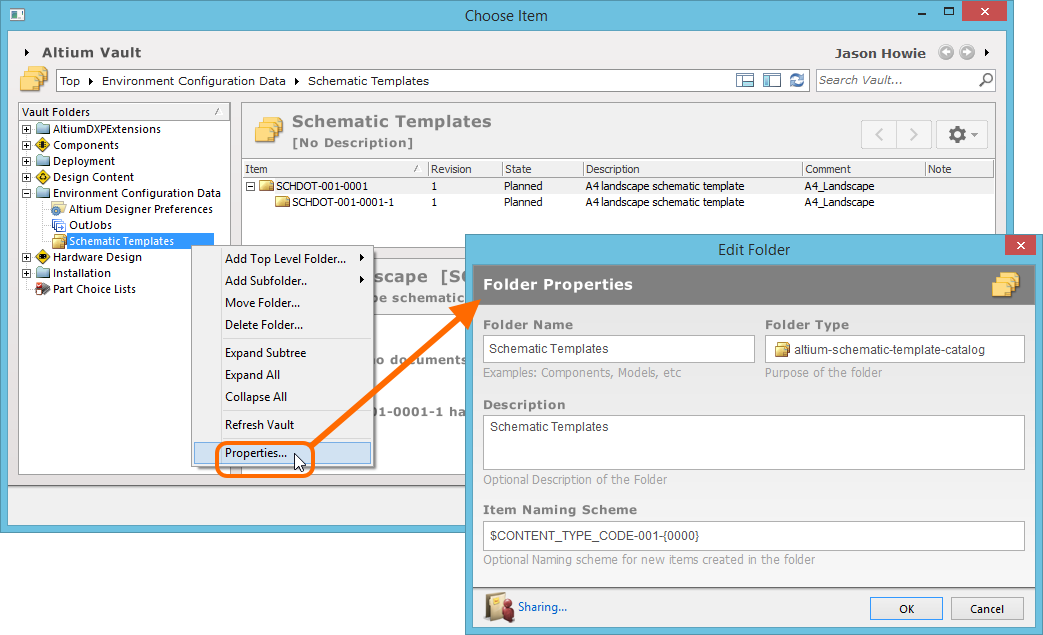
Specifying the folder type - its intended use - provides visual indication of the content contained within that folder while browsing the vault.
Item Naming Scheme
Another important aspect of the parent folder is the Item Naming Scheme employed for it. This defines the format of the unique ID for each Item created in that particular folder. Several default example schemes are available, utilizing the short-form code for either the folder type or the content type. Using a default naming scheme, the software will automatically assign the next available unique ID, based on that scheme, having scanned the entire vault and identifiers of existing Items. This can be a great time-saver when manually creating Schematic Template Items prior to release.
A custom scheme can also be defined for a folder, simply by typing it within the field, ensuring that the variable portion is enclosed in curly braces (e.g. SCHTEMPL-001-{C000}).

The Item Naming Scheme of the parent folder is applied to the Unique ID for each Item
created within that folder.
Item Lifecycle Definition and Revision Naming
When defining the Schematic Template Item, to which the source template sheet is linked, be sure to specify the type of lifecycle management to be used for the Item, and the naming scheme employed for its revisions, respectively.
Specify the required schemes in the Item Properties dialog, using the Lifecycle Definition and Revision Naming Scheme fields respectively.
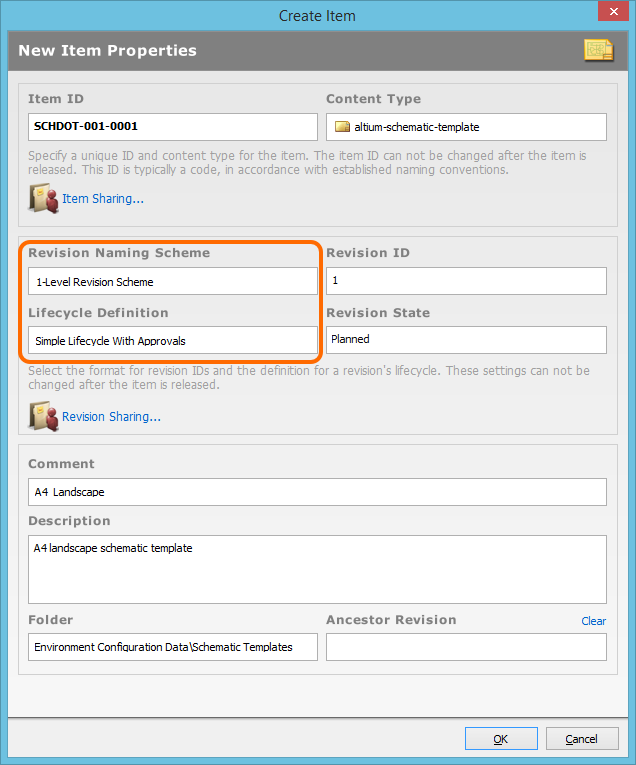
Selecting the Lifecycle Definition and Revision Naming schemes for a manually created Item.
Verifying the Link is Established
Once the required revision of the Schematic Template Item in the target vault is chosen, clicking OK in the Choose Item dialog will create the link between source sheet and target Item. Evidence of the link can be seen back in the Document Options dialog. Close the dialogs and save the source document – so that the link information is saved to the sheet.

Evidence that the source template sheet is now linked to an Item in the vault.
Performing the Release
With the link to the target vault and Item-Revision in place, the process of releasing the source template into the vault can proceed. Select the File » Release To <TargetVaultName> command. When the data has been prepared to be added to the vault, the Release confirmation dialog will appear. This dialog also includes a field to add any pertinent release notes. Click Yes to commit the template to the vault.
After its release, the Revision State is updated in the Document Options dialog, which will now show Released (when using basic lifecycle management), or New From Design (when using another default management scheme). Be sure to save the document. Click the Show in Explorer button to browse the released template directly in the vault using the Vaults panel.
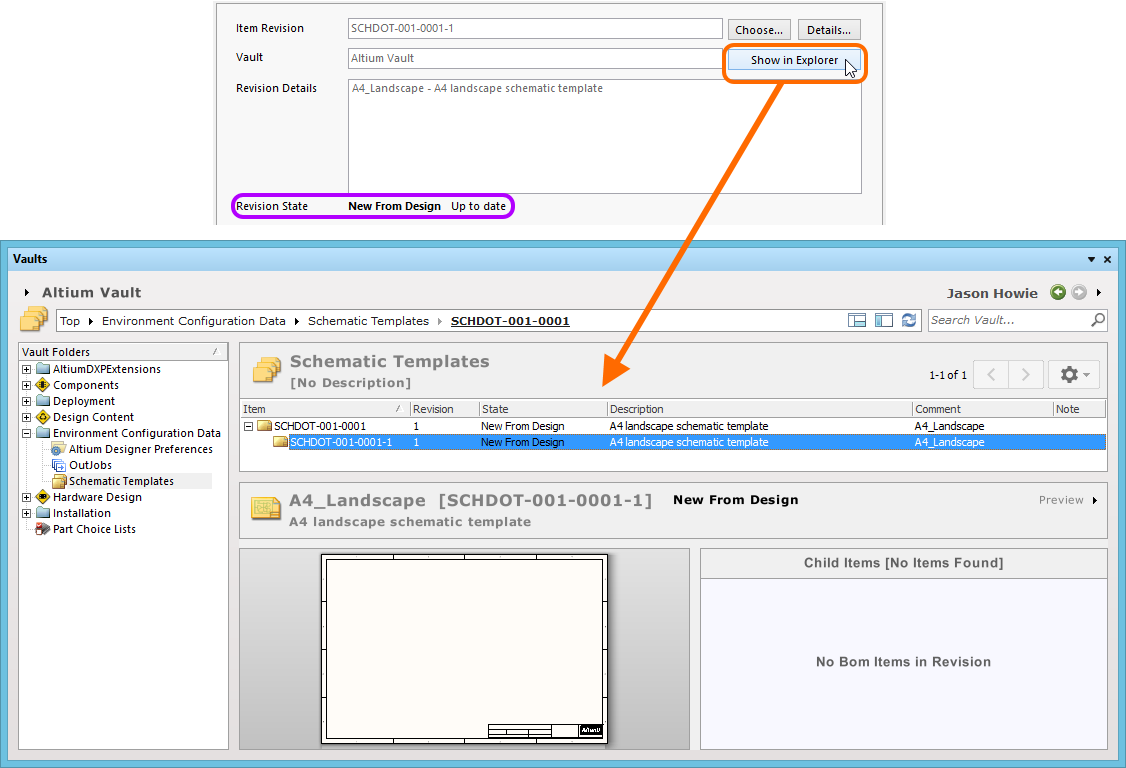
Browsing the released Schematic Template Item in the vault, using the Vaults panel.
The released data stored in the vault consists of the template defined in the .SchDot or .SchDoc file (as applicable).
With the template released, it can now be reused as the template for schematic source documents in new design projects. For more information on both its manual reuse, and reuse as part of a defined environment configuration, see Reusing a Managed Schematic Template Item.
Re-releasing the Source Template
With the source template file linked to the vault and Schematic Template Item therein, re-releasing the template – to take into account any modifications – is a straightforward process:
- Make the changes to the template as required.
- Create a new
Plannedrevision for the linked Schematic Template Item. This can be done from the Lifecycle view for the Item, in the Vaults panel, or from the detailed view for the Item. With the template document active in the workspace, the latter can be accessed from the Document Options dialog by clicking the Details button (to the far right of the Item Revision field). - Choose this new Item Revision in the Document Options dialog.
- Save the SchDot/SchDoc file.
- Use the File » Release To <TargetVaultName> command.
Streamlined Re-release Through File-less Editing
Main article: File-less Editing in an Altium Vault
File-less editing frees you of the shackles of separate version-controlled source data. You can simply edit a supported Item type using a temporary editor loaded with the latest source direct from the vault itself. And once editing is complete, the entity is re-released into a subsequent planned revision of its parent Item, and the temporary editor closed. There are no files on your hard drive, no questioning whether you are working with the correct or latest source, and no having to maintain separate version control software. The Altium Vault handles it all, with the same great integrity you've come to expect, and in a manner that greatly expedites changes to your data.
Releasing Multiple Schematic Templates
Releasing single schematic templates to a target vault can be a tedious task – especially since release of a single template requires that file (SchDot or SchDoc) to be open and active in Altium Designer. This is also the case if changes have been made affecting an array of source templates, that need to be re-released into a new revision of each target Schematic Template Item.
To facilitate the release of multiple schematic templates to a target vault simultaneously, Altium Designer provides a Release Manager (File » Release Manager). Use it to batch-release schematic template files in a nominated source folder location.
Setting up for release couldn't be simpler:
- Set the Document Type according to the format used for your templates –
SCHDOTorSCHDOC. - Point to a top-level folder containing the schematic template files you want to release. Files can be stored in sub-folders within this folder.
- Choose the target vault.
- Choose to create a top-level folder in the vault based on the nominated top-level Windows folder, or choose an existing vault folder. You can optionally create sub-folders in the nominated vault folder, for each Windows sub-folder. Additionally, you can opt to create a vault folder for each source template file.
- Use the Default Options for New Released Schematic Templates region of the Release Manager to control how required new Items are created as part of the release process – in terms of Lifecycle Definition, Item Naming and Item Revision Naming schemes, and starting index.
- Hit the Analyze Folders button.
Analysis of source folders and target vault folders (and Items) based on your chosen options will be performed and the source template files detected will be listed. For each entry, the target Item will be displayed, its current and/or next revision (as applicable) and the action that will be performed by the release process.
Enable the templates that you want to release and then click the Prepare Items and Documents button to effectively commit the link information to the source template files involved in the release. Once saved, proceed with the release by clicking the Release Items button.
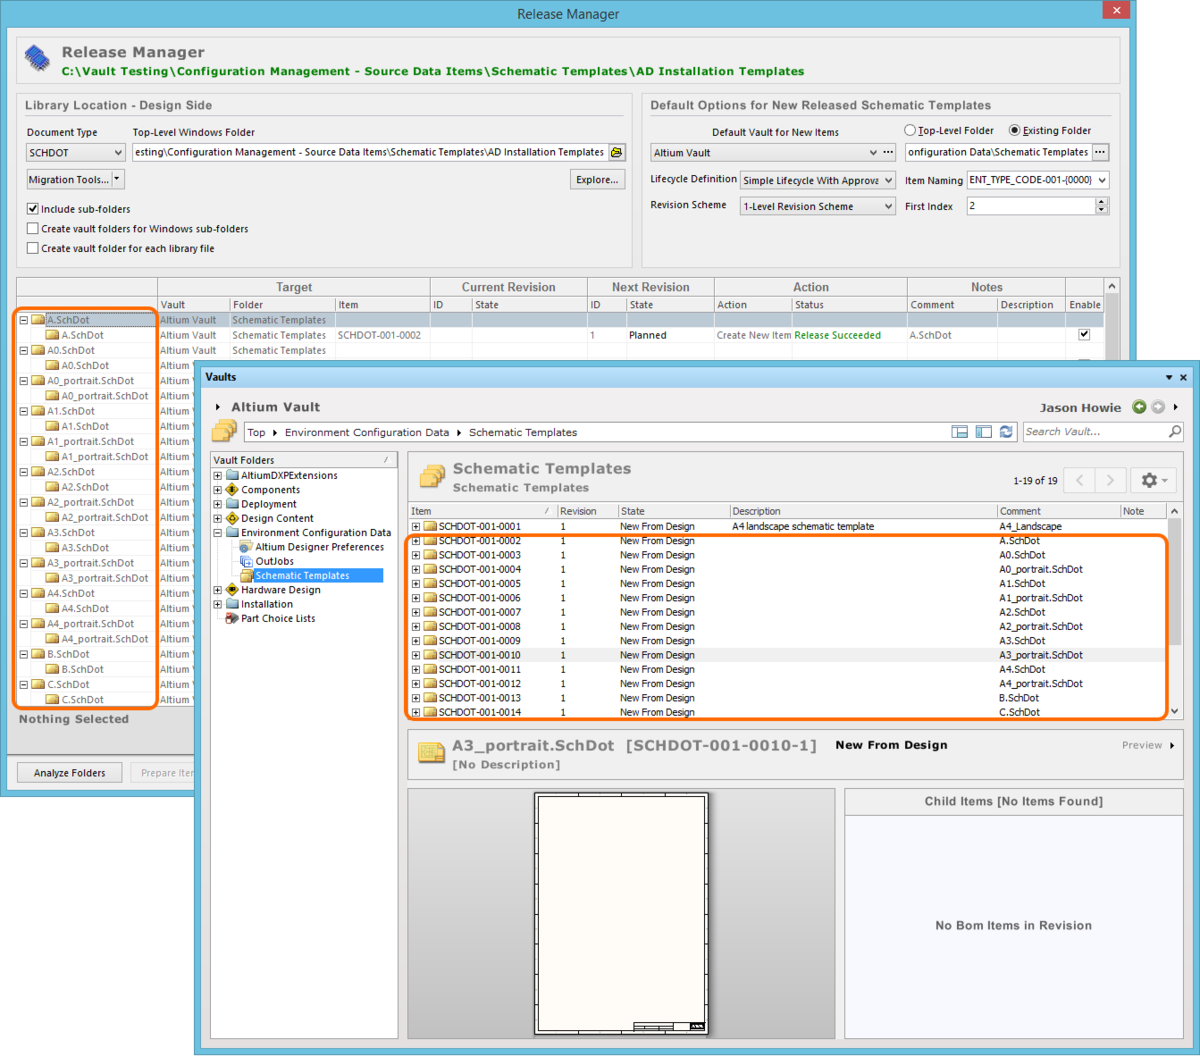
Batch-release schematic templates using the Release Manager.