Releasing a Schematic Symbol to a Vault
Contents
- Creating the Schematic Symbol
- Linking the Library to a Vault
- Folder Type
- Item Naming Scheme
- Item Lifecycle Definition and Revision Naming
- Verifying the Link is Established
- Performing the Release
- Release Manager
- Preparing the Symbol for Release into the Vault
- Releasing the Symbol
- Re-releasing the Schematic Symbol
- Streamlined Re-release Through File-less Editing
- Clearing the Link to a Released Item
- Severing the Link
- Re-establishing the Link
- Releasing Multiple Schematic Library Files
Parent article: Vault-Based Domain Models
From a designer's perspective, a vault-based component (Component Item) gathers together all information needed to represent that component across all design domains, within a single entity. It could therefore be thought of as a container in this respect. A 'bucket' into which all domain models and parametric information is stored.
In terms of its representation in the various domains, a vault-based component doesn't contain the domain models themselves, but rather links to these models. These links are specified on the design-side, as part of the source component definition – from which the released Component Item is generated. As such, before you can delve into the process of defining and releasing vault-based components, you must first ensure that all the domain models themselves have been created and released.
This article takes a look at the process of releasing a Schematic Symbol into the vault so that it can be used in the creation of one or more vault-based components.
Creating the Schematic Symbol
A drawn schematic symbol within a Schematic Library document (*.SchLib) on the design side is mapped to a Schematic Symbol Item in an Altium Vault. Each release of the library stores the symbol model data into a new revision of that Item.
Firstly, create a new Schematic Library file (File » New » Library » Schematic Library) and add/draw the schematic symbol as required. A single library may contain any number of schematic symbols, with each independently linked to a unique Item in the target vault.
One important thing to observe here is that only the symbol graphics need be defined – the representation of the higher-level vault-based component within the schematic editing domain. It is not a 'schematic component' as defined for use in integrated libraries, where other models and parameters are defined as part of that schematic component. A vault-based component needs only the graphical depiction of the symbol. It will include links to other domain models and parameters as part of its own definition.
Once the symbol is drawn as required, save the library.
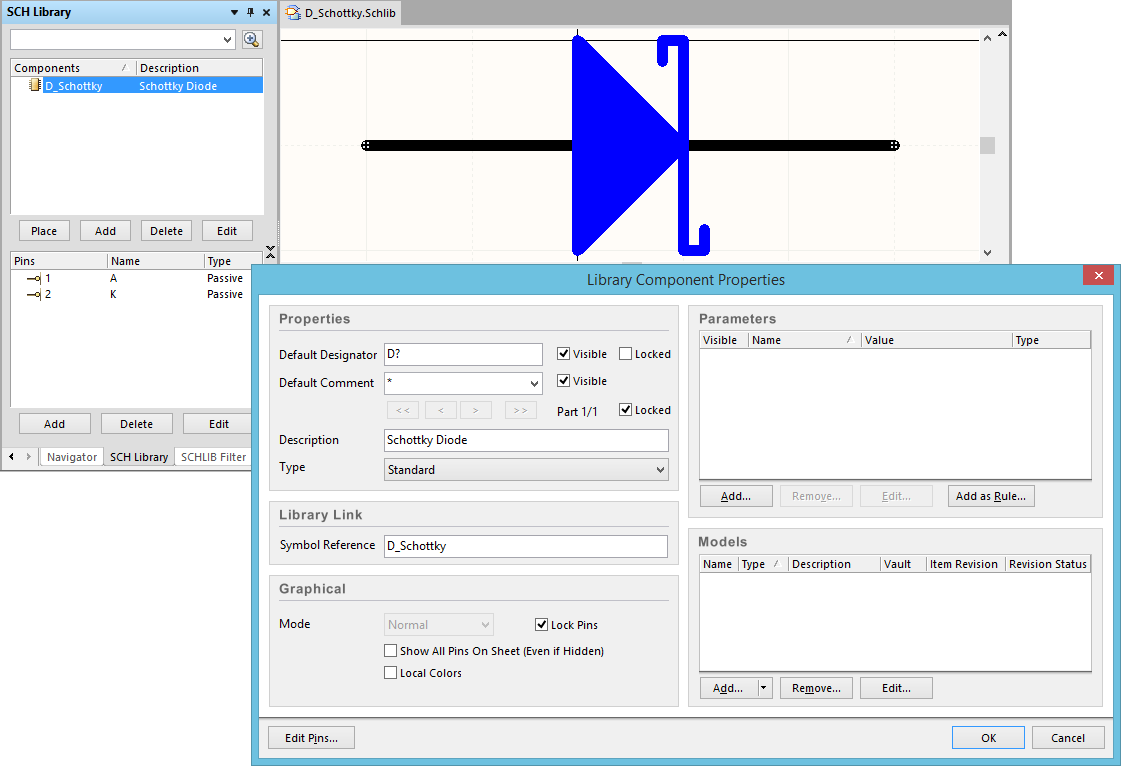
Example schematic symbol in a Schematic Library file.
You can now proceed to release the schematic symbol. To do so requires the following steps:
- Link the Schematic Library file to the required target vault, and a specific folder within that vault.
- Release the symbol into the next planned revision of the corresponding target Item.
Linking the Library to a Vault
Linking the Schematic Library to a vault is performed in the Library Editor Workspace dialog. Enable the Link To Vault option in this dialog to access link controls.
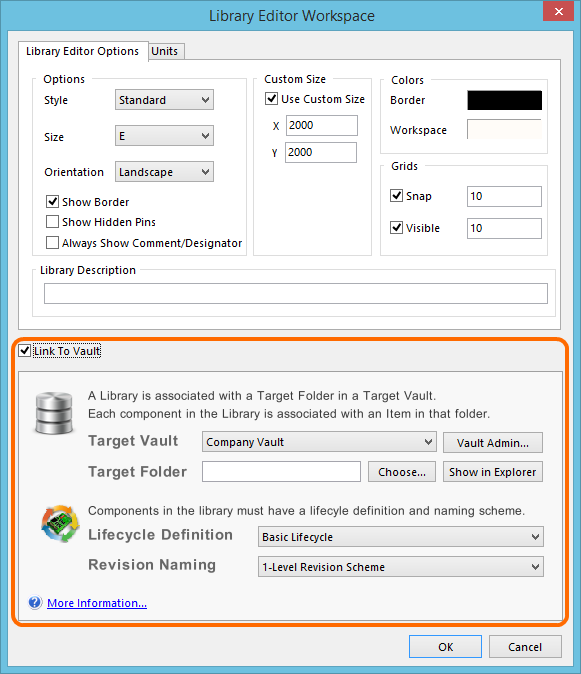
Link the Schematic Library to the required target vault, and folder within that vault, using the
Library Editor Workspace dialog.
Use the Target Vault field to nominate the vault into which you want to store released data for the symbol within the library. The drop-down associated to the field displays all vaults that you currently have an active connection to. If you have not connected to a vault, click the Vault Admin button to access the Data Management – Vaults page of the Preferences dialog, from where you can make a connection to the required vault as necessary.
Use the Target Folder field to nominate the folder into which the corresponding Item for the symbol being released will be created. Click the Choose button to access the Choose Folder dialog. This dialog essentially provides you with a folder-specific view into the target vault. Either browse to, and select an existing folder in the vault, or add a new folder. (Using the Show in Explorer button will quickly access the Vaults panel, with the chosen folder made active).
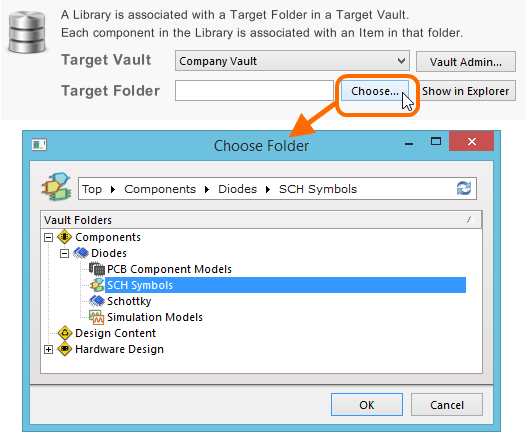
Choose a target folder in which the released Schematic Symbol Item is to be created and reside.
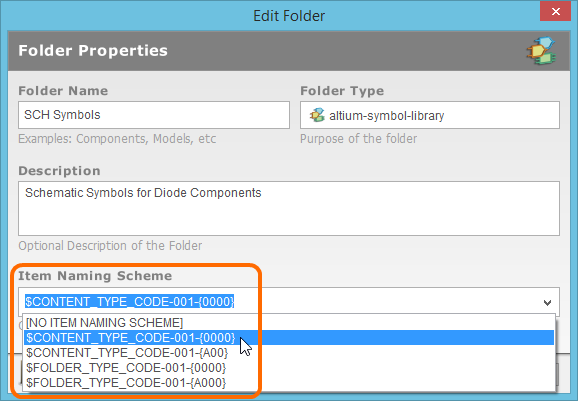
Folder Type
When creating the folder in which to store the symbol, you can specify the folder's type. This has no bearing on the content of the folder – releasing schematic symbols will always result in Schematic Symbol Items. It simply provides a visual 'clue' as to what is stored in a folder and can be beneficial when browsing a vault for particular content. To nominate a folder's use as a container for Schematic Symbol Items, set its Folder Type as altium-symbol-library.
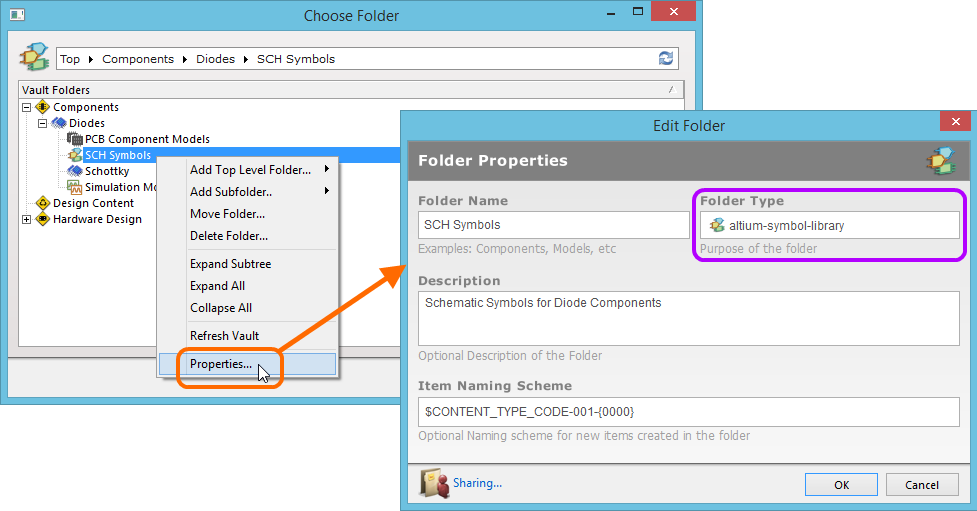
Specifying the folder type - its intended use - gives a visual indication of the content of that folder when browsing the vault!
Item Naming Scheme
Another important aspect of the parent folder is the Item Naming Scheme employed for it. This defines the format of the unique ID for each Item created in that particular folder. Several default example schemes are available, utilizing the short-form code for either the folder type or the content type. Using a default naming scheme, the software will automatically assign the next available unique ID, based on that scheme, having scanned the entire vault and identifiers of existing Items.
A custom scheme can also be defined for a folder, simply by typing it within the field, ensuring that the variable portion is enclosed in curly braces (e.g. SYMBOL-001-{J000}).
The Item Naming Scheme of the parent folder is applied to the unique ID for each
Item created in that folder.
Item Lifecycle Definition and Revision Naming
Use the Lifecycle Definition and Revision Naming fields (in the Library Editor Workspace dialog) to choose the type of lifecycle management to be used for the created Schematic Symbol Item, and the naming scheme employed for its revisions, respectively.

Selecting the Lifecycle Definition and Revision Naming schmes.
Verifying the Link is Established
After defining the link to the vault as required, clicking OK in the Library Editor Workspace dialog will create the link and store it in the Schematic Library document. You can view this information at any time using the Document Options command from the main Tools menu.
At the individual symbol level, evidence of the link can be seen when using the Tools » Component Properties command. With the link to the vault established, the resulting dialog is now named Schematic Symbol Properties rather than Library Component Properties. Essentially, the Models region is removed and the Library Link region replaced with Symbol Name and Vault Links regions. For a new, unreleased symbol, information in the Vault Links region will become populated once the symbol is released to the vault.
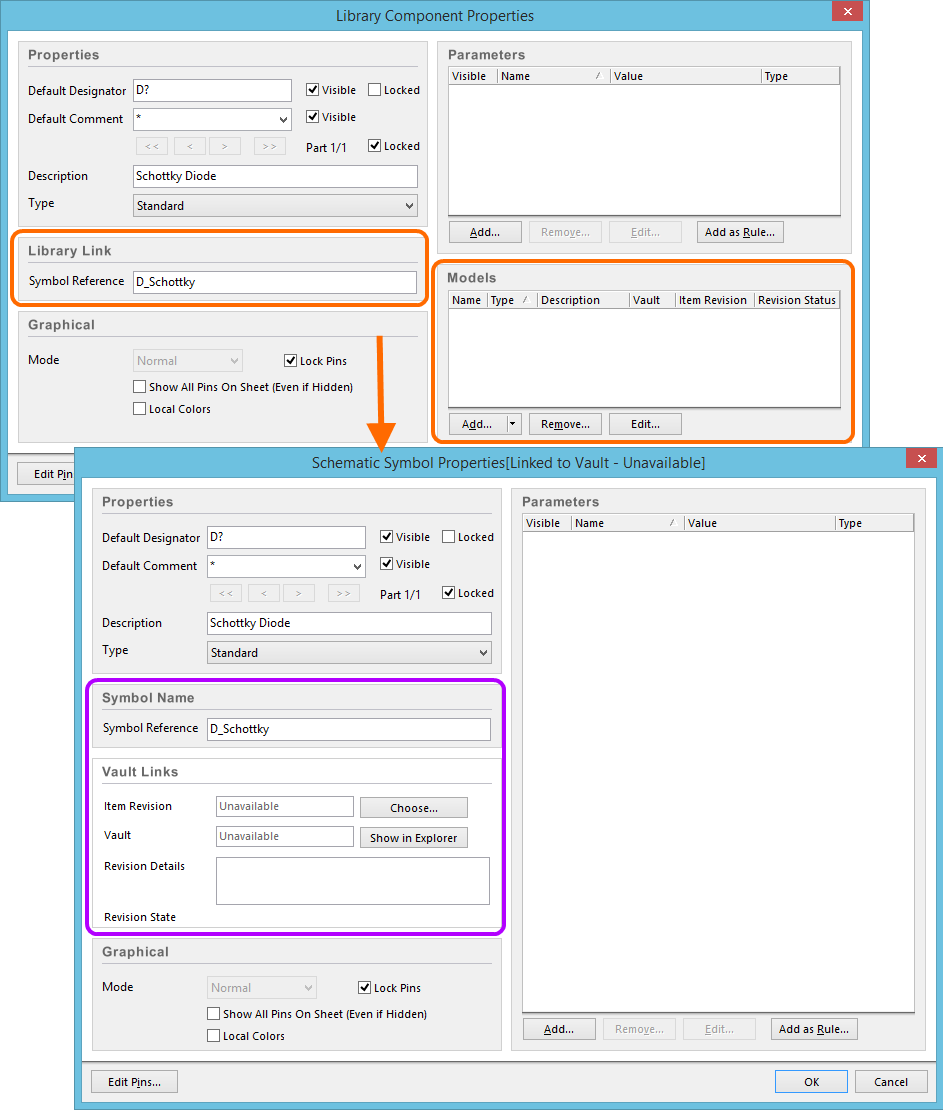
Evidence that the link to the vault has been established.
Save the library file – the library is now ready to release.
Performing the Release
With the link to the target vault (and folder therein) in place, you can now proceed to release the symbol in your library. The release process is performed from within the Release Manager dialog.
Release Manager
The Release Manager dialog is accessed using the File » Release To <TargetVaultName> command. This is a modified version of the full Release Manager dialog, the difference being that in this context it is used to release the single, active library document, rather than batch-release multiple libraries in a nominated source folder.
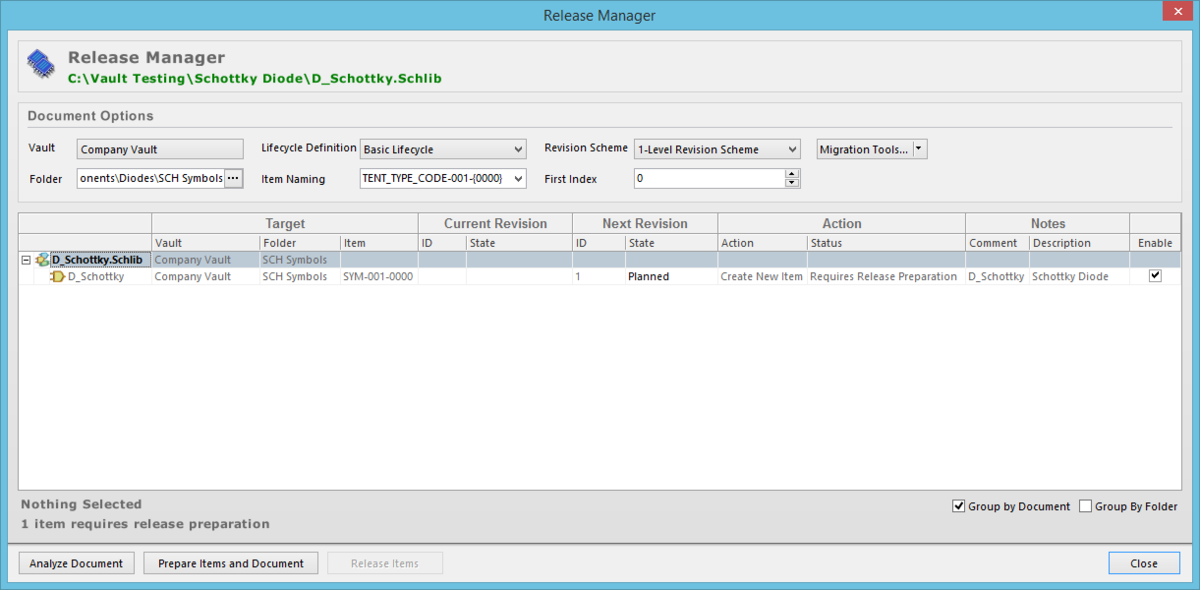
Release source symbol(s) in the active library document using the Release Manager.
The contents of the library document to be released are listed in the main grid region of the dialog. The grid itself presents all information relating to the link between a source symbol and its vault-based Item, as well as the actions that will be taken if the source entity is included in the release process. Considering a source symbol entry in the grid, the following information is presented:
- Target – this region of the entry provides information regarding the link to the Item, that is either already established (if released already) or will be established (if awaiting initial release). It consists of the target vault, the folder within that vault, and the ID of the Item itself.
- Current Revision – if the source symbol has been released previously, this region of the entry provides information about the latest released revision, in terms of revision ID and lifecycle state.
- Next Revision – this region of the entry provides information about the next revision of the Item that will be created to receive data from a subsequent release of the source symbol. It reflects the revision ID and the lifecycle state of that revision which, for a new release, will always be in the
Plannedstate. - Action – this region of the entry shows the action that will be taken by the Release Manager, for this particular symbol, as part of the release process. For an entity that has not yet been released, this entry will display
Create New Item. The associated Status field is used to indicate the next step to be taken in the process (e.g.Requires Release Preparation) and, once the release process is complete, reflects the result. - Notes – the only editable section for a symbol's entry, fields are provided in which to enter a Comment and Description for the revision of the Schematic Symbol Item that is created in the vault upon release. By default, these are automatically populated with the name of the symbol (its Symbol Reference), and its Description (where defined).
- Enable – this checkbox controls whether the symbol is included as part of the release process (checked) or excluded from the process (unchecked).
The Document Options region above the grid presents default options when creating new Items in the target vault. The target vault itself cannot be changed here, but you can freely change other information including the target vault folder in which to release and the various schemes employed for Item Naming, Item Revision Naming and Lifecycle Definition.
In terms of Item Naming, what you set here will override whatever was set at the folder-level within the target vault. A wider choice of default naming schemes is presented here, including schemes to create an Item named using the component name specified in the source Schematic library:
- $COMPONENT_NAME
- $CONTENT_TYPE_CODE-$COMPONENT_NAME-001-{0000}
- $COMPONENT_NAME-$CONTENT_TYPE_CODE-001-{0000}
Use the associated First Index field to specify the base level Item – the starting point of the assigned Item ID range. If existing Items in the target vault already use the chosen Item Naming scheme, you can leave this index as 0, since the next available index in the scheme will automatically be used.
Preparing the Symbol for Release into the Vault
Before the symbol can be released to the target vault, the library document and corresponding Item for the symbol being released, must first be prepared. To do this, simply click the Prepare Items and Document button, to the right of the Analyze Document button.
On the vault side, the Item itself will be created, with initial revision in the Planned state. If re-releasing to an existing Item, the next planned revision will be created. This is important, so that this Item, and the unique ID assigned to it, are essentially locked-down – so no-one else releasing to the vault can create an Item with this same ID, or release to the same revision of an existing Item, before this release process is finalized.
On the document side, the source library document is saved with the link information. This is the link to the target vault and folder, along with the Item naming, lifecycle definition and revision naming schemes. At the lowest level, the symbol in the library will store information that links it to the corresponding named-revision of the Item in the vault that will receive and store the release data for it.
Once the preparation phase is complete, the Action-Status field will display Ready To Release.
With the document prepared for release, the Release Items button becomes available – this indicates readiness to proceed with the release.
Releasing the Symbol
To go ahead and release the symbol, click the Release Items button. The Confirm Release dialog will appear, allowing you to review the release actions either at a summary level, or at a more detailed level. If the release actions are correct, proceed to release by pressing OK.
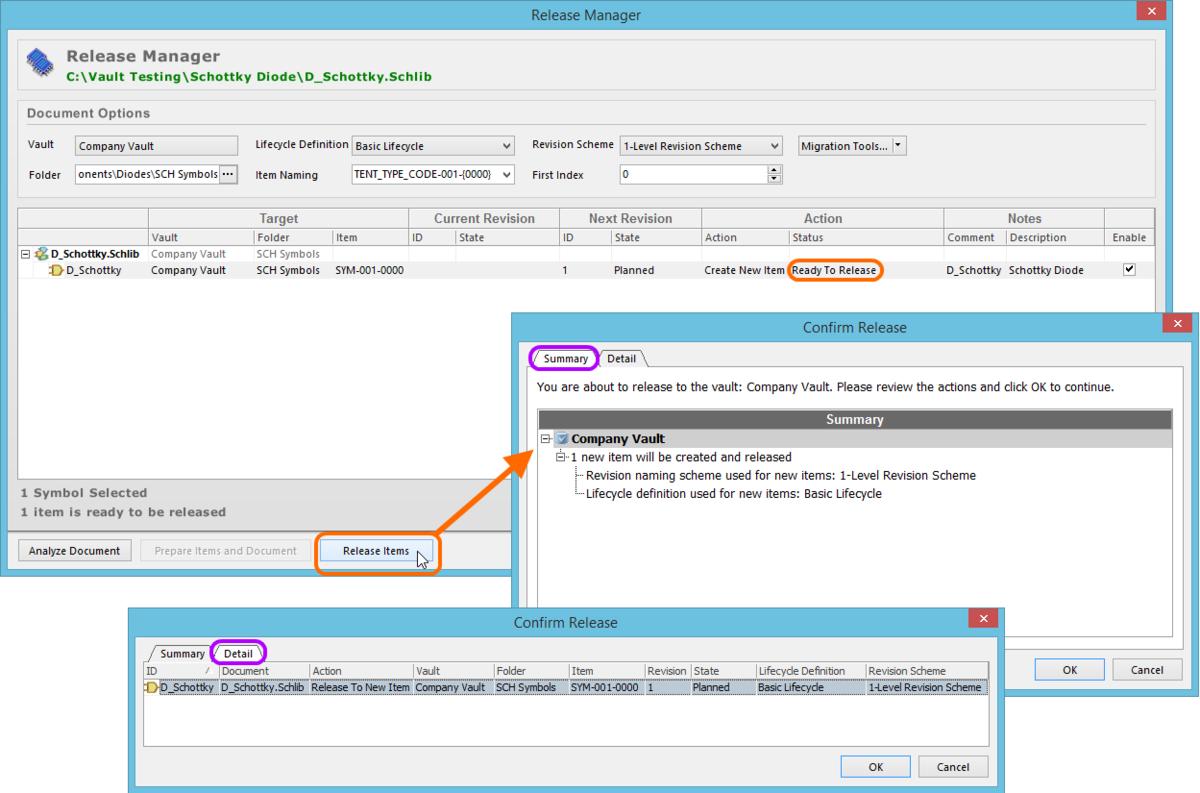
Review and confirm the actions that will be taken by the release process.
Back in the Release Manager dialog, the Action-Status field will display Release Running.... When the process completes, the Action-Status field will change to Release Succeeded – provided the release was successful.
After its release, information regarding the Item that the symbol is mapped to is displayed in the Vault Links region of the Schematic Symbol Properties dialog. Click the Show in Explorer button to browse the released symbol directly in the vault using the Vaults panel.
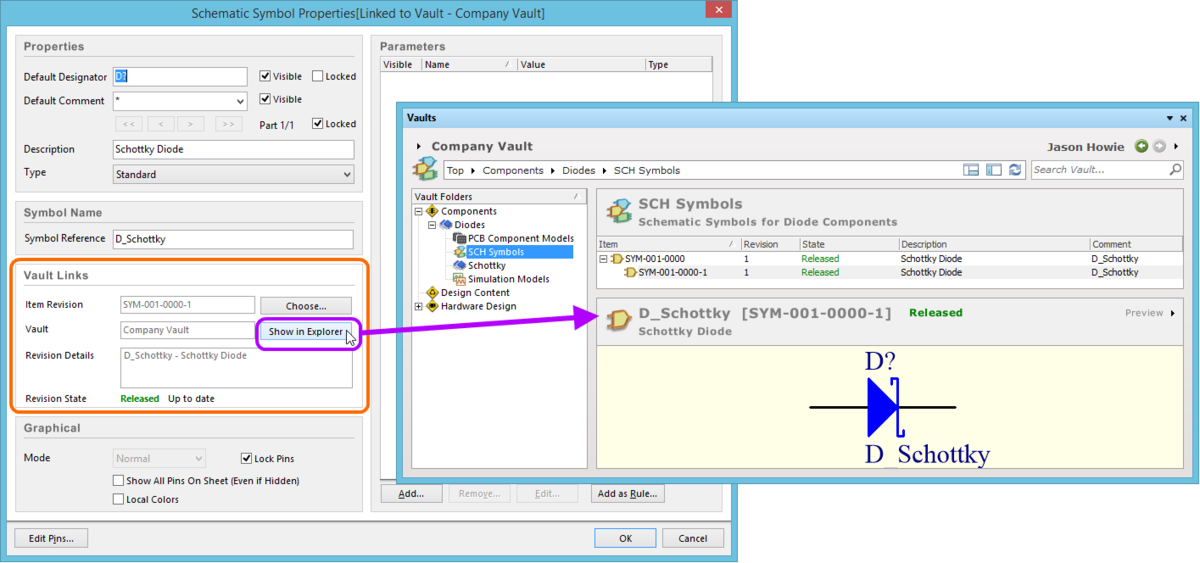
Example showing information about a symbol's mapped Item in the vault. Access the Vaults panel to browse the released Item directly within the vault.
When releasing a library document containing multiple symbols, the release process will essentially split the library as part of the release. For each released symbol, the released data stored in the vault consists of the model definition, saved in its own Schematic Library file, named using the Symbol Reference. So for a symbol named D_Schottky stored on the design-side in a library of symbols called Diodes.SchLib, the resulting released data will be a single library file named D_Schottky.SchLib, containing only that particular symbol (D_Schottky). If you have already split your library document on the design side, and are therefore releasing a library containing a single symbol only, the release data will simply be a snapshot of that library document.
Re-releasing the Schematic Symbol
With the source schematic library document linked to the vault and folder therein, re-releasing the symbol in that library – to take into account any modifications – is a straightforward process:
- Make changes to the symbol as required.
- Save the library file.
- Use the File » Release To <TargetVaultName> command.
The source library document and linked target folder and Items therein will be analyzed and the Release Manager dialog will present updated link and status information and ready the library and its constituent symbol for possible re-release. The action for a symbol that is being re-released now appears as To New Revision.
Note that all entries in the grid will be initially disabled from releasing by default. Use multi-select features and controls on the right-click menu to enable selected entries for re-release, or all entries, as required. Re-release is then a matter of two clicks – one to Prepare Items and Documents and one to Release Items.
Streamlined Re-release Through File-less Editing
Main article: File-less Editing in an Altium Vault
File-less editing frees you of the shackles of separate version-controlled source data. You can simply edit a supported Item type using a temporary editor loaded with the latest source direct from the vault itself. And once editing is complete, the entity is re-released into a subsequent planned revision of its parent Item, and the temporary editor closed. There are no files on your hard drive, no questioning whether you are working with the correct or latest source, and no having to maintain separate version control software. The Altium Vault handles it all, with the same great integrity you've come to expect, and in a manner that greatly expedites changes to your data.
Clearing the Link to a Released Item
If a source Schematic Library has its components fully defined in the traditional sense – with parameters and model links – then it could quite happily be used in the capacity of other component management methodologies. So you could link and release to a vault, then, keeping the vault links in-place, use the library standalone, as part of an IntLib, or as part of a DbLib/SVNDbLib. However, if the model links have never been defined, or have been inadvertently stripped as part of the library splitting process, you will not be able to add them in while the source symbol is linked to a Schematic Symbol Item in the target vault. No matter if wanting to use a DbLib or SVNDbLib, but preventing use of the SchLib in a standalone or integrated library capacity. To get the ability to add the model links back, you would need to sever the link with the vault.
Another need to sever the links between symbols and their existing vault Items might be if you require to release again to a new set of Items. For example, if you have previously released but then deleted the Items from the vault, the source library will still have defined links (although invalid as the vault Items would no longer be found). Similarly, if you need to release the source library to a different target vault.
Severing the Link
Severing the link to the vault can be done in two ways:
- Disable the Link To Vault option in the Library Editor Workspace dialog.
- Right-click in the grid region of the Release Manager dialog and choose the Clear Vault Links In Documents command.
Doing so will also revert the Schematic Symbol Properties dialog back to the Library Component Properties dialog.
Re-establishing the Link
If you need to re-establish the original link between the source library document and the released Item in the vault, you will need to perform the following:
- Link back to the same vault and folder (containing the original released Schematic Symbol Item). This involves enabling the Link To Vault option again in the Library Editor Workspace dialog, and specifying the required Target Vault and Target Folder.
- Re-link the source symbol with its original released Item by choosing that Item (and latest revision thereof) from the Vault Links region of the Schematic Symbol Properties dialog. If this is not done, it is possible to release the same source symbol to a different (and new) Item in the vault!
- Save the library document.
Releasing Multiple Schematic Library Files
Main article: Batch Releasing to a Vault with the Release Manager
When migrating components from existing component management methodologies to the next-generation vault-based component model, releasing Schematic Libraries each containing a single symbol can be a tedious task – especially since release of a single Schematic Library file requires that file to be open and active in Altium Designer. This is also the case if changes have been made affecting symbols across an array of source Schematic Libraries, that need to be re-released into a new revision of each target Schematic Symbol Item.
To facilitate the release of multiple libraries to a target vault simultaneously, Altium Designer provides a Release Manager (File » Release Manager). Unlike the streamlined version of this dialog – which is concerned with the active document only – this is the full release 'console'. Use it to batch-release symbols stored across multiple Schematic Libraries in a nominated source folder location.
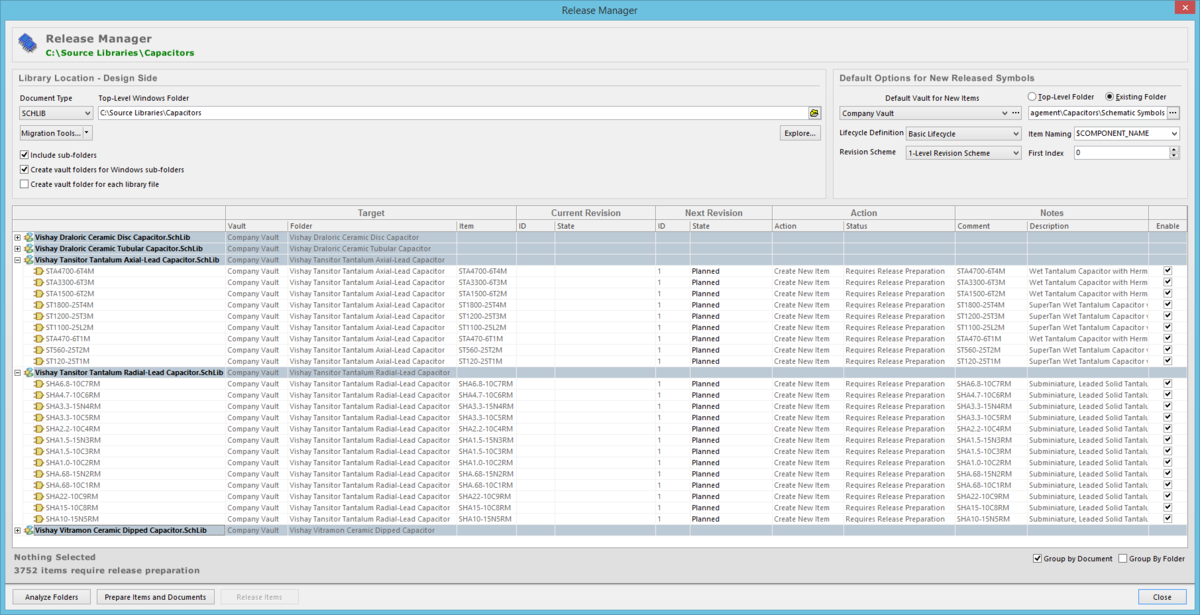
Release symbols, stored in one or more source Schematic Libraries, using the Release Manager.