Component Templates
Contents
- The Component Template Item Type
- Item Lifecycle Definition and Revision Naming
- The CMPT (Component Template) Editor
- Defining the Template
- Specifying Document Options
- Defining Parameters
- Column Ordering and Sizing
- Sorting
- Column-based Filtering
- Referencing a Component Template
- Manually from within the CmpLib
- Inherited from the Component Library Vault Folder
- Impact on CmpLib Parameters when using a Component Template
Altium Vault 2.5, in conjunction with Altium Designer 15.1, brings support for creating and defining Component Templates. Just as a schematic template can be used to predefine information on schematic sheets that reference it, a component template is referenced by a component library (CmpLib), and provides predefined settings for use by component definitions defined therein.
In particular, component templates have been developed with parametric information firmly in mind, allowing you define, in a single location, a 'bucket set' of parameters that will be made available to the referencing component library. Through the template, you can control which of those parameters are to be made visible, fill-in default values, and even mark those parameters that are required as mandatory. In addition, you can also force the use of parameters, marking them as required. Validation checks are in-place at the time of component definition release, to ensure compliance.
The Component Template Item Type
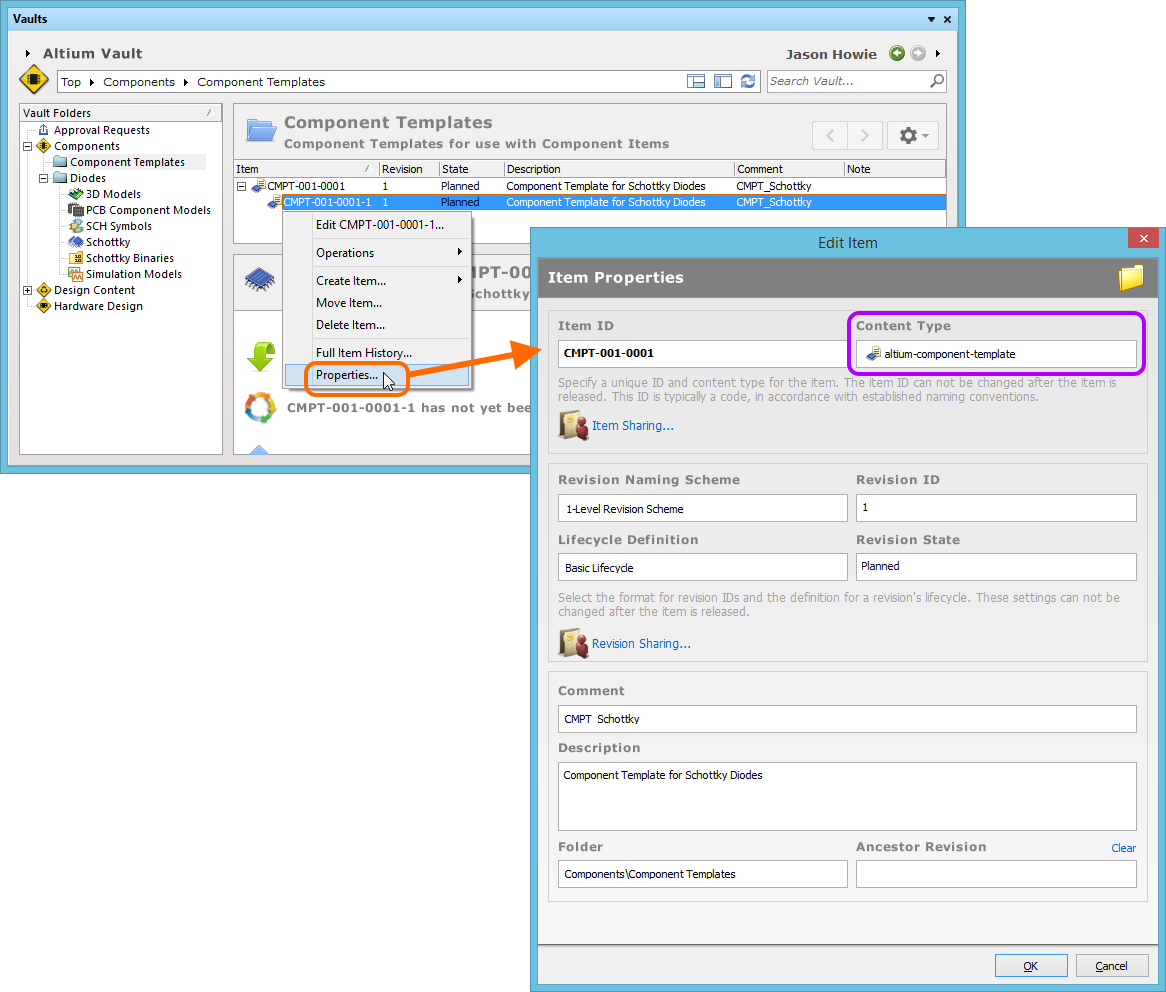
A defined component template (.cmpt) is stored within revisions of a Component Template Item. Each release of the template stores the template data into a new revision of that Item. When creating the target Component Template Item in which to store your template, ensure that its Content Type is set to altium-component-template.
An example Component Template Item.
Item Lifecycle Definition and Revision Naming
When defining the Component Template Item, whose revisions will accommodate releases of the source component template, be sure to specify the type of lifecycle management to be used for the Item, and the naming scheme employed for its revisions, respectively.
Specify the required schemes in the Item Properties dialog, using the Lifecycle Definition and Revision Naming Scheme fields respectively.
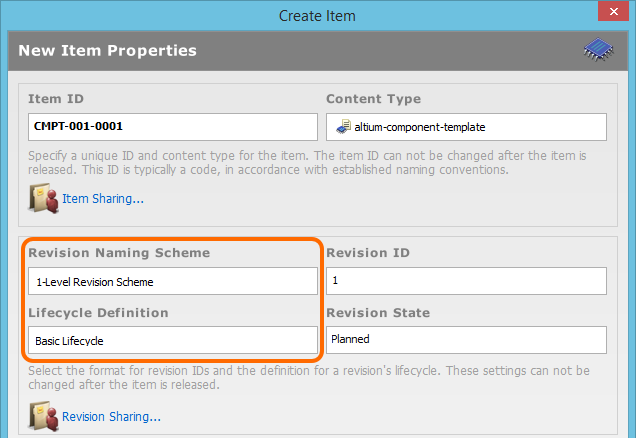
Selecting the Lifecycle Definition and Revision Naming scheme for a manually created Item.
The CMPT (Component Template) Editor
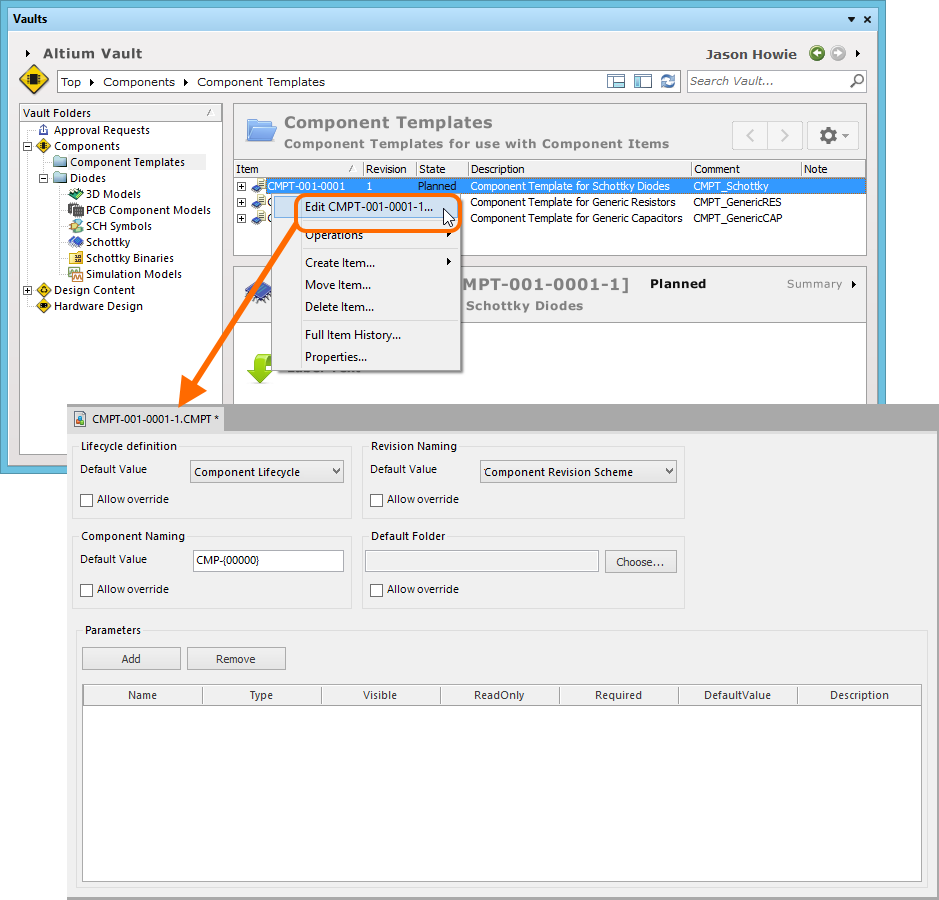
A component template itself is defined using the CMPT Editor. This is a temporary file-less editor delivered through a purpose-made extension - the Component Template Editor extension.

The Component Template Editor extension.
The CMP Editor is accessed by:
- Right-clicking on the required existing revision of a Component Template Item in the Vaults panel, and choosing the Edit command from the context menu.
- When creating a new Component Template Item, and the Open for editing after creation option is enabled, in the Create Item dialog.
When accessed, the editor presents a component template file, pre-linked to the revision of the Component Template Item (by virtue of the file-less editing methodology). The file is therefore named using the Item Revision full ID, in the format <Item>-<Revision>.cmpt (e.g. CMPT-001-0001-1.cmpt).
Accessing the CMPT Editor - providing file-less editing of the component template file (*.cmpt).
Defining the Template
The template editor is essentially divided into two main regions - one for defining the document options for a CmpLib that references the template, and one for defining the parameters to be used in that CmpLib.
Specifying Document Options
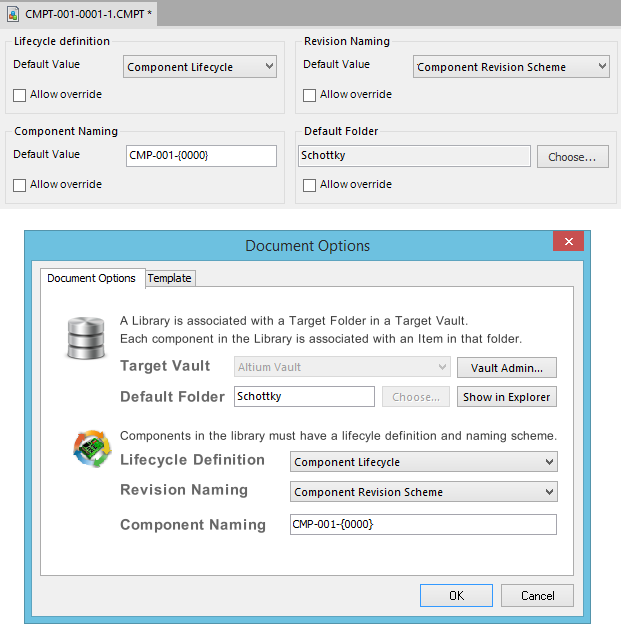
The top half of the editor is dedicated to defining default values for the following Component Library properties:
- Lifecycle Definition - use the drop-down field to choose from all definitions defined for the vault.
- Revision Naming - use the drop-down field to choose from all schemes defined for the vault.
- Component Naming - use this field to define a default Item Naming Scheme for components released from the CmpLib file, ensuring a unique ID for each resulting Component Item in the vault. The entry here will be used as the template for automatically naming a newly-added component definition (in its associated Name field). The software will automatically assign the next available unique ID, based on that scheme, having scanned the entire vault and identifiers of existing Items. A default Item naming scheme – CMP-{00000} – is provided, but you can of course create your own scheme, simply by typing it within the field, ensuring that the variable portion is enclosed in curly braces (e.g. CMP-001-{0000}).
- Default Folder - to specify a default folder within the target vault in which to store the released Component Items. Do this by clicking the Choose button to access the Choose Folder dialog - a cut-down version of the Vaults panel, from where you can browse to, and choose, an existing folder in the vault, or create a new one on-the-fly.
When the template is referenced, the entries specified here are used to pre-fill the corresponding fields on the
Document Options tab of the Document Options dialog - over in the referencing CmpLib file.
Defining Parameters
The lower half of the editor is dedicated to defining and managing the parameters that will be made available to the referencing Component Library.
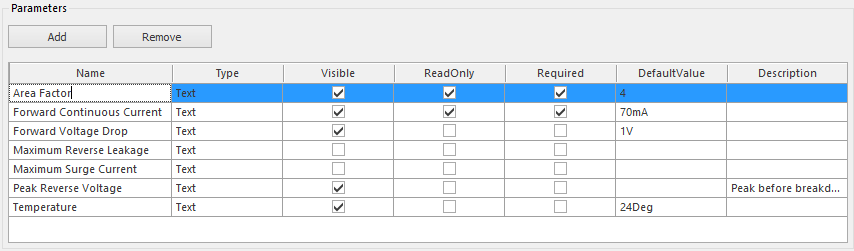
Example parameters defined within a component template.
To add a new parameter to the list, simply click the Add button (or use the Add command from the right-click context menu) - the parameter is added to the bottom of the current list. Each parameter is presented in the grid-like listing in terms of the following information:
- Name - use this field to name the parameter, typically a meaningful name that conveys its purpose. When initially added, parameters will be given default names (Parameter, Parameter1, Parameter2, and so on).
- Type - the type of parameter, of which Text is the only type currently supported.
- Visible - enable this option to have the corresponding Show option for the parameter enabled in the referencing CmpLib. This, in turn, controls the display of the corresponding column for that parameter in the lower region of the CmpLib Editor – where the component definitions themselves are defined.
- ReadOnly - enable this option to make the parameter read-only. In the referencing CmpLib, the value for the parameter will be made non-editable.
- Required - enable this option to make the parameter a 'required parameter'. In the referencing CmpLib, the parameter must have a value defined for it, otherwise release of the associated component definition will not be possible. In the CmpLib, such a parameter is distinguished by the value cell having a red border, when no value has been entered.
- DefaultValue - use this field to enter a default value for the parameter.
- Description - add any description for the parameter, for example a concise note about what it provides.
The parameters list also supports simple copy and paste actions, allowing you to duplicate an existing parameter. The copied parameter will be added to the bottom of the list.
Bear in mind that two parameters cannot have the same name. When pasting a copied parameter, be sure to change the name. If not, an error dialog will prompt you to do so, with an indication of the field in error. Click Yes to fix the name. If you click No, the pasted parameter will be removed.

Duplicate parameter names are not permitted.
Column Ordering and Sizing
The order of the columns is customizable. Simply click on a column's header and drag it horizontally to the required new position. Valid positions are highlighted by vertical positional arrows.
Sorting
Parameters can be sorted by a specific column simply by clicking on that column's header. Click once to sort in ascending order (based on the content of that column). Click again to sort in descending order.
You can sort by multiple columns. With the parameters already sorted by a specific column, simply Shift+click on another column to 'sub-sort' by the content of that column.
Column-based Filtering
Like an Excel spreadsheet, the parameters can be further filtered by the contents of each column. To do this, click the small funnel (filter) icon, located at the right-hand side of a column header (![]() ). A menu will appear containing an entry for each value present in that column. Click an entry to reduce the list to only include parameters with that value.
). A menu will appear containing an entry for each value present in that column. Click an entry to reduce the list to only include parameters with that value.
Alternatively, for greater filtering control select (Custom..), which displays the Custom AutoFilter dialog. Use this dialog to set up a custom filter to meet your requirements, by specifying which rows of information you want to show based on filter criteria you apply to the data column.
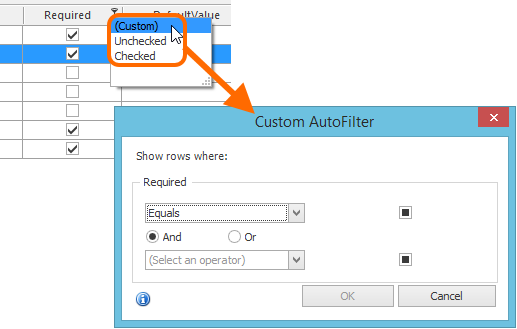
Choose to apply standard or customized column filtering.
When a column filter is applied, the filter icon is displayed in blue (![]() ), indicating that there is filtering applied based on that column. Filtering can be applied to multiple data columns. Each 'column filter' becomes an ANDed condition in the overall filter. A textual representation of the filtering currently in effect will be presented at the bottom of the region.
), indicating that there is filtering applied based on that column. Filtering can be applied to multiple data columns. Each 'column filter' becomes an ANDed condition in the overall filter. A textual representation of the filtering currently in effect will be presented at the bottom of the region.
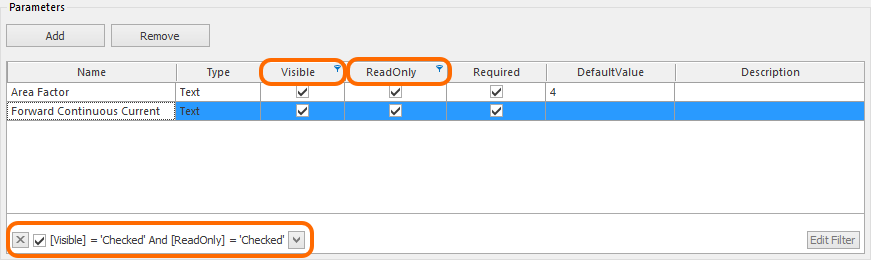
An example of column filtering in action.
To further customize the current filter, click the Edit Filter button, to the far right of the textual representation of the filter, to open the Filter Editor dialog. Use this dialog to create more sophisticated and complex filters as needed.
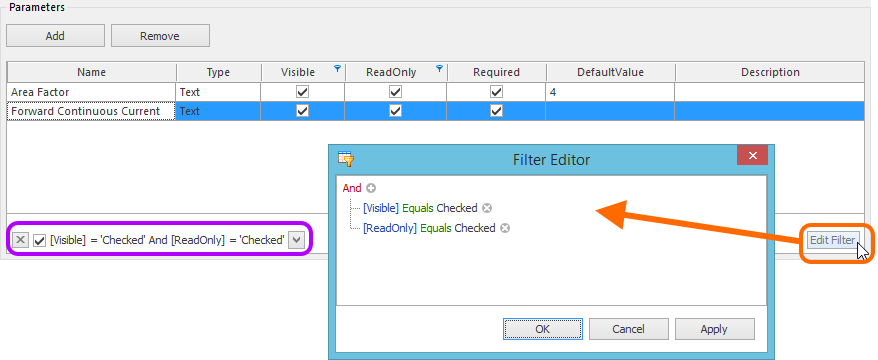
Use the Filter Editor to create more sophisticated filtering.
Referencing a Component Template
Using a revision of a Component Template Item - or rather referencing one from the component library used to edit a specific Component Item Revision - can be performed in the following ways.
Manually from within the CmpLib
There are two ways of 'hooking up' a Component Template to the component library used for the Component Item Revision currently being edited:
- From the Template tab of the Document Options dialog (Edit » Document Options). Simply click the Choose button to the right of the Item Revision field. This gives access to the Choose Item dialog – essentially a trimmed incarnation of the Vaults panel. Use this dialog to browse to, and select the revision of the required Component Template Item. After clicking OK, a link will be created between the component library and the target revision of the Component Template Item. Evidence of this link can be seen back on the Template tab of the Document Options dialog.

Manually linking the component library to a revision of a Component Template Item, in the target vault.
- From the Add menu associated with the Required Models/Parameters region of the CmpLib Editor. The Templates sub-menu lists all Component Template Items currently available in the same Altium Vault in which the Component Item itself resides. Simply click on an entry to create a link to the latest revision of that Component Template Item. Once again, verification of the link can be seen on the Templates tab of the Document Options dialog.
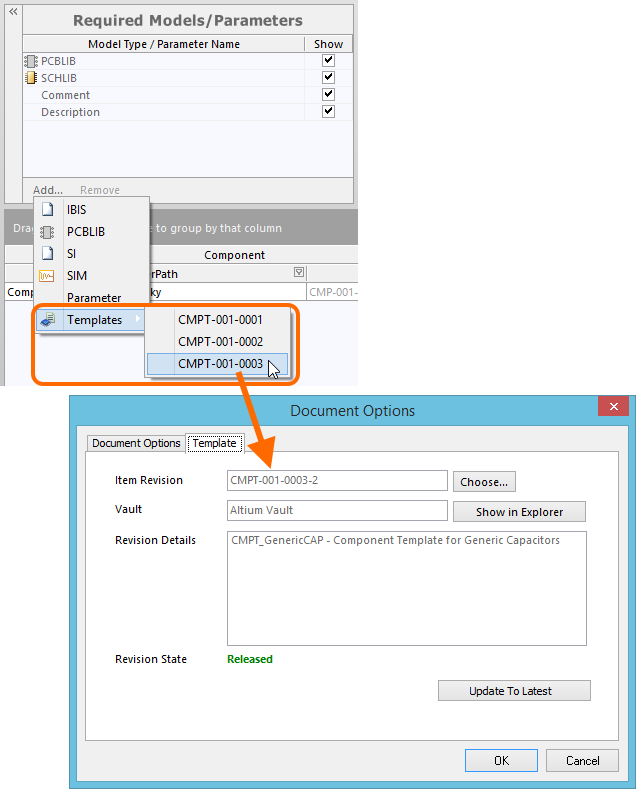
Quickly linking a Component Template Item from a menu of all available templates.
Inherited from the Component Library Vault Folder
You can specify a Component Template Item to be automatically used for all Component Items (and revisions thereof) stored within a Component Library folder within the vault.
Specify the required template using the Component Template field, when defining the folder's properties, in the Edit Folder dialog. The field's associated drop-down lists all Component Template Items currently available in the same Altium Vault in which the Component Library folder itself resides. Simply choose an entry to create a link to the latest revision of that Component Template Item, for each Component Item created within that folder.
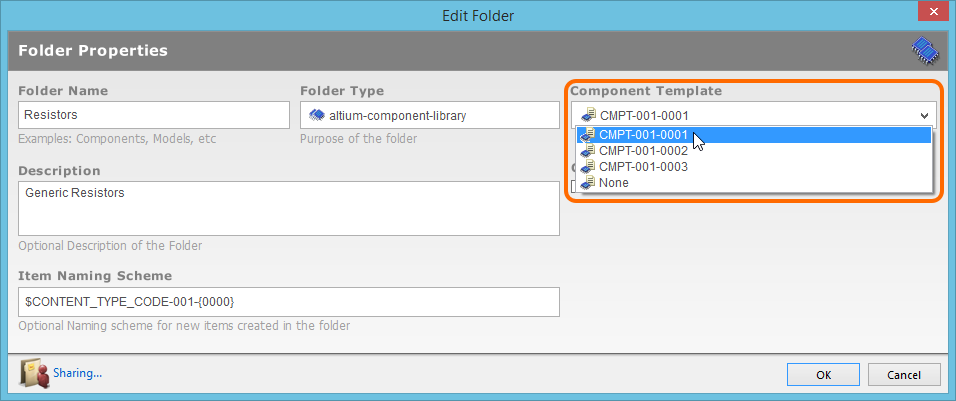
Specify a default Component Template Item, to be applied to all Component Items created within the Component Library folder.
Impact on CmpLib Parameters when using a Component Template
When editing a revision of a Component Item, and a revision of a Component Template Item is linked to/referenced, the following happens within the Component Library Editor, with respect to parameters:
- The parameters defined within the referenced template are added to the Required Models/Parameters region.
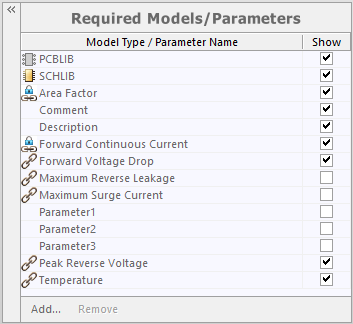
Example of parameters after linking to a revision of a Component
Template Item.
- The template-based parameters are grouped together in the component definitions area of the editor, with the unique ID for the referenced Component Template Item used as the header text.

Appearance of example template-based parameters in the area where the component definitions themselves are defined.