Enhancements to the Vault Migration Tool
Contents
A number of beneficial enhancements have been made to the latest version of the Vault Migration Tool - version 1.3.0.7. These range from the cosmetic (updating nomenclature in line with the current naming of the latest vault technology; Altium Vault), through to the helpful (better error reporting if trying to migrate data from v1.1 of the Altium Personal Vault), and on to prime new functionality (the ability to migrate from using a Firebird database to an Oracle database, as the back-end).
Migrating from Firebird-based to Oracle-based Installation
Many organizations already utilize an Oracle database as the back-end for their existing systems. Hosting the Altium Vault on their existing infrastructure is an attractive proposition, since it reduces installation and management complexity. And while the Oracle database type can be chosen directly as part of initial vault installation, many designers choose to first experience the Altium Vault in its default guise, a guise that uses a Firebird database as the back-end for data storage. This could be to 'test the waters' as it were, before integration with their existing Oracle database, or it could be that an Oracle-based system is introduced into their organization at a later stage.
Whatever the reason, there needs to be a streamlined tool for taking the current Altium Vault-on-Firebird installation, and essentially switching to an Altium Vault-on-Oracle installation, with data migrated safely and securely between the two. This migration functionality is now available as an additional mode in the Vault Migration Tool.
Pre-Migration Preparation
Before migration can proceed, there are some prerequisite steps that need to be performed – 'pre-migratory' checks, as it were.
- To access the Vault Migration Tool, you need to first download and run a small executable –
VaultMigrationTool.exe. This executable can be obtained by downloading a zip file, available from the Legacy Downloads for Vault Technologies page, and can be saved anywhere on your hard disk. Extract the downloaded zip file, which contains this executable, along with the filesVaultMigrationTool.exe.manifest(which ensures the utility is run as administrator) andVaultMigrationTool.sql(providing the smarts of the migration features). - Your current vault must be an Altium Vault (version 2.0 or later). If using a legacy Altium Vault Server (v1.1, v1.2), upgrade to a later version of vault first. For more information, see the section Updating the Vault Installation, in the document Altium Vault - Details for IT Departments.
Migrating the Data
Right-click on the VaultMigrationTool.exe file and elect to Run as administrator. The Vault Migration Tool dialog will appear. The tool can be configured in different modes, to suit a variety of different purposes. Simply choose the last entry in the Migration Mode region: Altium Vault (Firebird) -> Altium Vault (Oracle).
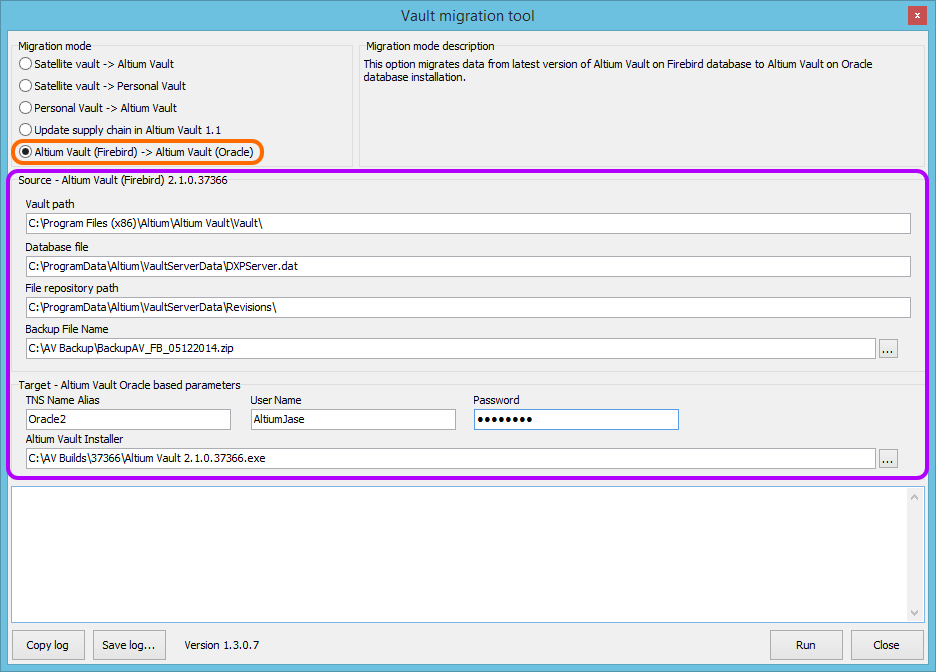
Use the Vault Migration Tool to move from using an Altium Vault based on Firebird database installation, to an installation that is based on an Oracle database backend.
Use the various fields in the dialog to specify information required by the migration process. This information primarily relates to installation paths for the source (existing) Firebird-based Altium Vault, and options relating to installation of the new target (Oracle-based) Altium Vault, as well as parameters for access to the organization's Oracle database.
- Source - Altium Vault (Firebird) - this region provides controls for specifying the following information, relating to the source (existing) Firebird-based Altium Vault:
- Vault Path - enter here the path to the source Altium Vault executable folder. For a default Altium Vault installation, this will be
\Program Files (x86)\Altium\Altium Vault\Vault\. For a non-default install, this will be in the location to which you installed the original vault. Double-clicking on the field will give access to the Select Directory dialog, which can be used to browse to, and select, the required directory. - Database file - enter here the path to the Altium Vault database file. For a default Altium Vault installation, this will be
\ProgramData\Altium\VaultServerData\DXPServer.dat. For a non-default install, this will be in the location to which you stored that folder. - File repository path - enter here the path to the Altium Vault file repository. For a default Altium Vault installation, this will be
\ProgramData\Altium\VaultServerData\Revisions\. For a non-default install, this will be in the location to which you stored that folder.
- Vault Path - enter here the path to the source Altium Vault executable folder. For a default Altium Vault installation, this will be
- Target - Altium Vault Oracle based parameters - this region provides controls for specifying the following information, relating to access of the organization's Oracle database:
- TNS Alias - enter the TNS Alias defined for the Oracle database to which you wish to connect. The TNS (Transparent Network Substrate) Alias is a pointer to the database. It includes the server address, port and SID (Service Identifier). The alias is declared and defined in the relevant tnsnames.ora file.
- User Name - enter here the username portion of your Oracle database login credentials.
- Password - enter here the password portion of your Oracle database login credentials.
- Altium Vault Installer - enter here the path to the Altium Vault Installer executable. This is used to install the Altium Vault again, but this time using Oracle as the database back-end.
- Backup File Name - enter here the path to a backup zip archive (*.zip). Essentially, you are specifying where, and under what name, a backup file is to be created by the Backup Tool. A backup of the original Firebird-based vault is made as a matter of course, more for peace of mind, just in case any technical glitches do occur in the migration process.
With all required information specified, click the Run button to proceed with the migration. As migration proceeds, messages will be displayed on the tool's progress in the lower region of the dialog. The process completes with the final message "Migration successfully finished". The actual migration process can be broken down as follows:
- The Backup Tool is launched, and makes a backup zip of the current Altium Vault install, in accordance with the entry specified in the Backup File Name field.
- The current Altium Vault is uninstalled - leaving the data intact.
- The Altium Vault is then re-installed, using the executable specified in the Altium Vault Installer field.
- The database connection parameters are passed to the Installer from the Vault Migration Tool (TNS Alias, User Name, and Password), and all data is then copied from the original Firebird database to the Oracle database (both databases have the same structure).

Example message stream (taken from the MigrationToolLog.txt file) for a successful migration from a Firebird-based Altium
Vault, to an Oracle-based Altium Vault.
Better Error Reporting
The following check has been included in this latest release of the Vault Migration Tool:
- If you are trying to migrate data from version 1.1 of the Altium Personal Vault, to an Altium Vault (2.0 or later), you will be alerted that this is not supported. You will need to first upgrade your Personal Vault from v1.1 to v1.2, and then perform the migration.