AltiumLive Dashboard - Managing Users
Contents
Parent article: AltiumLive - Dashboard
Main page for managing users within the Dashboard.
The Users page is part of the AltiumLive Dashboard. Use this page to manage the users in the account. A user is simply a person who it is intended will use a licensed seat of an Altium Design solution. Users can access various features and capabilities within the AltiumLive community, determined through the relationship they have with their parent Organization.
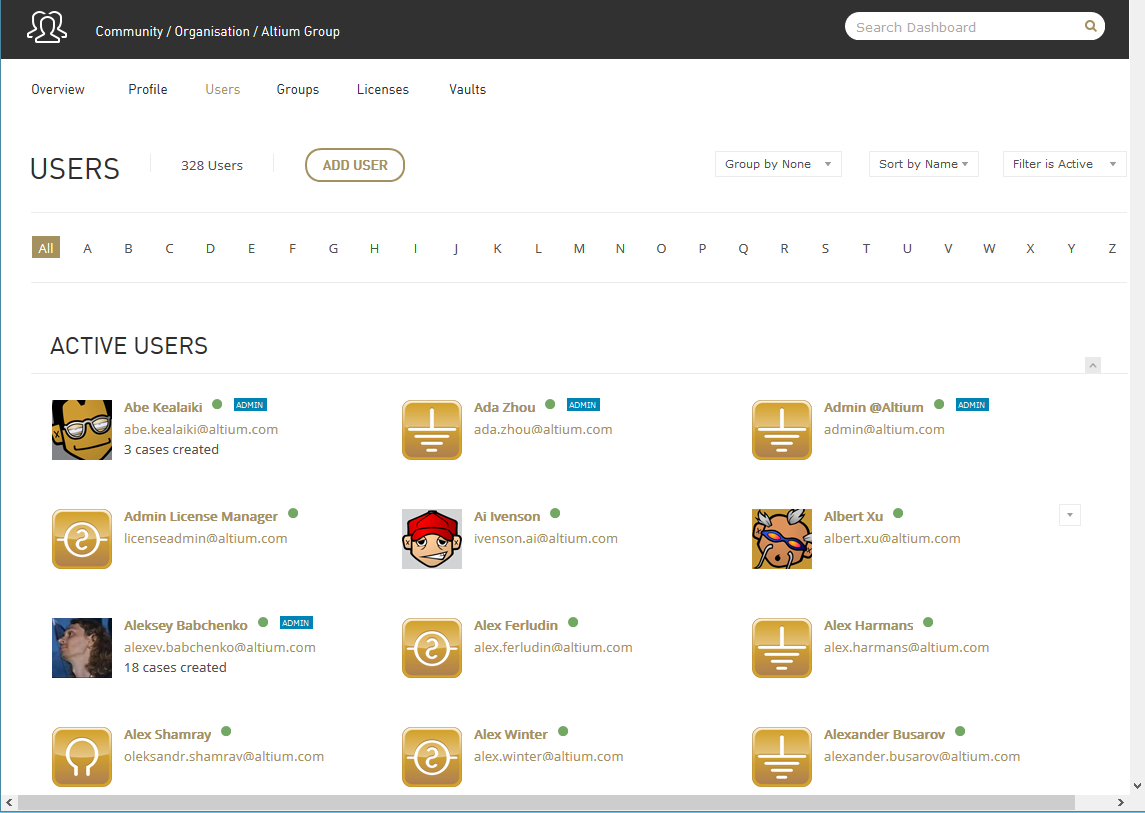
Top-Level Listing of Users
The page initially presents a top-level listing of all active users in the account. Each user in the list is displayed in terms of:
- User Name
- Email address
- An avatar icon/image uploaded as part of their AltiumLive account.
If a user is an administrator for the account – is therefore a member of the Group Administrators group – they will have the ![]() icon next to their name.
icon next to their name.
An active user is denoted by the ![]() icon next to their name. When the list view is changed to display inactive users as well – for example when filtering to show all users in the account – an inactive user is denoted by the
icon next to their name. When the list view is changed to display inactive users as well – for example when filtering to show all users in the account – an inactive user is denoted by the ![]() icon next to their name.
icon next to their name.
Grouping, Sorting and Filtering
Controls located above the list allow you to group, sort and filter the list in a variety of ways, to better target the users that you wish to view and/or manage.
-
Group By – use the options here to group the users by a specific criteria. Three options are available:
Group(arrange users according to the groups they belong to);Status(arrange users according to whether they are active or inactive);None(no grouping – all users presented in a single list). -
Sort By – use the options here to sort the users by a specific criteria. Two options are available:
Name(sort alphabetically by name, in ascending order from A-Z);Email(sort alphabetically by email address, in ascending order from A-Z). Note that sorted lists are read left-to-right, top-to-bottom. -
Filter – use the options here to filter the users by a specific criteria. Three options are available:
Active(present only users who are currently active on the account);Inactive(present only users who are currently inactive (have been deactivated));All(present all users associated to the account – both active and inactive).
By default, the Users page has the following settings when accessed: Group By – None, Sort By – Name, Filter – Active.
Adding a User
To add a new user for the account, simply click on the Add User button, located at the top-left of the page. The detailed Add User page will appear, from where you can specify the contact details and additional group membership for that user.

When you click to add a new user, you will be presented with a page to specify that user and group membership.
In the Personal Details region of the page, specify the contact details for the user – especially their first and last name, and their Email address (marked as required fields with a red asterisk). To the left of these details is the user's profile picture. This picture is used throughout the AltiumLive community to help identify the user. A default 'shadow head' image will be assigned initially, but this can be changed after the user has been added to the account. The user will also be able to personalize their profile picture after they are added to the account, by signing into AltiumLive and accessing their personal account information.
Specify also which of the additional existing groups the user is to be made a member of, if required. By default, all users are added to the system group All Account Members. If the user is required to have administrative powers, check the box next to the Group Administrators entry.
Fill out personal details for the user and assign to one or more additional existing groups as required.
Once all details are filled out and specified as required, click the Add button – the new user will be created and added to the account.
Upon addition and activation, an email from Altium Support will be sent to that user, containing their AltiumLive Account Credentials – their username (email address) and temporary password.
Armed with these credentials they are able to sign-in, access and use an applicable license for their Altium Design solution, and also sign-in and participate within the AltiumLive community. What they can do within the community depends on the capabilities and features available to their parent Organization. In other words, the users inherit access and use of AltiumLive Services that are available to their Organization.
Editing an Existing User
To edit an existing user for the account, either click on an individual user's name in a user list, or use the Edit command from the associated control drop-down. This will give access to the detailed page for that user.
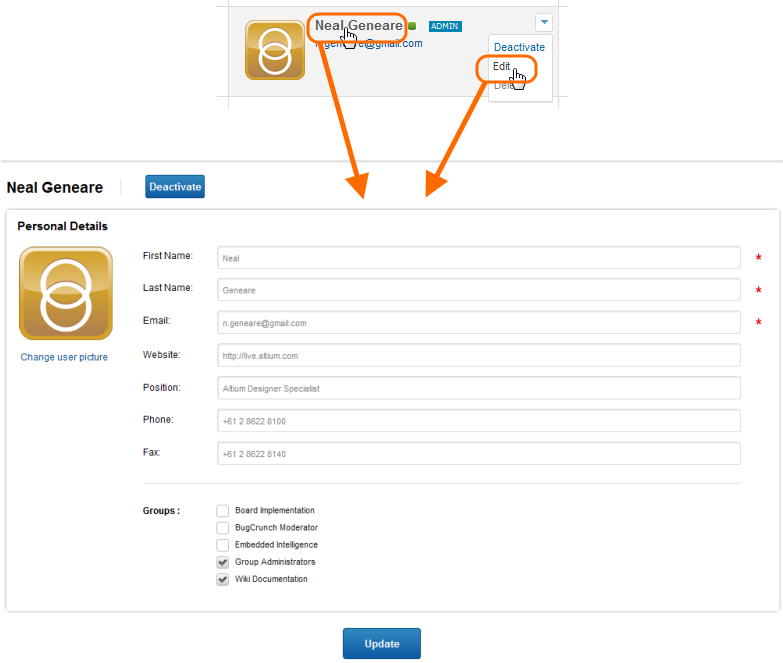
Access and make changes to a user on the account as required.
Make any changes to the contact details for that user and group assignment as required. You will also be able to change the user's profile picture – click the Change user picture link, then in the pop-up window that appears, browse to, select and upload the required image – maximum size 220x220 pixels and stored in JPG or PNG format. Note however, that the user can assign their profile picture independently when accessing their account in AltiumLive.
Change the profile picture for a user as required.
When all modifications have been made as required, simply click the Update button to effect those changes.
Deactivating a User
If, for any reason, you need to suspend user-access to your Altium Account, this can be achieved by 'deactivating' a user. Unlike deletion, a deactivated user remains associated to the account, and can be 'reactivated' again at any time in the future. They are simply rendered inactive, and any resources assigned to them become freed up for re-assignment to other users.
Deactivation of a currently active user can be performed from a top-level user list (using the available Deactivate command), or from the detailed page for that user (by clicking the Deactivate button). For the latter, once the process is complete the page will update, presenting verification of the deactivation. Notice that the Groups have been removed, leaving only the user's contact details and last profile picture uploaded. This information can still be updated while the user is in an inactive state.
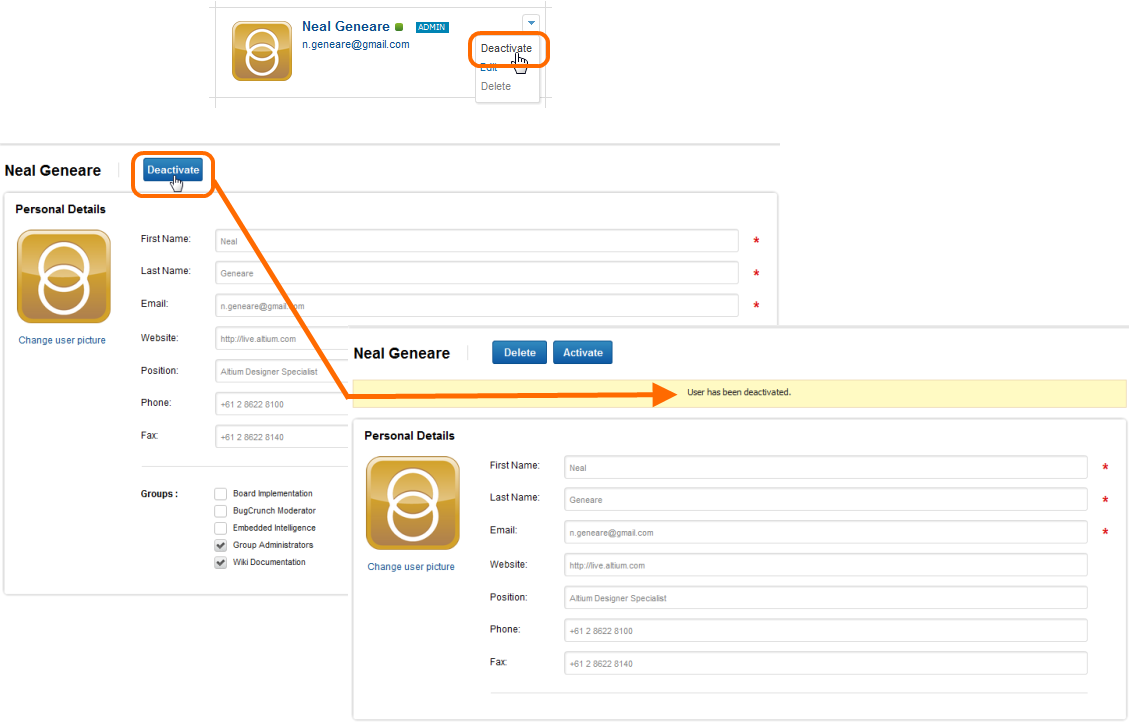
Deactivate a user when you want to keep them attached to your Altium Account, but without assigning any resources to them.
Deactivation will result in the user not being able to sign into the Altium Account – so no access from within Altium Designer, and no access to the AltiumLive community.
You can quickly see which users are currently inactive on your Altium Account by either setting the Group By control for user lists to Status, or by setting the Filter control to Inactive.
Reactivation
Reactivation of a currently inactive user can be performed from a top-level user list (using the available Activate command), or from the detailed page for that user (by clicking the Activate button). For the latter, once the process is complete the page will update, presenting verification of the activation. Notice that the Groups have been added – make assignments as required.
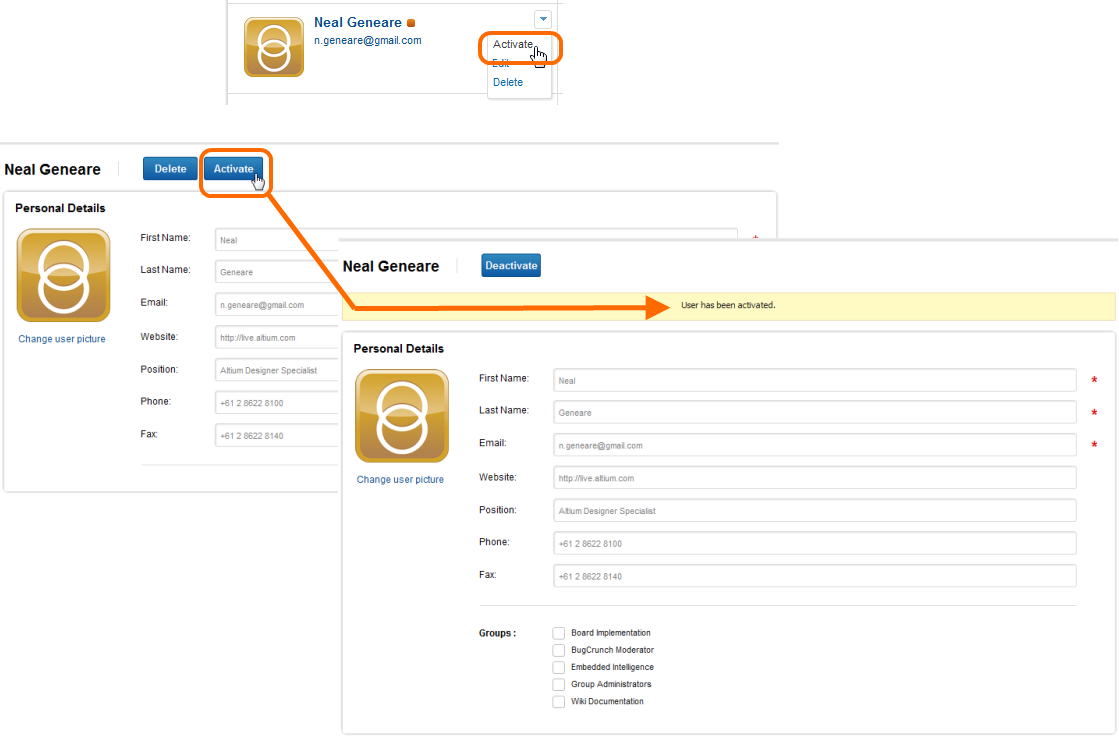
Reactivate a currently inactive user.
Activation of the user will send an email to that user with a new (reset) temporary password, so that they can once again sign into the account from within Altium Designer and access applicable licenses available to them, and once again access the AltiumLive community.
You can quickly see which users are currently active on your Altium Account by either setting the Group By control for user lists to Status, or by setting the Filter control to Active.
Resetting a User's AltiumLive Password
A user's AltiumLive account password can be reset in two ways:
- By a Group Administrator from within the Dashboard. This is performed by deactivating, then reactivating the required user. It is the act of activation that triggers the password reset and issuance of an email to that user containing a new, temporary password.
- By the user. This is performed from the AltiumLive Sign-In page by clicking the Forgot Password link. An email will be sent to that user containing a new, temporary password.
Emailing a User
Having performed some action relating to a user in the account, as an administrator you may want to notify that user, especially if it gives them access or new abilities that they would otherwise not be aware of. An email can be sent to a user by clicking on their email address entry at the list level. As the URL contains the 'mailto' entry, your email client will be accessed (if running) or launched (if not), with a new email composed ready with that user's address. Simply type your mail content and send off to the targeted user.
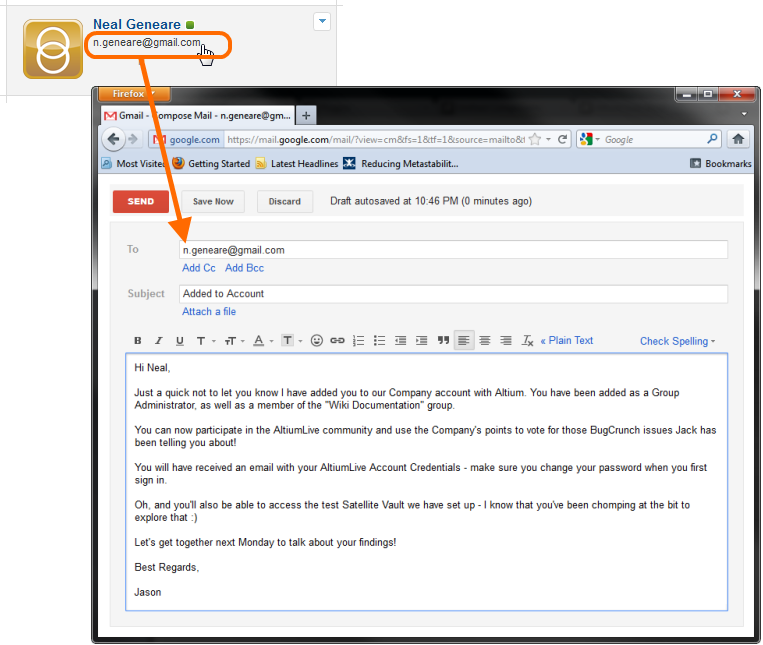
Send an email to a user to notify them of changes, as required.
Deleting a User
Once a user has been deactivated, they can be subsequently deleted from the account. Deletion of a currently inactive user can be performed from a top-level user list (using the available Delete command), or from the detailed page for that user (by clicking the Delete button). A dialog will appear asking for confirmation to proceed with the deletion. Click OK to proceed, after which the user will be deleted from the account.
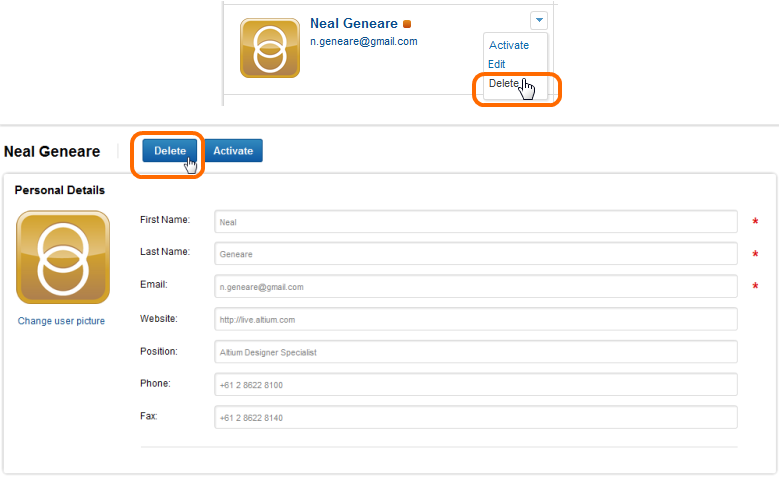
Access the control for deleting an existing user from within a top-level list view of users, or the detailed page for that user.