Libraries
Contents
- Summary
- Panel Access
- Content and Use
- Making Libraries Available
- Project Tab
- Installed Tab
- Search Path Tab
- Elements of the Libraries Panel
- Browsing and Placing from the Current Library
- Setting the Browse Mode for Library Types
- Display of Component Information
- Placing the Selected Component
- Searching for Components
- Filtering Components in the Current Library
- Incremental Search
- Searching Across Libraries
- Setting the Search Filter
- Setting the Scope
- Advanced Query Searching
- Search Results
- Searching for a Database Component
- See Also
Parent page: IntegratedLibrary((Panels))

Use the Libraries panel to access components in libraries currently available in Altium Designer.
Summary
The Libraries panel enables you to browse and place components from the libraries currently available in Altium Designer.
Panel Access
To display the Libraries panel:
- In the PCB Editor, select Design » Browse Components
- In the Schematic Editor, select Design » Browse Library
- Click the System button at the bottom-right of Altium Designer and select the Libraries entry from the pop-up menu that appears.
Use the System button to display the Libraries panel, the tick indicates that the panel is already opened in the workspace.
Panels can be configured to be floating in the editor space or docked to sides of the screen. If the Libraries panel is currently in the group of docked Workspace panels, use the Libraries tab located at the bottom of the panels to bring it to the front.
If the panel is already open and docked with other panels, use the Libraries tab to bring it to the front.
Content and Use
In Altium Designer, components, footprints and other models can only be used from available libraries. The term available libraries means those libraries that:
- belong to the active project (the project currently selected in the Projects panel), or
- have been installed in Altium Designer, or
- are available on a defined search path. Search paths are a project setting, only those defined in the active project can be accessed.
Once libraries have been made available the contents of one of those libraries is presented in the Libraries panel, and components can be placed from it.
Making Libraries Available
All three of the methods of making a library available are configured in the Available Libraries dialog, click the Libraries button ![]() at the top of the panel to open the dialog. Alternatively, select Add/Remove Libraries from the Design menu in the Schematic or PCB editor. The dialog has three tabs, which are described in the following sections.
at the top of the panel to open the dialog. Alternatively, select Add/Remove Libraries from the Design menu in the Schematic or PCB editor. The dialog has three tabs, which are described in the following sections.
Project Tab
This tab lists all of the libraries that are part of the active project (the project currently selected in the Projects panel).
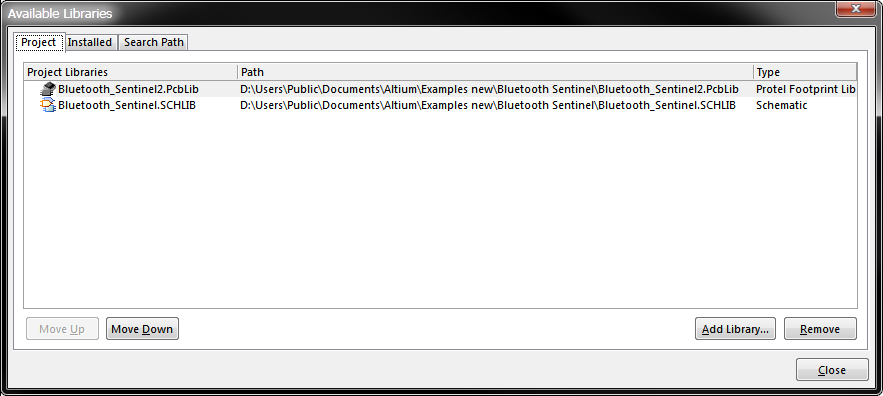
To add a library to the project, click the Add Library button. The Open dialog will appear, browse to and select a library file that you wish to add to the project (and this list).
The following types of library files are supported as project libraries:
- Integrated Libraries (*.IntLib)
- Schematic Libraries (*.SchLib)
- Database Libraries (*.DBLib)
- SVN Database Libraries (*.SVNDBLib)
- Footprint Libraries (*.PcbLib)
- Sim Model Files (*.Mdl)
- Sim Subcircuit Files (*.Ckt)
- PCB3D Model Libraries (*.PCB3DLib) (Legacy library type, not used from Altium Designer 10 onwards)
Use the Move Up and Move Down buttons to define the search order of the libraries.
Installed Tab
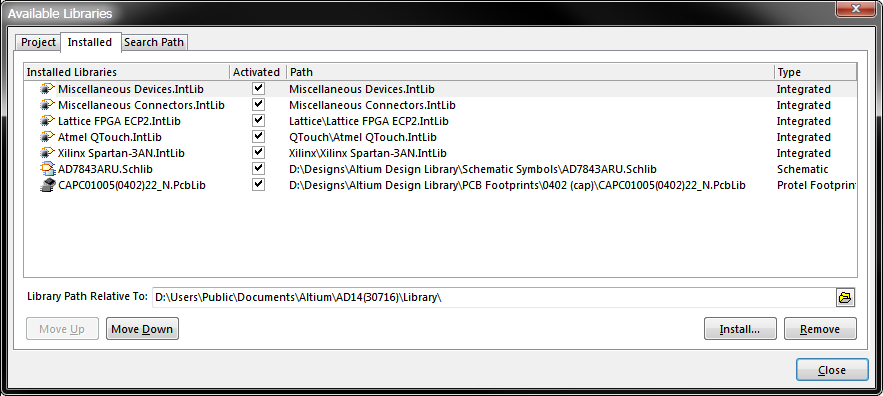
This tab lists all of the installed libraries. This list is an Altium Designer environment setting, any libraries added to the list will be available for all projects, and the list is persistent across design sessions. Project libraries can be added to this list, but are not initially part of it.
Click the Install button to run the Open dialog, from where you can browse to and select a library that you wish to add to the list.
The following types of library files are supported as installed libraries:
- Integrated Libraries (*.IntLib)
- Schematic Libraries (*.SchLib)
- Database Libraries (*.DBLib)
- SVN Database Libraries (*.SVNDBLib)
- Footprint Libraries (*.PcbLib)
- Sim Model Files (*.Mdl)
- Sim Subcircuit Files (*.Ckt)
- PCB3D Model Libraries (*.PCB3DLib) (Legacy library type, not used from Altium Designer 10 onwards)
Use the Move Up and Move Down buttons to define the search order of the libraries.
Search Path Tab
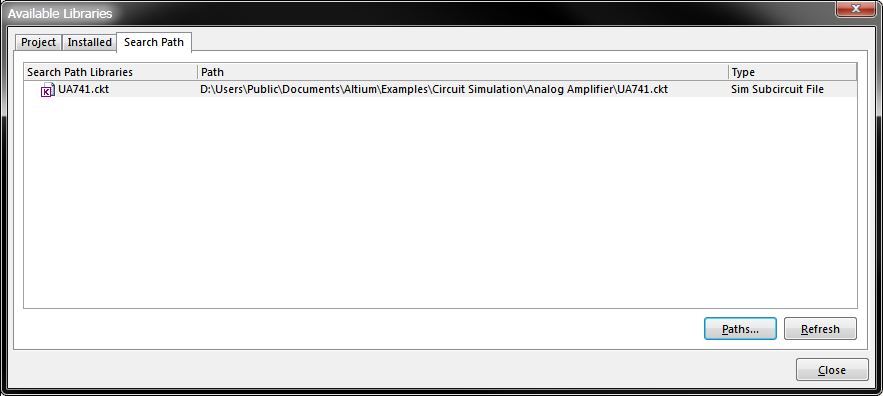
This tab lists all libraries that have been found along the Library Search Paths for the project. These paths are defined in the Search Paths tab of the Options For Project dialog. Clicking the Paths button will take you directly to this tab, from where you can define further search paths or modify existing ones as required.
Use the Refresh button to re-interrogate the search paths and ensure that the library list is current.
The following types of library files are supported as search path libraries:
- Database Libraries (*.DBLib)
- SVN Database Libraries (*.SVNDBLib)
- Footprint Libraries (*.PcbLib)
- Sim Model Files (*.Mdl)
- Sim Subcircuit Files (*.Ckt)
- VHDL Libraries (*.VhdLib)
- PCB3D Model Libraries (*.PCB3DLib) (Legacy library type, not used from Altium Designer 10 onwards)
Libraries in this tab are searched in the order they appear, click the Paths button to define the order.
Elements of the Libraries Panel
The panel is divided into a number of controls and regions, the image below sumarizes the function of each.
The Libraries panel is used to locate and place components into your design.
Browsing and Placing from the Current Library
The upper dropdown lists the libraries that are available for use with the active project. Click the dropdown to select the library you want to be the current library available for use in the Libraries panel.
Click the dropdown arrow to select a library.
The following types of library file can be listed:
- Schematic Component libraries *.SchLib; *.Lib
- Footprint libraries *.PcbLib; *.Lib
- PCB3D Model libraries *.PCB3DLib (Legacy library type, not used from Altium Designer 10 onwards)
- Integrated libraries *.IntLib
- Database libraries *.DBLib
- SVN Database libraries *.SVNDBLib.
Setting the Browse Mode for Library Types
The types of libraries shown in the dropdown list will change, depending on the panel browse mode selected. The mode itself is determined using the options accessed by clicking the ![]() button, at the far right of the dropdown field:
button, at the far right of the dropdown field:
Configure which types of libraries should be displayed in the panel.
- Components - enable this to display component libraries; including SchLib, IntLib, DBLib, SVNDBLib and Lib (older schematic libraries).
- Footprints - enable this to display footprint libraries; including PcbLib and Lib (older PCB libraries).
- 3D Models - enable this to display PCB3D model libraries. Note that this is a legacy library type, not used from Altium Designer 10 onwards. 3D models are now incorporated into the footprint, in the footprint library.
Any combination of browse modes may be enabled at any given time. The drop-down list will update accordingly. As integrated libraries can include all types of components/models, separate entries for those libraries will be listed for each browse mode enabled.
Display of Component Information
When Altium Designer is first installed, the Libraries panel will display the Component Name, Description and Library fields for each component. These columns can be changed, in both which column is displayed and the order they are displayed in. To change which columns are displayed, right-click on one of the column headers and choose Select Columns from the menu that appears, as shown in the image below.
Right-click to configure which columns are displayed.
The Select Parameter Columns dialog will appear, select the required column and use the Add or Remove buttons to move the selected parameter between the Known Parameters and Selected Parameters lists. You can also double-click on an entry to move it from one list to the other. The list of parameters is derived from all parameters across all components in the available libraries.
Use the dialog to add or remove parameters from the Libraries panel.
Placing the Selected Component
Once you have located the required component, use one of the following techniques to place the component on the active document:
- Click the Place button at the top of the panel
- Double-click on the component in the list
- Click and hold on the component, then drag and drop the component onto the document
The component will appear, floating on the cursor. While it is floating:
- Press the Spacebar to rotate the part anitclockwise, in steps of 90°. Press Shift+Spacebar to rotate clockwise.
- Press the X or Y key to flip the part along the X-axis or Y-axis respectively.
- Press Tab to open the component's properties dialog, which can be edited prior to placement.
-
For a PCB component footprint, press the L key to flip the footprint to the other side of the board.
After placing the component another will appear on the cursor, ready for placement. Continue to place further instances of this component, or right-click (or Esc) to stop placing this component. When using the click-and-drag placement method, only a single instance of the part is placed, you do not remain in placement mode.
Searching for Components
If you know which library contains the component you need, you add it in the Available Libraries dialog.
Filtering Components in the Current Library
To find a component within the current library, either scroll to find it in the list of components, or use the filter field to perform a string search on the component Name field.
Filter the list of components by name to quickly locate the required component.
Incremental Search
Incremental search is the name given to searching as you type - to do this in the current library click on the first entry in the list of components, then start typing the name of the component you want to search for. The list will automatically jump to the component whose name matches the string you are typing. To perform an incremental search on the contents of a different column, drag and drop that column to be the left-most column.
Using the incremental search to first find the components whose name starts with LED, then to find components whose description starts with typic.
Searching Across Libraries
When you do not know which library contains the component, or if it is even available, then you can search for it. To search for a component, click the Search button at the top of the panel, to open the Libraries Search dialog.
The searching process can be summarized as follows:
- Searching is performed by defining Filters that are applied to all libraries that can be searching according to the current search Scope.
- The Scope includes the type of libraries to search, only one type can be searched at a time (Components, Footprints, 3D Models or Database Components).
- The Scope defines which libraries will be searched: it is either the libraries Altium Designer currently has access to (Available libraries), or all libraries within a folder (Libraries on path).
- When searching libraries on a path the target is a specific folder, and can also Include Subdirectories.
- You can also search within the search results, by setting the Scope to Refine last search.
Use the Libraries Search dialog to search for a component or footprint.
Setting the Search Filter
The Filters region of the dialog is used to define strings that are to be used for searching. There are three regions that must be configured:
- Field - This is the attribute of the component that is to be searched. It can be any component or footprint attribute, including the Name, Description, Comment, Footprint, or any parameter that has been added to a component.
- Operator - Defines how a match is determined, can be when the value is: equal, contains, starts with, or ends with. Note that equal requires an exact string match so is only used when you are confident that you have the correct and complete search string.
- Value - the characters to be search for in the chosen Field, matched according to the chosen Operator.
Setting the Scope
There are essentially two approaches to searching, either:
- Libraries currently available in Altium Designer - that is the list of libraries shown in the dropdown at the top of the Libraries panel.
- Libraries stored in a specific folder, along with subdirectories if the option is enabled.
Searching will return all items of the chosen search type (Components/Footprints/PCB3D Models), found in all libraries that fall under the defined scope (Available Libraries/Libraries on specified search path). For example, if you wanted to find a component that you believe is in a library within specific folders on the hard disk, and that library was not currently listed in the Available Libraries, you would define the search as follows:
- in the Options region of the dialog, set the Search type to Components,
- in the Scope region, choose the Libraries on path option,
- in the Path region, set the path to point to the folder containing the library document that you wish to search,
- click the Search button.
Advanced Query Searching
In the default mode, the Libraries Search dialog actually converts the Filter settings to a query, which is then applied to the libraries currently targeted by the Scope. You can see this query as well as manually enter your own, by clicking ![]() to switch the dialog to Advanced mode, as shown in the image below.
to switch the dialog to Advanced mode, as shown in the image below.
In the Advanced mode a query of any complexity can be defined.
The top section of the dialog, which is also referred to as the Query Editor section, allows you to construct filters through the entry of logical queries. In this mode you type a query directly into the field. For help with query keywords, click the Helper button to open the Query Helper dialog.
Use the Query Helper to locate and learn about query keywords - click in a keyword and press F1 for information about that keyword.
Notes on using queries and the Query Helper:
- Use the top section of the Query Helper dialog to compose a query expression, using the available Library Functions and System Functions.
- The mid-section of the Query Helper dialog provides a range of operators for use when constructing an expression.
- Use the Check Syntax button to verify that an expression is syntactically correct.
- When the expression for the query has been defined as required, clicking OK will load the Query Editor section of the Libraries Search dialog with the query, ready to proceed with the search.
- Use the Clear button in the Libraries Search dialog to clear the current query expression from the Query Editor section of the dialog.
Search Results
Once the search criteria have been defined, click on the Search button to begin the search. The Libraries Search dialog will close and the results of the search will be listed in the Libraries panel, under a new entry in the libraries dropdown list titled Query Results, as shown in the image below.
Search results are presented in the Libraries panel.
Searching for a Database Component
The search feature allows you to conduct a search of database components in a single table of an installed DBLib/SVNDBLib file.
To search a database library table for components:
- Open the Libraries Search dialog and set the Search In field to Database Components. The Scope and Path regions of the dialog will become grayed-out, as only database libraries that are currently available in Altium Designer can be searched.
- Select the required Table from the database library.
- Define the Filter properties as required, an example is shown in the image below. Note that partial string searches do not require the use of wildcards, these are added automatically if the Operator is set to contains.
- Click the Search button to perform the search, the results are listed in the Libraries panel.
Searching a database library table for components.
SQL Query Search
Database searching actually uses an SQL query to perform the search, the query can be seen by switching the Libraries Search dialog to the Advanced mode (click ![]() ). The SQL query for the search performed in the previous image is shown below. The SQL query can be entered or edited directly if required.
). The SQL query for the search performed in the previous image is shown below. The SQL query can be entered or edited directly if required.
An SQL query can be used to search a database table.
Creating a Custom Component Toolbar or Menu
You can also drag and drop a component from the panel directly onto a menu or toolbar, allowing you to easily build a toolbar or menu for quick access to your most commonly used components. The Component Name will be used as the caption entered into the menu or toolbar. The Edit Command dialog will also appear, with the Process (SCH:PlaceIntegratedComponent) and Parameters fields automatically filled in.
Right-click Menu
The right-click pop-up menu for the panel provides the following commands:
- Refresh Library - use this command to refresh the content of the active library in the panel. This can be especially useful when multiple users are working from a shared library (over the network)
- Refresh All - use this command to refresh the content of all Available Libraries in the panel. Again, this is useful when multiple users are working from shared libraries. When using an SVN Database Library, using the Refresh commands will refresh the local library cache with the latest symbol and footprint libraries from the Subversion repository.
- Add or Remove Libraries - use this command to run the Available Libraries dialog, from where you can define the list of currently available libraries for the active project
Library Report - use this command to generate a report containing all items in the library currently being browsed in the panel. After launching the command, the Library Report Settings dialog will appear: use the dialog to set options about the format and content of the report. You can choose to generate either a print-based Word document (*.doc) or a Browser-based HTML document (*.html). By default, the report will be generated and stored in the same location as the source library, using the library's name. - For each component in the library you can specify whether to include parameter, pin and model information. You can also specify whether the report should include images of components and their models (where applicable). The report can be generated in color or monochrome and when generating a report in HTML-format, you can determine whether or not images should be saved as metafiles
- Place[ComponentName/FootprintName] - use this command to place the currently selected component or footprint onto the active schematic or PCB document respectively
- References - this sub-menu will only appear if the currently selected component has one or more ComponentLink parameter pairings defined for it. The entries on the menu provide access to various linked documents (e.g. datasheets, web pages, text documents, etc). For more detailed information on defining such links, refer to the Sch_Obj-Parameter((Parameter))_AD topic.
- Select Columns - use this command to access the Select Parameter Columns dialog, from where you can specify which columns of parameter information are to be displayed for the list region of the panel.
Edit Component/Edit Footprint - this command becomes available when either a schematic library (*.SchLib) or Footprint library (*.PcbLib) is being browsed in the panel, respectively. It opens the source library for the currently selected component/footprint, making that component/footprint active in the design editor window, ready for editing. This feature is not available when browsing an integrated library (*.IntLib) or a Database Library (*.DBLib). When browsing an SVN Database Library (*.SVNDBLib), the wording changes to Edit Symbol SymbolName/Edit Footprint FootprintName, but the feature operates the same way.