Working with Version-Controlled Database Libraries
Contents
- Librarian or Designer?
- Working as a Librarian
- The Source Control Repository
- Using the Library Splitter Wizard
- Creating the SVN Database Library
- Specifying the Link to the External Database
- Specifying the Link to the Version Control Repository
- Matching Criteria
- A Word on Field Mappings...
- Specifying Symbol and Model Library Location
- Modifying a Database Table through the SVNDBLib File
- Editing an Existing Database Component
- Adding a New Component to the Database
- Removing a Component from the Database
- Specifying a Local Workspace
- Editing Symbols and Models
- Committing Changes to the Repository
- Physical Comparison of Revisions
- Browsing Differences
- Working as a Designer
- Localized Cache
- Automatic Cache Update
- Manually Forcing an Update of the Cache
- Placement
- Post-Placement Maintenance
- Dual Synchronization - SVNDBLib and DBLink
This document provides detailed information on placing components from a database using Altium Designer's SVN Database Library feature.
The ability to place components directly from a database using a Database Library (*.DBLib) already offers great flexibility and control. Extending this method of linking to allow source-controlled libraries - housing the schematic symbols and footprint models - lifts library and component management to a higher level still.
The source libraries are created, added-to and maintained, within a Subversion-based repository. The link to the repository and to the external database is defined within an SVN Database Library file (*.SVNDBLib), an extension of the Database Library file (*.DBLib) and often referred to as a Version-Controlled Database Library.
Librarian or Designer?
Altium Designer in no way prohibits a Designer from performing Librarian-based activities. Access rights/permissions defined for the source control repository will ultimately define how far the Designer can drive the Librarian 'car'. For example, the Designer may be able to checkout, open and modify a library, but is prevented from committing the change to the repository.
There are essentially two modes in which you can work with a version-controlled database library - as a Librarian, or as a Designer.
Altium Designer in no way prohibits a Designer from performing Librarian-based activities. Access rights/permissions defined for the source control repository will ultimately define how far the Designer can drive the Librarian 'car'. For example, the Designer may be able to checkout, open and modify a library, but is prevented from committing the change to the repository.
The use of these roles will differ from company to company. A larger company may have a dedicated library center which will, in the role of Librarian, solely be involved with the setup and maintenance of the symbol and model libraries in the source control repository and the generation of the SVN Database Library file(s). The SVNDBLib file(s) will then be made available to the Designer(s) within that company, who will install and use the library files from which to place the components in their designs.
In a smaller company, both roles may be filled by the same person. Not only will that person setup and maintain the repository of libraries, but will also use the defined SVNDBLib to carry out the design.
The following sections consider the role of the Librarian and Designer in greater detail.
Working as a Librarian
As a Librarian, not only will you need to set up and maintain the external source control repository of symbol and model libraries, but you will also be responsible for setting up the SVN Database Library file. This entails:
- Connecting to the external component database.
- Defining database record to component parameter/model mapping.
- Specifying the link to the SVN repository in which the symbol and model libraries are stored.
The following sections discuss the repository, configuration of the SVNDBLib file, and also how changes to symbols and models in the repository-based libraries are made.
The Source Control Repository
In Altium Designer, ensure that the Provider, on the Version Control - General page of the Preferences dialog, is set to SVN - Subversion. Use the Auto Detect Subversion button to quickly fill the path fields to the required SVN executables.
The symbol and model library files need to be added to a Subversion (SVN) repository. Addition of such files and management of folder structure within the repository is performed using an SVN client, such as TortoiseSVN.
In Altium Designer, ensure that the Provider, on the Version Control - General page of the Preferences dialog, is set to SVN - Subversion. Use the Auto Detect Subversion button to quickly fill the path fields to the required SVN executables.
One important thing to note when adding files to the repository, is that each symbol and model must be stored in its own library file. In a regular library - which can hold any number of symbols/models - changing a single entry would result in all being marked by the version control system as having been modified. Having one symbol/model per library file plays to the nature of version control, while allowing you to keep track of exactly what has been modified and what has not.
For the purposes of this document, it is assumed that the repository has already been created.
For more information on the use of the particular SVN client you are using, refer to the relevant documentation associated with that software.
For more information on version control, refer to the Working with a Version Control System tutorial. When reading this document, remember that for a version-controlled database library, the source control system used must be Subversion.
Using the Library Splitter Wizard
If the libraries for the symbols and models are being newly created, there is no problem ensuring only one symbol/model per file. Typically however, the source libraries will already exist. To simplify the job of separating these libraries into single-entity files for addition to the SVN repository, Altium Designer provides a splitting tool - the Library Splitter Wizard. The Library Splitter Wizard is accessible from the Tools menu when editing a PCB or Schematic library document.
Use the initial page of the Wizard to specify the source schematic, PCB and PCB3D libraries that you want to split (Figure 1). Use the Add button to access the Libraries dialog, then browse to and add a library to the list. The source libraries need not exist in the same folder.

Figure 1. Selecting the existing source libraries to be split.
The subsequent page of the Wizard allows you to specify the output directories into which the (split) individual symbol/model libraries will be placed.
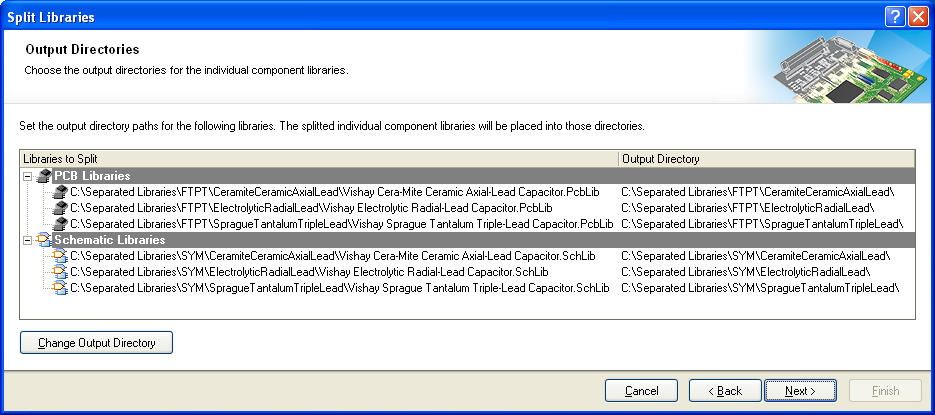
Figure 2. Setting output directories for the libraries to be split.
By default, the output directory will be set to the same directory in which the source library is stored. As the split library files will be added to the SVN repository, it can be a good idea to setup the folder structure that you want in the repository - in terms of the symbol/model files - locally on your hard disk.
Care should be taken if the original source libraries are stored in the same source directory folder. If the output directories are not specified and are left at their defaults - pointing to the same source directory folder - you can end up with a very large mixture of single symbol and model libraries. Sifting through these when creating the repository structure may prove very time consuming.
Once the structure is defined, copy the source libraries to their respective folders within that structure. You can then just leave the output directory settings for each source library at their defaults. After the split, the generated single library files will already be in the correct locations. You can then simply delete the original source library from each folder and add the folders to the repository, using the SVN client you have decided to use.
The Wizard provides additional options to control how the source libraries are split. For a schematic component library, two options are provided that allow you to strip the parameter and/or model information from each constituent component - leaving just the bare symbol.
An option is also provided to deal with the situation where an output directory already has libraries in it. You can set this option to:
- Overwrite Existing Files - with this setting, existing libraries will be overwritten by newly split libraries of the same name.
- Append Incrementing Number To File Names - with this setting, the Wizard will scan through the list of output directories to build a list of existing files to be protected. Each potential split library with the same name as an existing library will be appended with the suffix _n (where n is an integer, starting from 1).

Figure 3. Reviewing single libraries to be created.
Once the source libraries and options have been specified the Wizard will perform an analysis, the result of which is the set of single symbol/model libraries that will be created, listed for you to review.
The name of each split library to be generated is shown, as well as the actual name of the schematic component/footprint model/PCB3D model within that library. The original source library is also listed. The name used for a library will be the same as that used for the constituent component/model.
If any of the following characters have been used in the component/model name, they will be replaced by an underscore when creating the library name:
- \.
- !
- '
- [
- ]
Review the list of libraries to be created and then click Next to proceed with the splitting process and ultimately obtain the libraries to be added to the source control repository.
Creating the SVN Database Library
Just as the Database Library file is the backbone of the database library feature, so too is the SVN Database Library file the backbone of the version-controlled database library feature. This file is created and managed using Altium Designer's SVNDatabaseLib Editor (Figure 4).
An example SVN Database Library - Altium Design Library.SVNDBLib - can be found in the \Examples\Reference Designs\SVN DBLib folder of the installation.
Figure 4. The SVNDatabaseLib Editor.
The SVNDatabaseLib Editor becomes active when the active document in the main design window is a .SVNDBLib file. Create a new file of this type by using the *File » New » Library » SVN Database Library command.
Specifying the Link to the External Database
Connection to the external database is carried out in exactly the same way as for a DBLib file. Use the controls available in the Source of Connection region of the Editor's main display window to define this connection accordingly.
You can also use the SVN Database Library Conversion Wizard, to quickly create a SVNDBLib from:
- An Integrated Library (*.IntLib)
- A Database Library (*.DBLib).
- Individual schematic component libraries (*.SchLib) and PCB footprint libraries (*.PcbLib).
For more information, refer to the Database Library Migration Tools application note.
Specifying the Link to the Version Control Repository
With a DBLib, the symbol and model libraries are stored on your hard disk or other local/network medium. Remember that for a SVNDBLib, these libraries are stored under version control in a Subversion repository. As part of the SVNDBLib file, you must define the link to this repository.
The connection to the SVN repository is defined on the SVN Repository tab of the Database Library Options dialog ( Tools » Options ). Figure 5 shows an example connection to a web-based server, where the parent repository folder has the following address:
Use the dialog's 'What's This Help' feature to obtain detailed information about each of the options available. Simply click on the question mark button at the top right of the dialog and then click over a field or option to pop-up information specific to that field or option.
Figure 5. Defining the link to the SVN repository.
Matching Criteria
After successful connection to the external database, table and mapping data will be loaded. For each table in the database, you will need to define matching criteria - the parameter field (or fields) used to create and maintain the post-placement link between the schematic component and its source database record. Once again, matching criteria is defined in exactly the same way as for a DBLib file.
A Word on Field Mappings...
Mapping of parameters and models is carried out from the Field Mappings tab of the SVNDatabaseLib Editor's main display window, in the same way as for a DBLib file. In order to define the symbol and model information for a component upon placement, it is the symbol and model reference fields in the database that are the crucial mapping entities. You need to ensure that:
- The Database Field specifying the logical symbol for the component is mapped to the [Library Ref] entry in the Design Parameter column.
- The Database Field specifying the PCB footprint model is mapped to the [Footprint Ref] entry in the Design Parameter column.
When mapping symbols and models for an SVNDBLib file, path information in the external database is optional. If such path information does exist, it should be mapped to the respective Design Parameter entries ([Library Path] and [Footprint Path]).
Linked PCB3D and simulation models are currently not supported for an SVNDBLib.
All other database field names will be automatically mapped to design parameters using the same names. Change parameter naming on the design side, or specify database fields to not be mapped as required.
For more information, including the definition of parameter update options, refer back to the Model and Parameter Mapping section of the Using Components Directly from Your Company Database application note.
Specifying Symbol and Model Library Location
Figure 6. Specifying base repository directories for symbols and footprints.
When you place a component from an SVN Database Library its symbol (specified by the [Library Ref] mapping) and footprint model (specified by the [Footprint Ref] mapping) are extracted from symbol and model libraries in the version control repository.
In order to know where in the repository to look for libraries, the base directories in which these symbol and models reside must be specified in the SVNDBLib document. These directory paths are specified on the SVN Repository tab of the Database Library Options dialog.
In the example of Figure 6, the location for the schematic symbols and PCB footprint models have been set to point to the following sub-folders within the repository structure:
- The SYM folder for symbols
- The FTPT folder for footprints.
It is important to stress that the symbols and footprints must reside within the base repository directories specified. They can of course be in sub-folders of those directories and the paths specified for both symbols and footprints can point to the same directory in the repository. The following methods can be used to locate the required symbol and footprint model within these nominated base directories:
- Absolute Path - the full path to the location of the library can be entered into the database. (e.g. http://ares/svn/Altium/SVNTest/SchematicSymbols/Capacitor_NonPolarized.SchLib).
- Relative Path - a relative path (relative to the root of the repository) to the location of the library can be entered into the database. The URL for the repository - specified on the SVN Repository tab of the Database Library Options dialog - will be prefixed to the path you enter, to give the absolute address. Considering Figure 6 for example, if you specify /SVNTest/SchematicSymbols/Capacitor_NonPolarized.SchLib, the full path will be http://ares/svn/Altium/SVNTest/SchematicSymbols/Capacitor_NonPolarized.SchLib.
- Filename Only - you can simply specify the name of the library in which to find the required symbol or footprint, again within the database record for the component. The first file found with this name will be used. (e.g. Capacitor_NonPolarized.SchLib).
When searching for a symbol/model match, the flattened folder paths in the base symbol or footprint directory are sorted and searched alphabetically.
If the Library Splitter Wizard is used, there will always be a corresponding library with the name of the actual symbol/footprint.
symbol/footprint.
- No Path Information - you can opt not to enter any path information in the database record for the component. When locating the symbol/footprint, the system will initially look for the first library named like the symbol or footprint itself. For example, if the logical symbol name in the database (specified by the [Library Ref] mapping) is DIO-SCHOTTKY-2S, the system will look for the first file named DIO-SCHOTTKY-2S.SchLib and look for the symbol within this file. If the symbol/footprint cannot be found in this way, the system will look for a match in all libraries.
If you have defined fields in your database for symbol and footprint path information, these fields need to be mapped to the appropriate design parameters - [Library Path] and [Footprint Path] respectively.
Not specifying library path information in the database makes it much more robust. The repository location and/or its internal folder structure could be changed and the database would not need to be updated.
Modifying a Database Table through the SVNDBLib File
The occasion will often arise where a change is required to a component record in the database. An existing component may need one or more of its fields updated to better reflect its current status. A new component may be available for use and therefore needs to be added to the relevant database table. A component may have been marked as 'obsolete' and, no longer to be used in designs, is required to be deleted from the database altogether.
The SVNDatabaseLib Editor enables you to perform these actions directly, through its Table Browser, eliminating the need to open the external database. With the required table selected, commands for manipulating its entries in the database are available from the right-click menu (Figure 7).
Figure 7. Accessing commands to modify the underlying database table.
Editing an Existing Database Component
Figure 8. Editing the database fields for the selected component.
To edit an existing component in a database table, select its entry in the Table Browser, right-click and choose the Edit Component ComponentName command. A dialog for that component will appear (Figure 8).
All of the fields for the parent database table are listed, along with their values - currently defined for the chosen component. Simply click on a Field Value entry to edit it.
In Figure 9, the value for the DatasheetDocument field, for component 10ACD33, has been changed to 13-Jun-2006.
As illustrated this change, once made, can be verified in both the Table Browser and external database table.
Figure 9. Verifying the edit in both Table Browser (SVNDBLib) and database table (MDB).
Adding a New Component to the Database
To add a new component to a database table, right-click anywhere within the Table Browser and choose the Add New Component command. The New Component dialog will appear.
All of the fields for the parent database table are listed. Simply enter the information for this new physical component as required. The new component will be added to the bottom of the table (Figure 10).
Figure 10. Adding and defining a new physical component.
Removing a Component from the Database
To permanently remove an existing component from a database table, select its entry in the Table Browser, right-click and choose the Delete Component ComponentName command. A confirmation dialog will appear - click Yes to proceed with the removal.
Specifying a Local Workspace
files, such as SVNDBLib, MDB, XLS, should be located in a different directory, as these are not under version control.
The folder nominated as the local working directory should only be used to contain a copy of the version-controlled files. Other files, such as SVNDBLib, MDB, XLS, should be located in a different directory, as these are not under version control.
As a Librarian, you will routinely modify the component symbols and models stored in the SVN repository. To make such modifications, you will need to check the files out from the repository into a local working directory. Create this working directory and then specify it as the folder to be used on the Version Control - SVN Libraries page of the Preferences dialog (Figure 11).
Figure 11. Specifying a local workspace.
The folders checked out will be those specified in the Models Location region, on the SVN Repository tab of the Database Library Options dialog.
dialog.
To quickly check out all symbol and footprint model libraries from the repository into the nominated local working folder, simply run the Check Out All Working Folders command from the SVNDatabaseLib Editor's main Tools menu. Figure 12 illustrates the result of such a checkout, with all files and folders in the local workspace linked and up-to-date with the content of the repository.

Figure 12. Checkout of repository folders and files to the Librarian's local workspace.
Editing Symbols and Models
Repository and SVNDBLib file aside, the core workload of the Librarian is to maintain the version-controlled libraries. This involves making modifications to the schematic symbols and models, checked out to the local working folder, then committing these changes back to the SVN repository.
The main interface between the folders and files checked out to the local workspace, and the repository itself, is the Storage Manager panel.
When the SVNDBLib file is the active document, the Storage Manager panel will populate with the symbol and model folders checked out to the local working folder. The exact folders listed will be those specified in the Model Locations region, on the SVN Repository tab of the Database Library Options dialog (Figure 13).
Figure 13. The Storage Manager panel reflects the Librarian's local working folder.
To open a library file for editing, simply right-click on its entry in the All Files region of the panel, and choose Open from the context menu that appears. Make changes as required and save the file as normal using the associated Editor's standard Save command.
A library can also be opened for editing using one of the following methods:
- With the SVNDBLib file active, right-click on a component's record entry, on the Table Browser tab, and choose to open either the schematic symbol or the footprint model.
- With the SVNDBLib added to the Available Libraries, simply browse (using the Libraries panel) to the target component within the linked database, then right-click on its entry and choose to edit either the schematic symbol or the footprint model.
- Use the library Editor's File » Open command to browse to and open, the required library in the local work space.
- Drag-and-drop the library file from Window Explorer directly into Altium Designer.
Committing Changes to the Repository
Although there are different ways to open a library for editing, committal of any changes made - from within Altium Designer - can only be carried out through the Storage Manager panel.
One of the most important things to remember as a Librarian when using the Storage Manager panel, is to refresh the status of the link between the local working folders/files (displayed in the panel) and the corresponding folders/files in the source control repository. This is achieved using the Refresh Status command, available from the right-click menu in the All Files region of the panel (Figure 14).
Figure 14. Refreshing the status of the local working copy of the files.
Refreshing the status of the source libraries becomes even more important in a multi-librarian environment, where several people may be responsible for maintaining the repository of source symbol and model files.
When the local copy of a library is identical in revision to that of the repository, the status will display as No modification. You are free to open the file and make modifications.
If the status for a library is Out of date, you will need to get the latest version of the file from the repository - updating your own local working copy - before you can modify and commit your own changes. Use the Update command to do this (available from the same right-click menu for the region).
When you have made and saved changes to a library, the status will change to Locally modified by me. To push your local changes into the repository, simply right-click on the file's entry and choose the Commit command from the context menu. Once checked in to the repository, the status will return to No modification.
For more detailed information on the Storage Manager panel, press F1 when the cursor is over the (focused) panel.
Physical Comparison of Revisions
Physical comparison can be performed between any two revisions of the same symbol or model library. This allows you to clearly see, in a visual manner, the changes that have been made - between consecutive or non-consecutive revisions of the file.
Comparison can be made on one of two levels:
- At the local level - comparing two versions of the document stored within the Librarian's local workspace. Typically the current version is compared with a local backup (stored in a History folder, located in the same directory as the source library). Simply select the two versions of the library you wish to compare, in the Local History region of the Storage Manager panel, right-click and choose Compare.
- At the repository level - comparing two revisions of the document stored within the repository itself. Simply select the two revisions of the library you wish to compare, in the VCS Revisions region of the Storage Manager panel, right-click and choose Compare.
Once the Compare command is invoked, the two selected document revisions will be opened in the workspace, the graphical comparison is made, and any differences detected between the two will be listed in the Differences panel. It is a good idea to have the two documents open side-by-side in the workspace, to easily peruse the differences.
Browsing Differences
Figure 15 shows an example of differences detected between two revisions of the same library file (a schematic component library).
Figure 15. Detecting physical differences between document revisions.
Differences are listed in a hierarchical fashion. The top-level entry lists the number of differences detected. For libraries, this is the number of matching parts that are found to be different between the two revisions. For source libraries associated with an SVNDBLib - where there is only one symbol/model per file - this entry will always be 1.
The next level down lists the parts found to be different. The entry marked by a red cross icon shows the matching parts that are different. The sub-level entries correspond to that part on each separate document. Again, with a library associated with an SVNDBLib, there will only be one matching component.
The next level down lists the actual graphical differences between the parts or, put another way, the objects causing the differences. Again, an entry with a red cross reflects the matching object found to be different. The sub-level entries correspond to that object on each separate document.
Clicking on the top-level entry for a detected difference - denoted by the red cross icon - will highlight that difference on both documents simultaneously (Figure 16). Click on the sub-entry for an object to highlight it on its parent document separately.
Figure 16. Graphical comparison directly in the workspace.
Working as a Designer
As a Designer, you will take the SVNDBLib file generated by the Librarian and make it available in the Libraries panel by adding it to the Available Libraries list (Figure 17).
Figure 17. Making the SVN Database Library available for use.
The Libraries panel becomes a 'browsing window' into the linked external database. Browsing database components and searching for specific components is performed in the same way as for an installed DBLib. For more information, refer to the sections Browsing the Database Components and Searching for a Component , in the Using Components Directly from Your Company Database application note.
Localized Cache
When the SVNDBLib file is added to the Available Libraries list, the symbol and model libraries in the repository are cached in a temporary folder, local to the Designer's computer. When an action in the software calls for the use of a schematic symbol or model, that symbol/model is retrieved from the local cache.
Automatic Cache Update
The libraries in the cache will be automatically updated with the latest from the source control repository when performing any of the following actions within the software:
- Placing a component from an installed SVNDBLib file in the Libraries panel.
- Performing a design transfer (i.e. updating the PCB)
- Using the Update From Libraries command in the Schematic Editor.
- Using the Update From PCB Libraries command in the PCB Editor.
Although the update is automatic, it can be controlled by the use of an option available on the Version Control - SVN Libraries page of the Preferences dialog (Figure 18).
Figure 18. Setting the local cache 'update timer'.
This option essentially provides an update timer for the local cache. If the specified time has elapsed since the last time the cache was updated, then the cache will be updated automatically when one of the listed actions is performed. If an action is performed within this time, the current content of the cache will be used, which may be out of date compared to the content in the repository.
Manually Forcing an Update of the Cache
There may be times when you wish to force an update of the local cache, to ensure you have the most up-to-date libraries that are currently stored in the source control repository. For example, when gearing up to transfer the design from the schematic to the PCB.
repository.
You can force an update of the cache, manually, using one of the following methods:
- Using one of the Refresh commands available from the Libraries panel's right-click menu.
Whenever you restart Altium Designer, the local cache will be automatically refreshed with the latest libraries stored in the SVN repository. - Uninstalling and re-installing the SVNDBLib file from the Available Libraries list.
Placement
Placement is performed as it is for any other library loaded and available in the Libraries panel. With the target schematic sheet open as the active document in the main design window, simply select the component you want to place from the Libraries panel and either click the Place button or drag-and-drop the component directly onto the sheet. The component is built on-the-fly, with the following actions taking place:
- The schematic symbol is retrieved from the relevant schematic component library in the local cache.
- Any referenced footprint model is linked in.
- The design parameters specified in the SVNDBLib file are added (in accordance with the associated Add To Design update setting) to the component.
After placement, double-click on the component on the schematic to access its properties dialog (Figure 19). You will see the design parameters added to the Parameters region of the dialog, the linked models added to the Models region and this Library Link region.
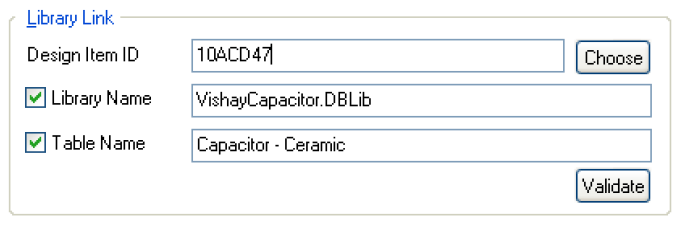
Figure 19. Examining the link for a placed part.
This region provides the following information:
- The parent SVN Database Library file
- The specific database table in which the component resides
- The value for Design Item ID (Component Name / Part Number). This is the chosen key field defined in the Field Settings region of the SVNDBLib file, and is typically the part number.
You can change the placed component to another from the same table by clicking the Choose button. This will open the Browse Libraries dialog, initially listing all components in the same table. In fact, you can change to a component in a different table of the same SVNDBLib file, or browse to one in a different SVNDBLib file altogether. The region will update accordingly with the new information for the chosen database component.
Post-Placement Maintenance
After placement, the chosen key parameter in the SVNDBLib file is used to ensure that the placed component on the schematic retains its link to the corresponding record for that component in the external database. This means that at any stage in the future, changes to parameter and model information in the database can be easily passed back to the placed component, synchronizing the two.
In the PCB Editor, use the Tools » Update From PCB Libraries command to update placed footprints with the latest information stored in the source libraries.
If you simply want to update parameter information, use the Update Parameters From Database command, available from the Schematic Editor's main Tools menu.
To perform a full update, including parameters, model and graphical attributes of schematic symbols, use the Update From Libraries command (also available from the Schematic Editor's main Tools menu).
For further information on using the various update tools, refer to the Keeping Components Up-To-Date document.
Dual Synchronization - SVNDBLib and DBLink
You may have an existing design project where the majority of the placed parts have been linked to an external database using a DBLink file. Design changes may result in additional circuitry, the components for which might be placed using the SVN Database Library (SVNDBLib) feature. The associated SVNDBLib file could, quite conceivably, point to a different external database.
When using the Update Parameters From Database command, all linked parameters for placed components will be queried - across all linked databases, irrespective of the linking method used - and detected differences for those parameters displayed in the Select Parameter Changes dialog.
If the same database field has been used for matching in both the DBLink and SVNDBLib files, the database linked by the DBLink file will be searched first for a match, followed by the database linked to by the SVNDBLib file. If the component is present in both databases, you could quite possibly match and update from the wrong external record.