Working with the Content Cart
Contents
Parent article: Vault Data Acquisition
Altium's Vault Data Acquisition feature provides a streamlined utility with which to essentially copy data between two Altium Vaults. The vehicle through which this is done – your interface to the Data Acquisition Service – is the Content Cart. This is control-central for defining what is to be acquired from the source vault, and transferred into the nominated target vault – a trusty removal van that 'carts' your nominated data between established vault residences.
Now there's no better way to illustrate the workings of a feature than by example. So to illustrate the ins-and-outs of the Content Cart, and its use in acquiring data, this article takes a look at acquiring some Component Items between the following vaults:
- Source Vault– the Altium Content Vault.
- Target Vault – a local Altium Vault, named
Company Vault.
Accessing the Cart
Access to the Content Cart is made from within the Vaults panel. While browsing the source vault from which you wish to obtain data, simply select the Item Revision(s) that you wish to acquire, and choose the Add to Content Cart command from the context menu.
Initial access to the cart loads it with the Item Revision(s) that are selected in the source vault at the time of access:
- A single specific revision of an Item.
- Multiple specific revisions of the same Item.
- The latest revisions of multiple Items.
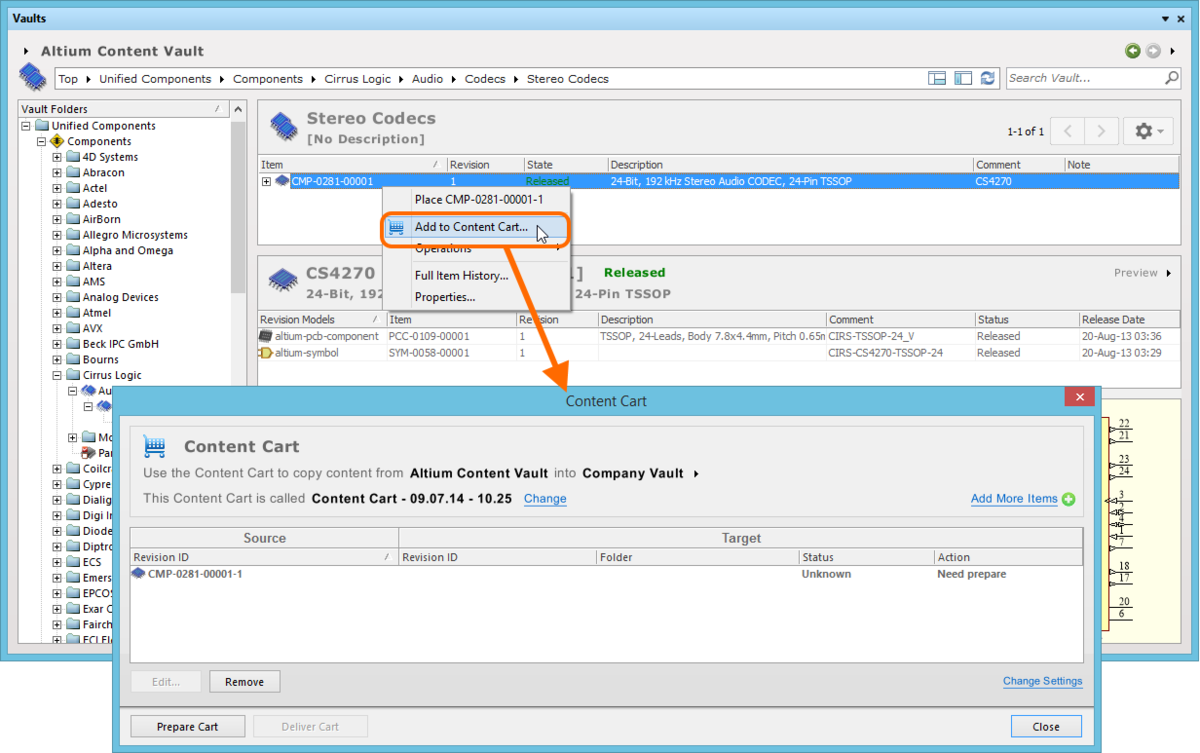
Locate the source Item Revision to be acquired, and add it to the Content Cart.
Specifying Source & Target Vaults
The two vaults involved in the acquisition are specified in the top region of the Content Cart dialog. The source vault is automatically determined, based on the residence of the Item Revision(s) you have specified to acquire. If you are only connected to one local vault, then that is automatically determined to be the target vault. If connected to multiple local vaults, simply click on the target vault's name, or on the ![]() control to its right, to access a drop-down listing of currently connected local vaults. Switch vaults as required.
control to its right, to access a drop-down listing of currently connected local vaults. Switch vaults as required.

Reflection of source and target Altium Vaults.
Naming the Cart
Acquired data from the source vault will be copied into new revisions of Items in the target vault. By default, these Items will be located in a defined, and newly-created folder structure within that vault. The top-level folder for this acquired content is named using the name of the cart itself. The default name is in the format Content Cart - <Current Date> - <Current Time>, and is determined at the moment the cart is accessed. This can be changed to a more meaningful name as required by clicking the Change control, to the right of the cart's name.
Use the subsequent Content Cart Name Selection dialog to directly enter the name of a new or existing folder. You can browse to, and select an existing folder for the cart, using the Choose Folder dialog – accessed by clicking the ![]() button, at the far right of the Content Cart Name field.
button, at the far right of the Content Cart Name field.

A Content Cart can be named as required.
Specifying Items to Acquire
Any number of Data Item Revisions can be 'loaded' onto the Content Cart for acquisition from the source vault. Initial access to the cart loads it with the Item Revision(s) that were selected in the source vault at the time of access, but any number of additional Items can be loaded. To do this, click the Add More Items control, at the top-right of the dialog. This gives access to the Choose Item dialog, from where you can choose one or more additional Item Revisions to acquire.
Remember, you can choose to add:
- A single specific revision of an Item.
- Multiple specific revisions of the same Item.
- The latest revisions of multiple Items.
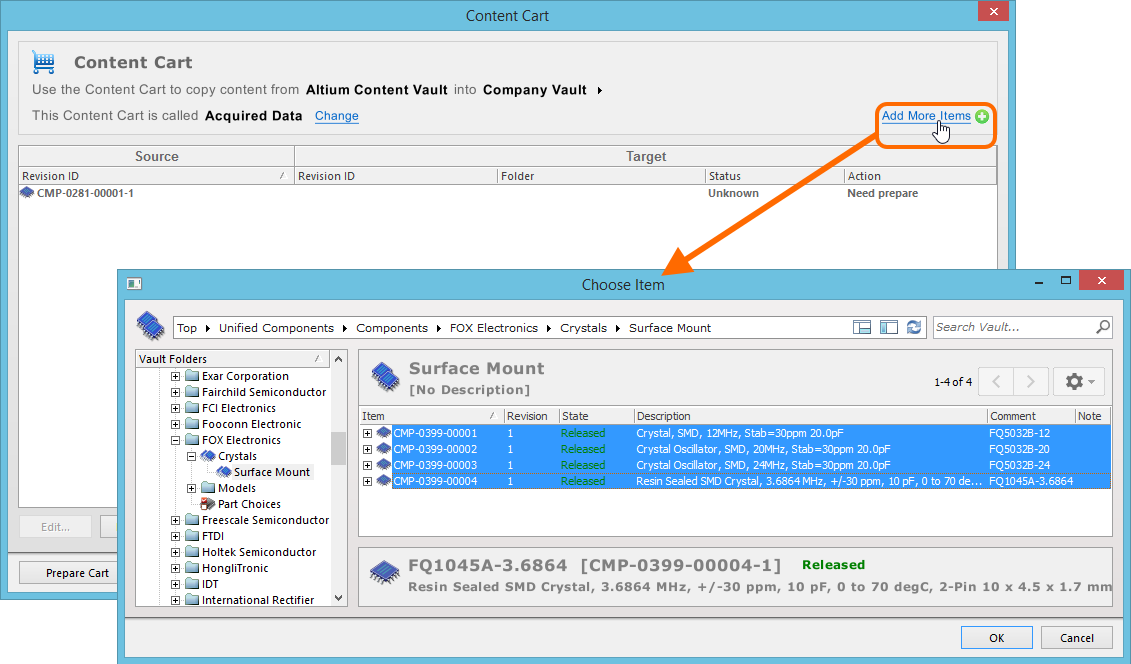
Add as many Item Revisions as you like to your Content Cart, to acquire en masse.
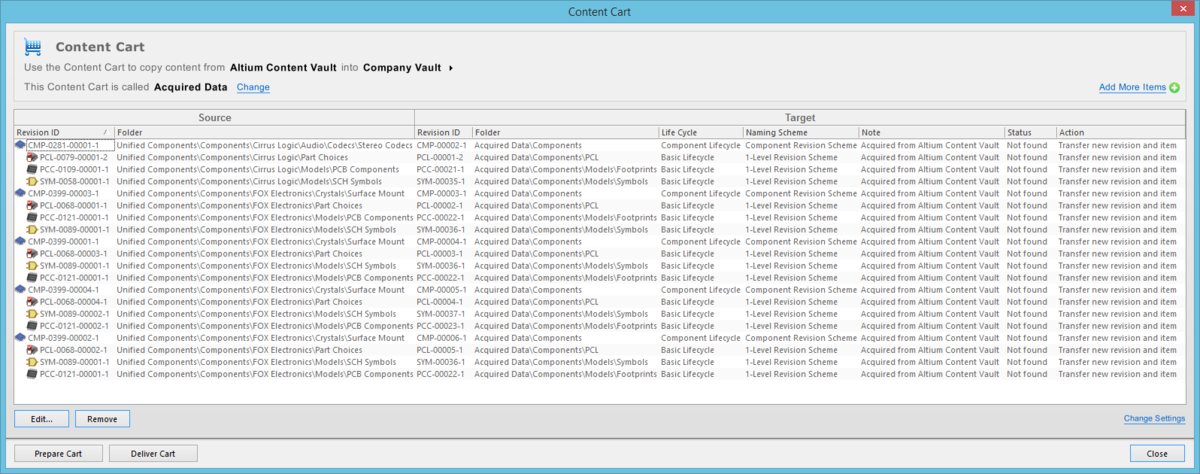
Acquisition Grid
The main area of the Content Cart dialog presents an 'acquisition grid' – listing all Item Revisions that you have chosen to acquire from the source vault.

The main acquisition grid, listing all Item Revisions chosen for acquisition from the source vault.
Cart Preparation
With the source Item Revisions chosen, the Content Cart now has to be 'prepared for delivery' to the target vault. To do this, click the Prepare Cart button. This prepares the target vault for acquisition – checking the status of the chosen Item Revisions involved (in case they have been acquired previously), the parent-child links, and proposing the action to be taken. The results of this preparation phase are presented back in the main acquisition grid.
An example Content Cart, prepared ready for delivery to the target vault.
For each Item Revision involved in the acquisition, the Source region of the grid expands to present all applicable child Item Revisions and, optionally, the folder in which they reside within the source vault. For each Item Revision (parent and child alike) the following information can be presented in the Target region of the grid:
- Revision ID – the full identifier for the Item Revision in the target vault, based on defined Item Naming and Revision Scheme for that Item type.
- Folder – the destination folder in the target vault in which the acquired Item Revision will be created/delivered.
- Life Cycle – the lifecycle definition defined for the parent Item.
- Naming Scheme – the revision naming scheme defined for identifying revisions of the parent Item.
- Note – an optional note that can be used to provide useful information about the acquisition to others, when browsing the acquired content in your local vault.
- Status – the current state of the Item Revision in the target vault. Possible states are:
Not found– the Item Revision has never been acquired.Already Exists– the Item Revision has been acquired previously.
- Action – the action that needs to be taken in order to achieve synchronization between source and target vaults. Possible actions are:
Transfer new revision and item– for completely new acquisitions, where the Item has never been acquired before. In other words, create an Item of that type and a new planned revision to accommodate the source data.Transfer new revision– when acquiring another revision of an Item, and a revision of that Item has been acquired previously.Nothing to do– the chosen Item Revision has already been acquired previously.
Cart Structure
As part of the preparation phase, the cart uses default settings defined for each Item type that can be acquired. These settings are defined in the Content Cart Structure dialog, accessed by clicking the Change Settings control at the bottom-right of the Content Cart dialog.
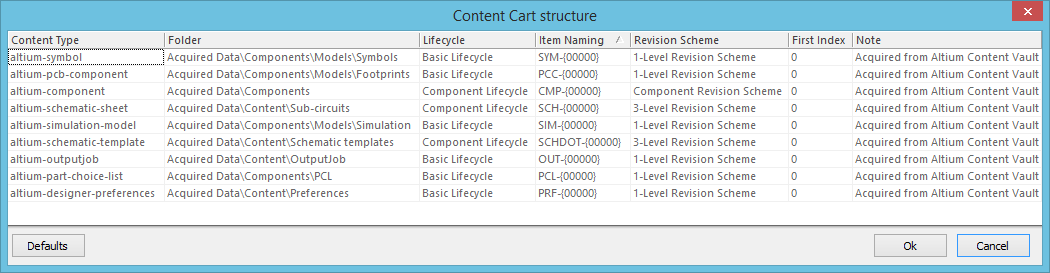
Default acquisition settings are defined in the Content Cart Structure dialog.
These settings are used to determine the properties of newly-created Item Revisions in the target vault – created ready, and in the planned state, to receive data from the original Item Revisions in the source vault. They include a default folder in the target vault, as well as default Lifecycle Definition, Item and Revision Naming Schemes, and a starting index. A default note is also defined, in the format Acquired from <SourceVaultName>. In terms of destination folders in the target vault, each Item type will be acquired into a distinct folder under a parent, top-level folder, named after the Content Cart itself.
Modify these default acquisition settings in-line with schemes employed (and preferred!) for those Item types in your target vault. Click on a cell to access edit controls.
The acquisition settings in the Content Cart Structure dialog are coarse-level defaults. For Items that have never been acquired before – so the parent Item and initial revision are being newly-created (Action is Transfer new revision and item) - properties at the individual Item-level can be defined if needed, giving finer-level control. To do so, simply select an Item Revision in the main acquisition grid, and click the Edit button. This will give you access to the Edit Item dialog, from where you can modify Item properties as required – overriding default settings.

For greater control, you can define properties at the individual Item level.
Cart Delivery
Once preparation is complete, click on the Deliver Cart button to proceed with the acquisition. A confirmation dialog will appear, notifying you that the Content Cart is about to be transferred from source to target vaults – click Yes to proceed. A second confirmation dialog will confirm the result of the acquisition, with the acquired Items available to browse in the target vault through the Vaults panel. If, before closing the Content Cart dialog, you run the preparation again – clicking Prepare Cart – the Status and Action fields will update to reflect the result – displaying Already Exists and Nothing to do, respectively.
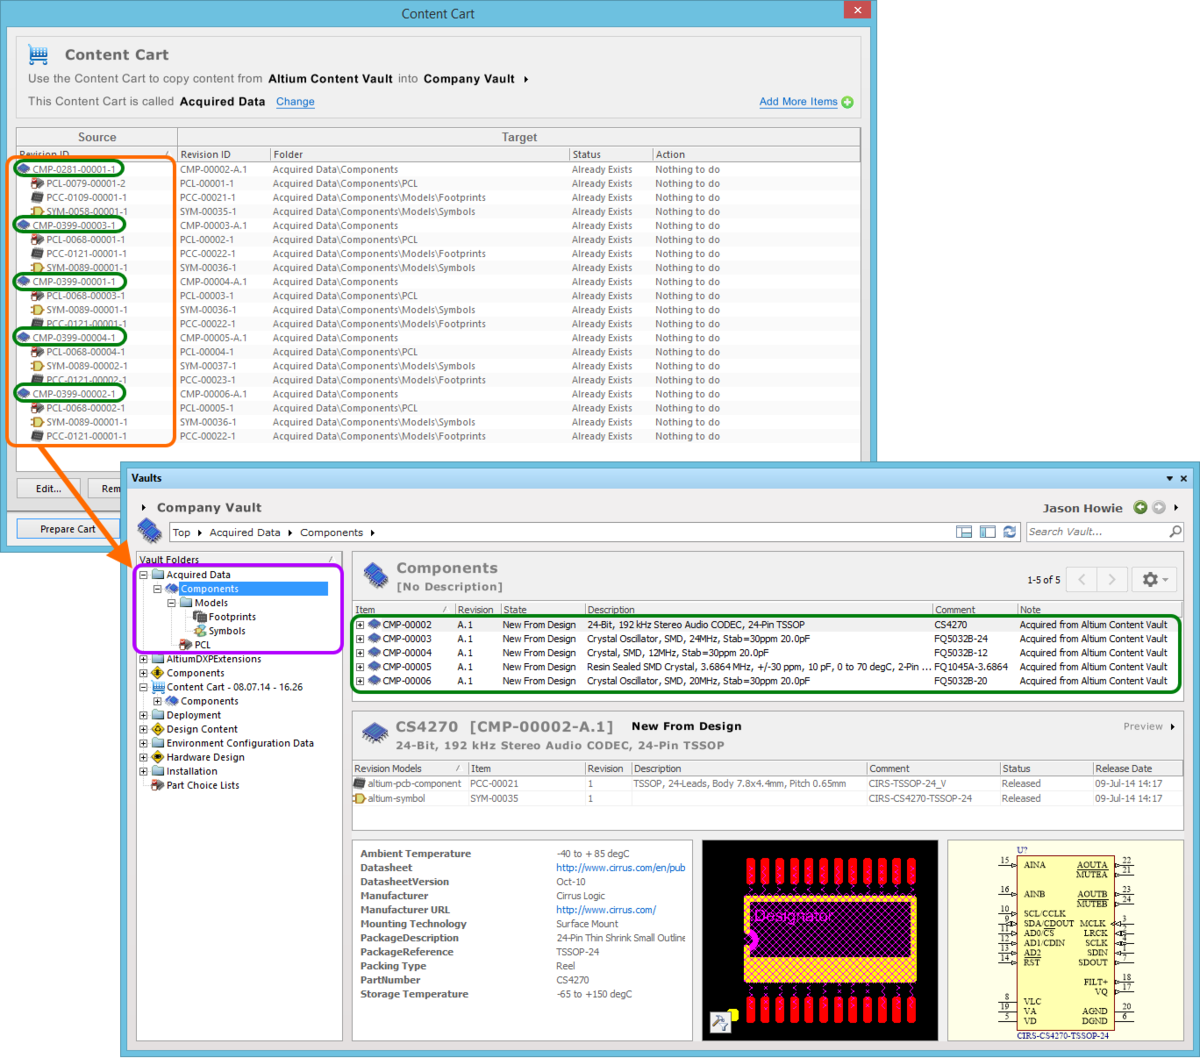
Browsing the fruits of a successful acquisition.
Acquired data points back to its original source. This ancestral link information can be seen by changing the aspect view for the target Item Revision to its Origin aspect view. To quickly jump to the original source Item Revision, click the Show in Explorer button.

Each acquired Item Revision in the target vault links bank to its original source Item Revision in the source vault.