Managing Vault Items with the Item Manager
Contents
- Accessing the Item Manager
- Migration to using Managed Design Items
- Manually Choosing Vault-Based Items
- Automatically Choosing Component Items
- Effecting the update
- Verifying the Update
- Keeping In-Sync - Updating a Design with Vault Changes
- Detecting When There are Updates Required
- Reporting Item Manager Updates
- Additional Update Options
Parent article: Items and Item Revisions
The Item Manager is a powerful tool providing two key abilities in relation to components and sheets of re-usable schematic circuitry in a board design project:
- Migration – firstly, it facilitates the migration of a design project from using components and schematic sheets based on older component management methodologies, to using next-generation vault-based entities (managed components and managed sheets). In this respect it can be thought of as providing 'Update to Vault' functionality.
- Synchronization – secondly, once your designs have been 'converted' to using managed (vault-based) Items, it facilitates the synchronization of instances of those managed components and sheets in a design project, with any changes to the source Items in the vault(s). In this respect, it can be thought of as providing 'Update from Vault' functionality.
This document takes a closer look at using the Item Manager to perform these two tasks.
Accessing the Item Manager
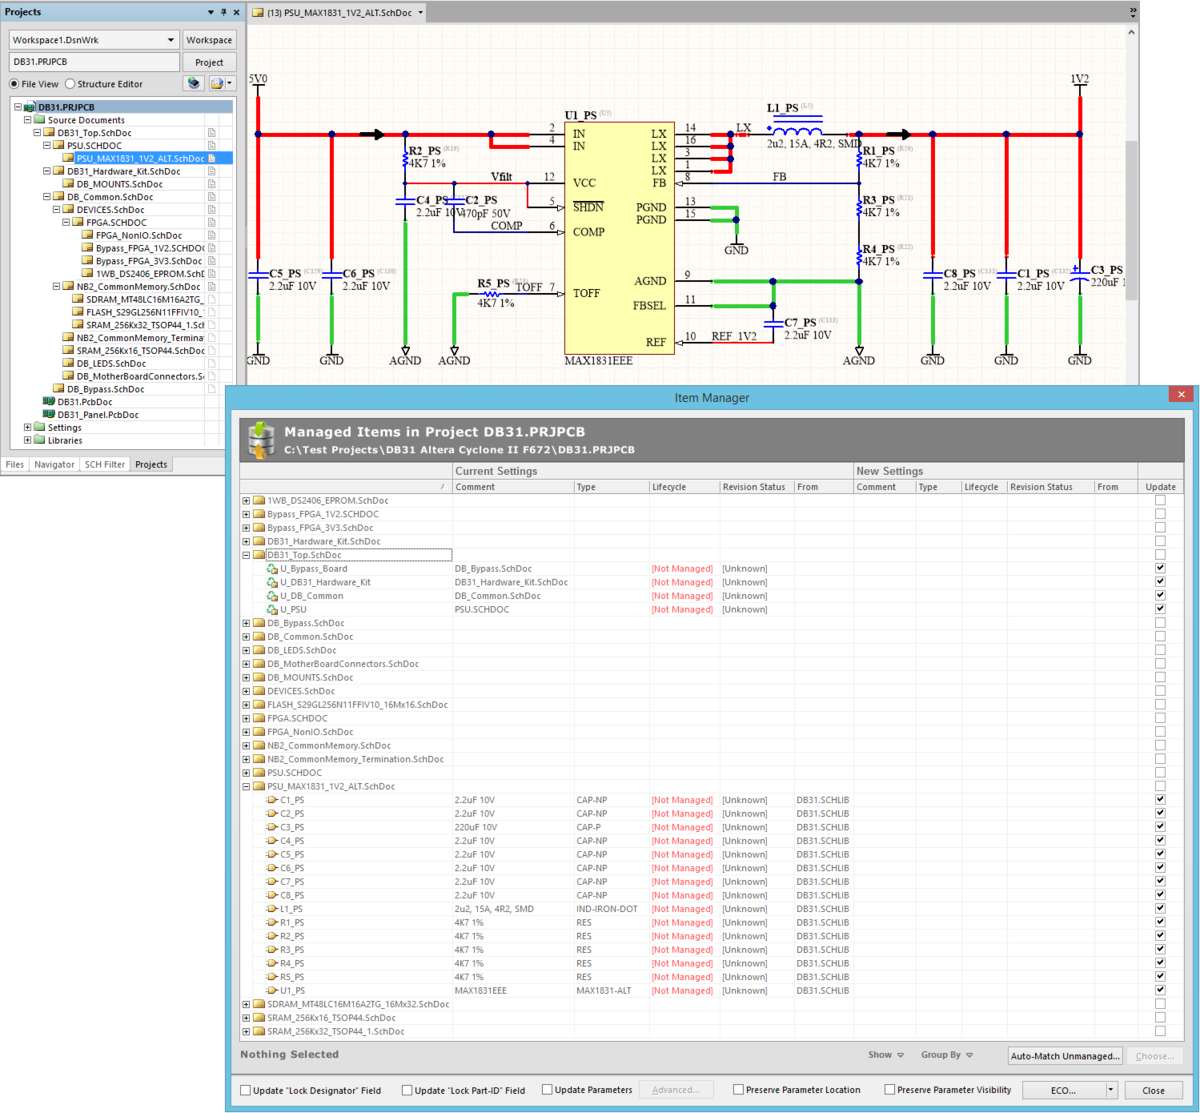
The Item Manager is accessed from the main Tools menu from an active schematic document (Tools » Item Manager) and presents all components and sheet symbols found in a single schematic sheet (free document), or the set of schematics in a board design project.
Access the Item Manager from the Schematic Editor's main Tools menu.
Migration to using Managed Design Items
Getting your source components and schematic sheets migrated into a vault is one thing, and Altium Designer provides the tools to do this quickly and efficiently either at the single, active library level, or en masse through use of its Release Manager. But once you have your collection of Component Items (referencing various vault-based domain model Items) and Schematic Sheet Items, what then? Your existing board design projects are still utilizing components that point to 'old world' source libraries. How to quickly update your design so that it uses the Items you have released into a vault?
The Item Manager fits the bill and provides the solution required – the final piece of the migratory puzzle as it were – by enabling you to essentially update unmanaged design items in a current board design project to use of managed design Items that reside in one or more Altium Vaults.
Assuming you have already created collections of vault-based components and schematic sheets in a target Altium Vault – through release of the required SCHLIBs, PCBLIBs, CMPLIBs, and schematic sheets – simply open the board design project whose design entities you wish to 'convert'. Then, from an active schematic document in that project, access the Item Manager.
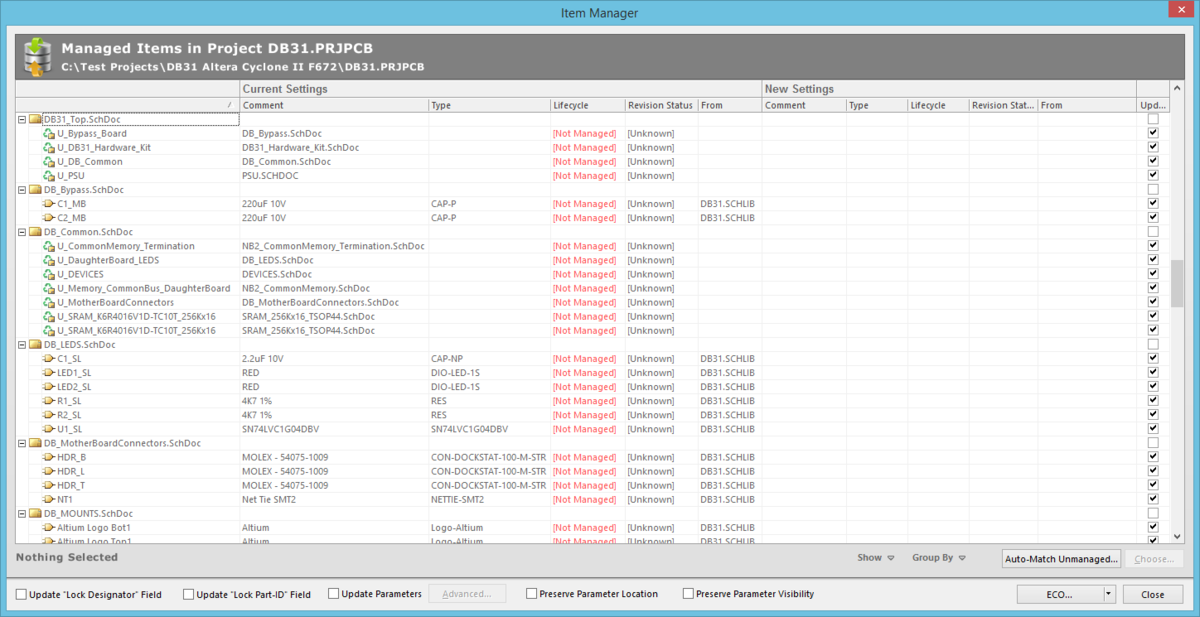
The Item Manager will open, presenting a grid listing the components and sheet symbols detected in the design.
The Item Manager surveys the board design schematics and presents information on the components and sheet symbols currently being used.
For each design entity, which is listed in terms of its designator, the following information is presented under the Current Settings region of the grid:
- Comment – for a currently unmanaged entity, this field will reflect the Comment property for a component, or the File Name property for a sheet symbol. Once managed, this field will simply reflect the Comment of the used Component Item or Schematic Sheet Item.
- Type – for a currently unamnaged entity, this field will reflect the Design Item ID property for a component. This entry will be blank for a sheet symbol. Once managed, this field will reflect the named-revision of the used Component Item or Schematic Sheet Item, in the form Item ID-Revision ID (e.g. CMP-00024-A.1).
- Lifecycle – for a currently unamanged entity, this field will simply reflect this in the state
[Not Managed]. Once managed, this field will reflect the current lifecycle state of the used Item. - Revision Status - for a currently unmanaged entity, this field holds no meaning, and will simply state [Unknown]. Once managed, this field tracks the validity of the Item, either Up to date (if the latest revision of the Item is being used), or Out of date (if a later revision is available).
- From – for a currently unmanaged entity, this field reflects the source library from which the component in the design was placed. Once managed, this field will display the name of the source vault in which the chosen Component Item or Schematic Sheet Item resides.
Use the Show and Group By controls below the grid to change what, and how, data is presented in the main grid.
The Show control provides a menu with the following options:
- Unmanaged Items – show those items in the board design project that are currently unmanaged, that is, they have not been placed from a vault.
- Components – show component items in the grid.
- Symbols – show sheet symbol items in the grid.
- Selected Only – only show those items that are currently selected on sheets of the board design project.
The Group By control provides a menu with the following options:
- Document – group items according to the source schematic sheet on which they reside.
- Item-Type – group items according to their type, as determined by their entry in the Type field.
You now need to replace the unmanaged entities with managed ones from a vault. For both components and sheet symbols, this can be done by manually choosing vault Items to use. For design components, this can also be performed in a more automated fashion, using the manager's auto-matching feature.
Manually Choosing Vault-Based Items
First, let's consider manual replacement. When you click on an entry in the grid, the Choose button becomes available at the bottom-right of the grid. Clicking this will give you access to a dialog, from where you can browse within any of your currently connected vaults and select the required Item, and specific revision of that Item.
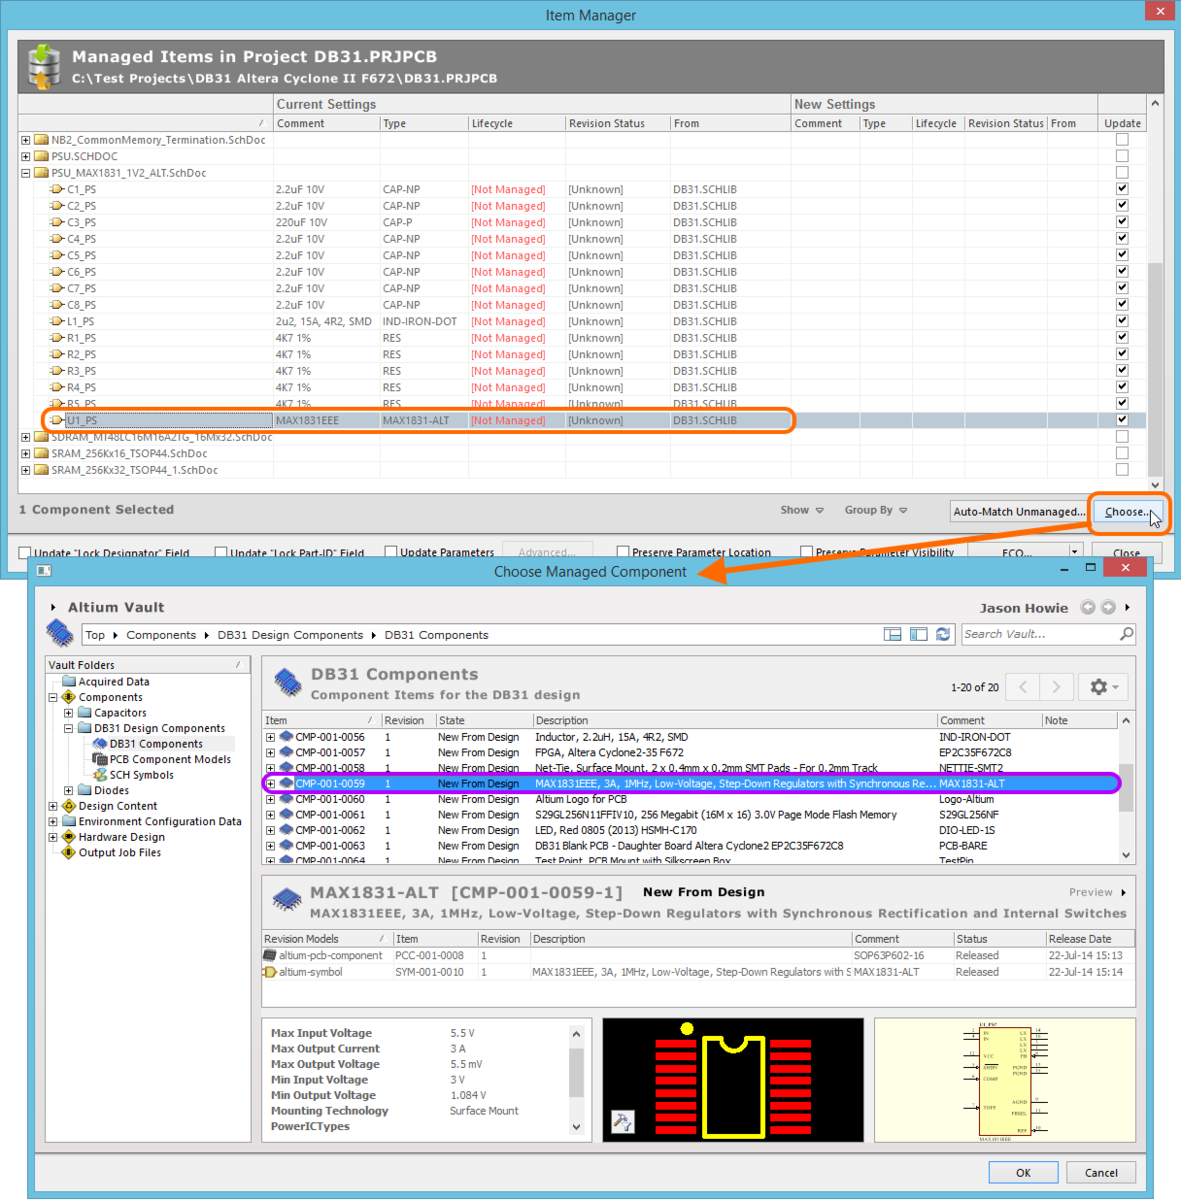
An example of manually choosing a managed component to use as the source for the existing design component in a design.
The choice of Item is reflected in the New Settings region of the grid, back in the Item manager.
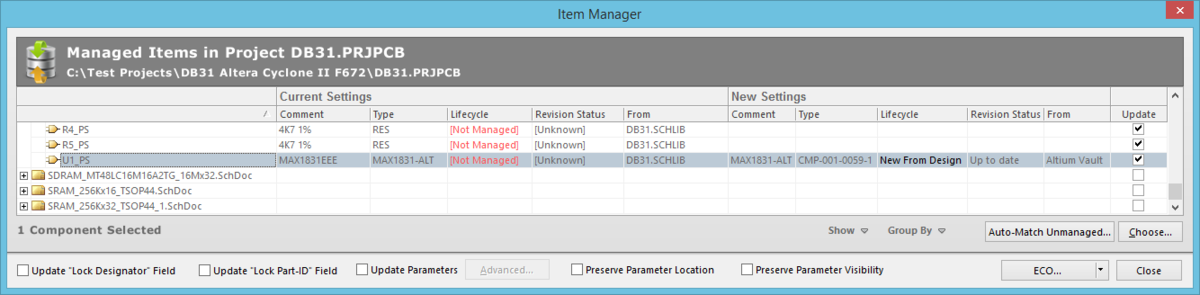
Details regarding the chosen managed Item appear in the New Settings region of the grid.
Automatically Choosing Component Items
Many board designs can be quite large, with a considerable number of components used. Manually choosing Component Items to use in-place of existing unmanaged design components can become a daunting task – and detract from the more important tasks that need your attention!
To make the choosing process more automated the Item Manager provides auto-matching functionality, taking the unmanaged design components and attempting to match each one with a managed Component Item in a connected vault. The matching process takes the Design Item ID of an unmanaged design component and compares it against the Comment property of managed Component Items in a vault. When a match is found, that managed Component Item will be proposed for the update.
To run this process, simply click the Auto-Match Unmanaged button. The Link Unmanaged Components To Vault dialog will appear, with the results of the matching process, grouped by Item-Type.
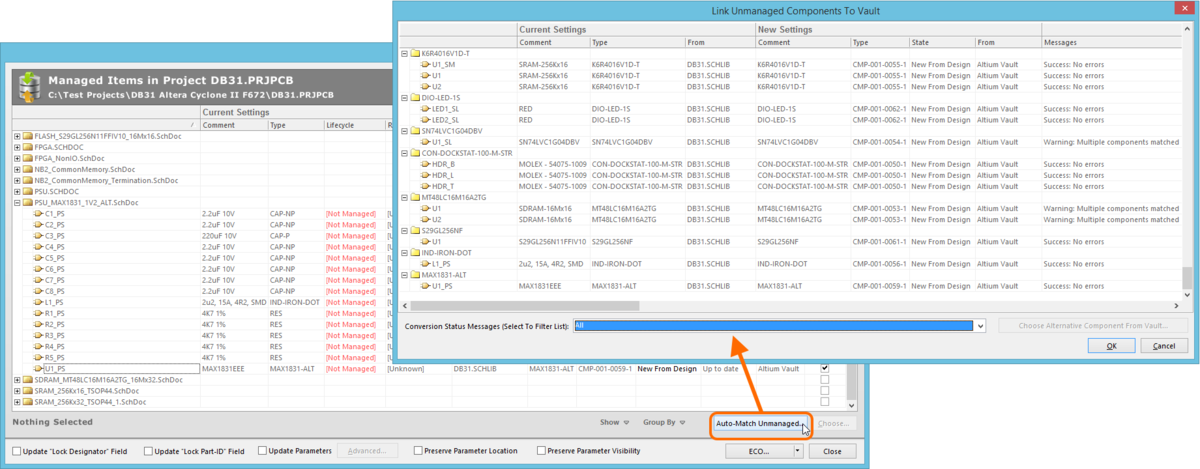
Auto-matching - the quickest way to replace your unmanaged design components with managed ones!
For a successful match, the Messages field will display Success: No Errors. If there is an error preventing a successful match, an alternative message will be displayed. If more than one Item-Revision exists in a vault with the same value for its Comment property, the Messages field will display Warning: Multiple components matched. While a match is still proposed, selecting a component entry with this message will enable the Choose Alternative Component From Vault button. Use this to choose the specific Item-Revision as required, if the proposed match is not suitable.
Click OK to accept the links – the information in the New Settings region of the Link Unmanaged Components To Vault dialog will be copied to the New Settings region back in the Item Manager.
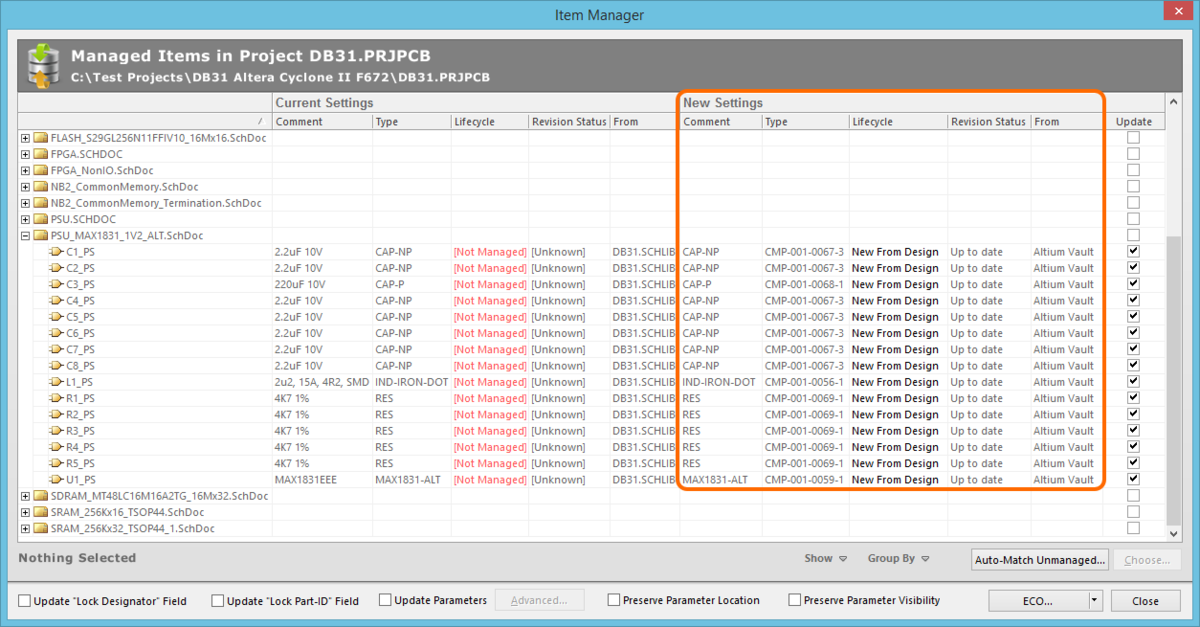
Proposed changes are ready to be implemented.
Effecting the update
Once changes have been set up as required, those changes need to be implemented. This is done through an Engineering Change Order (ECO). The drop-down menu associated with the ECO button, at the bottom of the Item Manager, provides two ways in which to effect an update:
- Generate ECO - use this command to generate and execute an ECO through the Engineering Change Order dialog. Using the dialog, you are able to browse the actions that will be taken to implement those changes. You can disable any actions as required – you always have full control of what gets changed. When ready, execute the ECO and the changes will be effected.
- Apply ECO - use this command to directly create and execute an ECO quietly - without the Engineering Change Order dialog appearing.
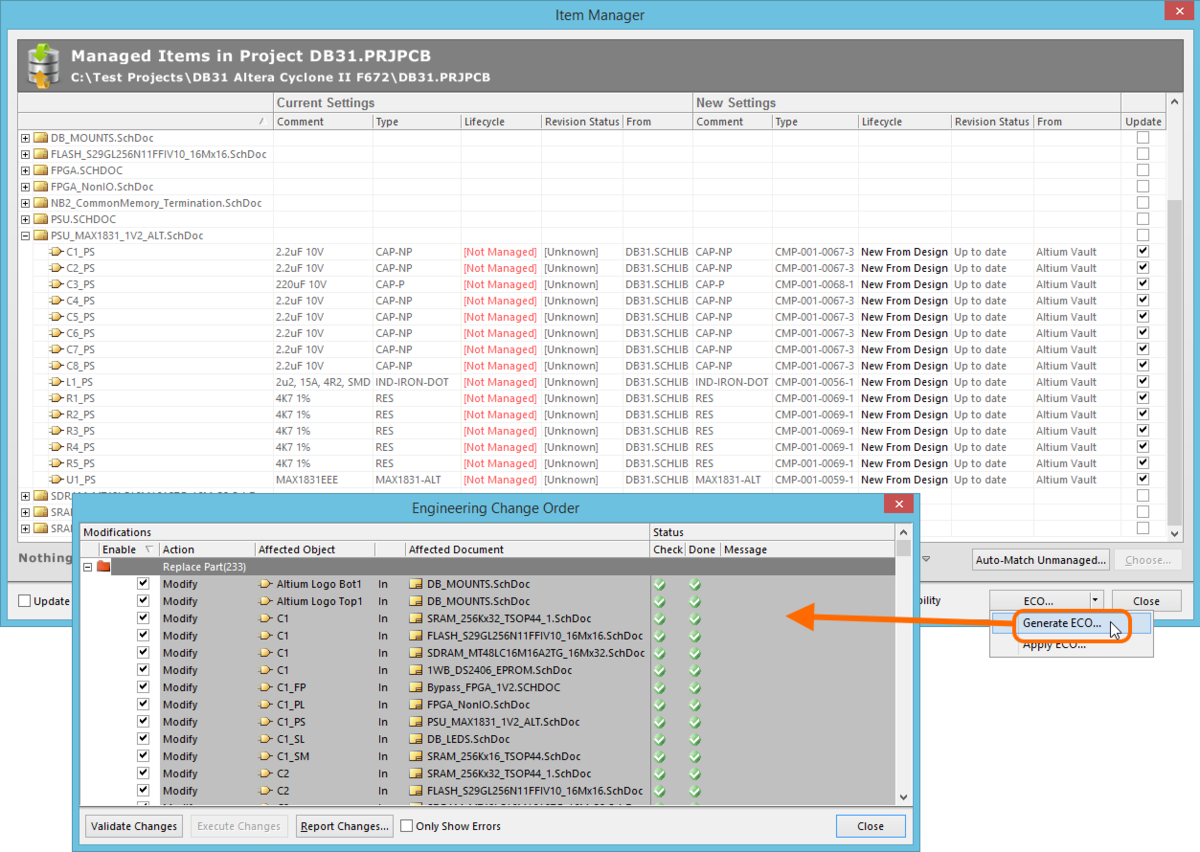
Changes are implemented through use of an Engineering Change Order (ECO), which can be run quietly, or through a dialog (as shown).
Verifying the Update
Verification that replacement has indeed been successful can be performed at the individual component/sheet symbol level within the schematic sheets of the board design project. Simply access the associated properties dialog for an item, which will now show a link back to the corresponding source vault Item.
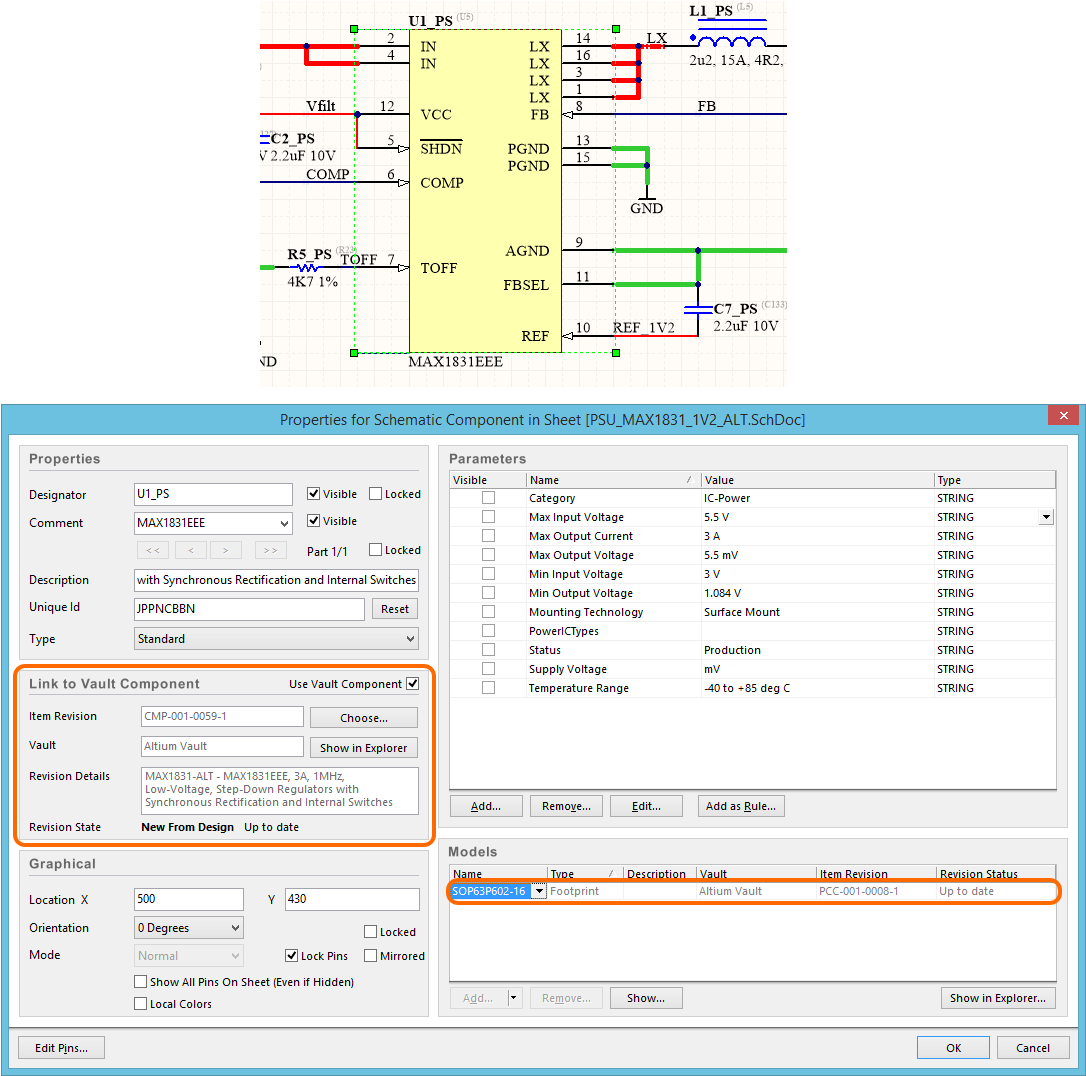
Example showing the successful replacement of an unmanaged component. The properties dialog reflects the link from the placed instance back to the source named-revision of the chosen vault-based Component Item.
Alternatively, verification can be performed quickly back in the Item Manager, which updates to reflect the new settings for the items in the board design project, in the Current Settings region of the grid.
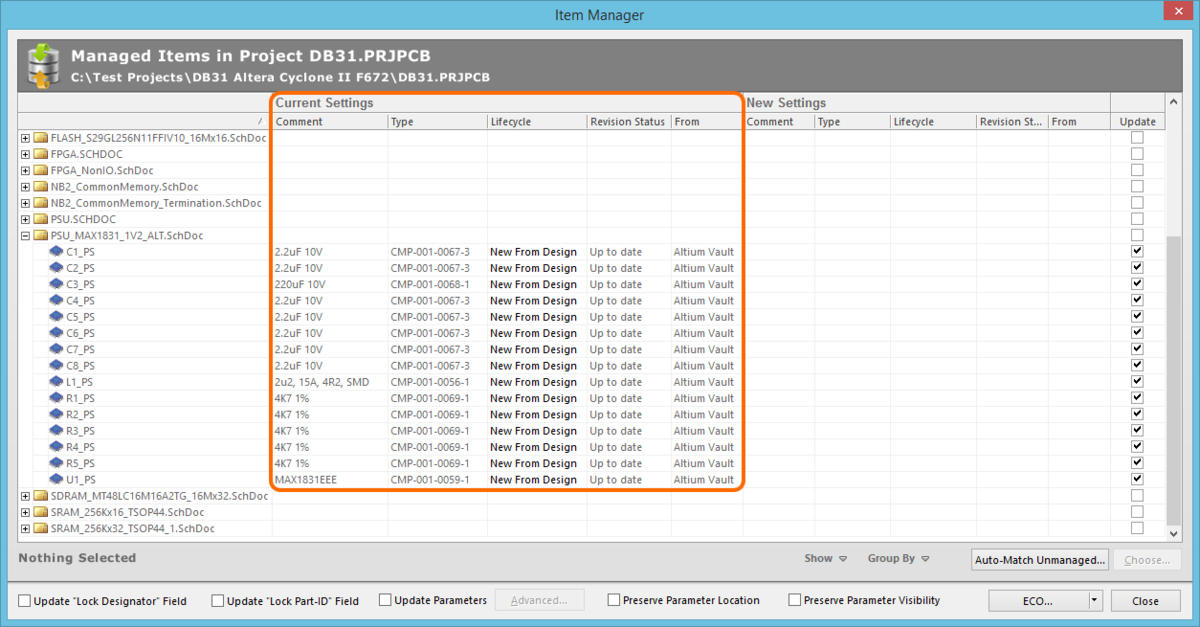
Example of the Item Manager showing the new current settings for the design items in the board design project. Previously unmanaged design components have now been fully replaced with managed Component Items from a vault.
Keeping In-Sync - Updating a Design with Vault Changes
During the course of product development, it is normal for changes to occur. For example, component models may be updated to a new drawing standard, or component definitions may have been updated to add new parameters. These changes must then flow through to any affected schematic sheets.
As well as being used to detect and manage components that are currently Not Managed (meaning they are not from an Altium Vault), the Item Manager is also used to detect and manage Items that are Out of date. The Item Manager compares the Items found on the current design (PrjPcb or a managed SchDoc) against those same Items in the Vault - with all differences being flagged. Out of date Items can easily be updated, and a report can also be generated.
Detecting When There are Updates Required
Related article: Identifying Out of Date Vault Items
When the Item Manager is opened it automatically compiles the schematic project, detects and lists all components, flagging if they are managed or not, and then compares the Item-Revision of each managed component on the schematics against the available Revisions of that Item in the Vault. If there are Items that have a newer revision available in the Vault, these are flagged in the Revision Status column of the Item Manager, which will state Out of date for this Item (as shown in the image below).
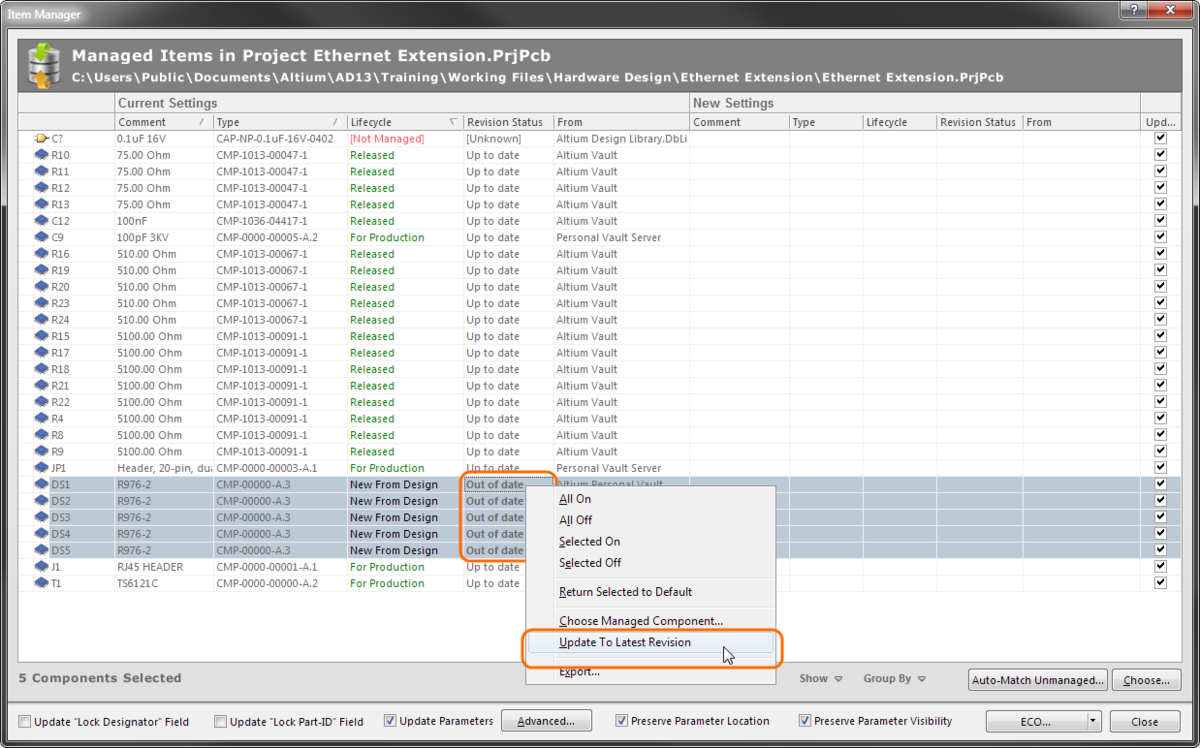
Note the 5 components that have been detected as being Out of Date, select them and then right-click to Update them.
To bring out of date items up to date they must first be selected. Once they are selected, right-click and choose Update to Latest Revision from the menu. The New Settings region of the dialog will then show the detail of each new Item-Revision. Click the ECO button and select Apply ECO, this will generate the Change Orders and apply them to the components in the design. These Items have now been updated to the latest Revision.
Reporting Item Manager Updates
Before committing to perform all of the changes detailed in the Item Manager, you may want to inspect the design and confirm that you approve of each change. To help in this process you can generate a snapshot report of the current listing in the Item Manager. To do this, right-click anywhere in the Item Manager and select Export from the menu, as shown in the image below. Navigate to a suitable location and name the report as required.
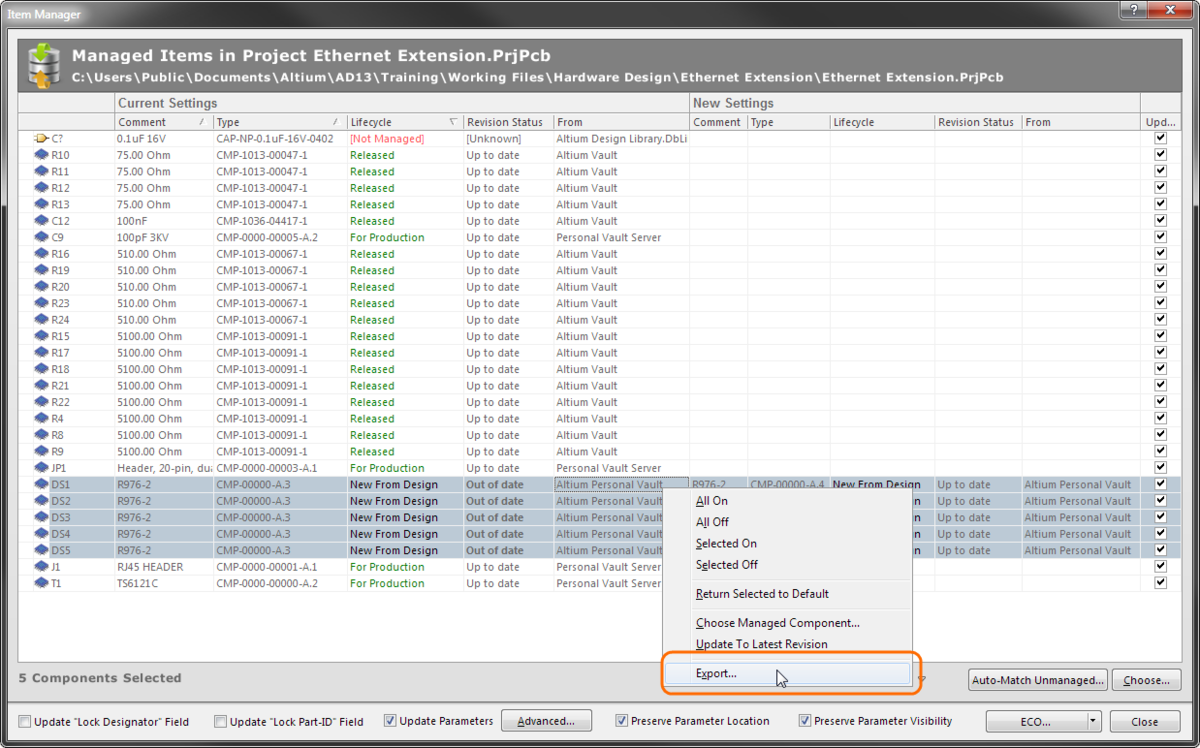
Select Export from the right-click menu to generate a report from the Item Manager.
The report is generated as an HTML file, presented with the same layout as the current Item Manager display. The report shown below was generated from the Item Manager shown in the image above.
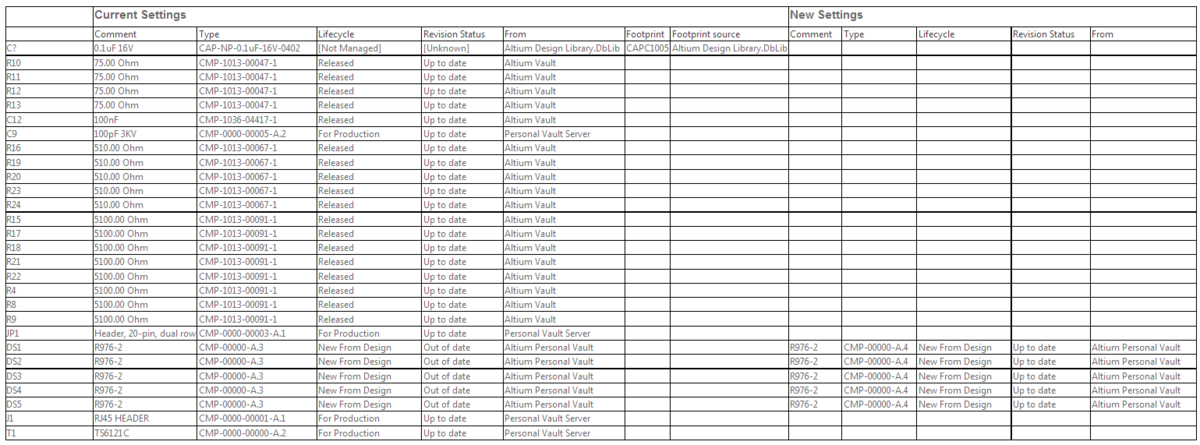
The report is generated in an HTML format, ready to open in your preferred Web Browser.
Additional Update Options
Additional update options are available at the bottom of the Item Manager. These include the ability to update the Locked property associated to a component's designator and/or sub-part fields, as well as controlling the update of parameters. If you have made any component parameters visible on the sheet, there are also options to Preserve Parameter Visibility, and Preserve Parameter Location, ensuring the look and feel of your placed design components are not graphically affected when switched over to vault-based instances.

Additional options to further control what gets updated.
If the option to Update Parameters is enabled, the Advanced button also becomes available. Clicking this will give you access to the Library Update Settings dialog. This dialog lists all parameters found across all components in the design project, and provides full control over what parameters are involved in the update, and how they are updated.

Decide which parameters to update and how - you have full control.
Simply enable the associated Update field to include a parameter in the update process. Use the drop-down fields below the listing of parameters to control how those parameters, included as part of the update, get updated.
- Library parameters not in sheet – choose the default update action to be used when the revision of the source Component Item in the vault has a parameter present, but that parameter is not possessed by a placed instance of that component on the schematic sheet. Three levels of action are available:
Add,Do not add, andAdd if not blank(the revision of the Component Item in the vault chosen for update has a value assigned for the parameter).
- Sheet parameters not in library – choose the default update action to be used when a placed instance of a component on the schematic sheet possesses a parameter, but the revision of the Component Item in the vault chosen for update does not. There are three levels of action available:
Remove,Do not remove, andRemove if not blank(the placed component instance has a value assigned for the parameter).