Item Lifecycle Management
Contents
- Modeling the Lifecycle
- States, Stages and Transitions
- Viewing and Editing Lifecycle Definitions
- Default Definitions
- Adding a New Definition
- Configuring a Definition
- Initial State
- Stages
- States and Transitions
- Linking Stages to Levels of the Revision Naming Scheme
- Saving a Definition
- Cloning a Definition
- Deleting a Definition
- Exporting and Importing Definitions
- Renaming a Lifecycle Definition
- Example Default Lifecycle States
Parent article: Items and Item Revisions
Each Item in an Altium Vault is comprised of a series of revisions, with a new revision used to accommodate the new data from a linked design-side entity, each time that entity is released. The revision therefore reflects the progress of the Item as it undergoes design changes. Or to say that the other way around, if the design changes, the revision must be incremented to reflect that.
For any revision of an Item, it is also important to reflect the current state of that revision – what stage of its 'life' it has reached. This status is referred to as the Item Revision's Lifecycle.
The lifecycle allows a company to manage the Item from a business perspective – and in accordance with company policies and practices. With this lifecycle information, people that need to use an Item in a vault – from a designer contemplating reuse of a released design 'building block', to the supply chain needing the data to fabricate and assemble a board – are able to see, at-a-glance, what stage a revision of an Item has reached in its 'life' and therefore what it can be safely used for.
Modeling the Lifecycle
While different organizations may choose to model or label the lifecycle of design items slightly differently, they will all follow a similar theme. For example, the general cycle of a product’s life will be something like: it starts as a design idea, then becomes a prototype, then goes into production, then at some point becomes obsolete and is no longer made or sold.
Using lifecycle status information on every component of a design helps to ensure that a design can only be promoted to a higher state if that new state is less than or equal to the lowest-state component within the design. For example, if a design is ready to move into production, it should only be allowed to do so if all components within it are also in production – i.e. components that are still In Prototype (or New From Design) must be promoted to In Production before the design as a whole can be promoted to that level.
In many cases, the revisions of Design Items will progress through the various lifecycle states linearly however it should not be assumed that this is the only path that can be taken. For example, some Item Revisions may end up being abandoned before they have even reached the prototyping stage. In Altium Vaults, the allowable states that an Item's revision can move between are defined by a Transition table included in the lifecycle definition.
An Altium Vault supports two levels of lifecycle management: Simple or Advanced. These essentially determine the style of management, upon which the lifecycle definitions themselves are then built. For a lifecycle definition based on the Simple management style, only states and state transitions are involved. For a lifecycle definition based on the Advanced management style, states can be further clustered into defined stages.
States, Stages and Transitions
Main article: Managing the Item's Revision and Lifecycle State - the Item View
Each point in the Item Revision's lifecycle is referred to as a State, for example In Production. When an Item's revision changes state it is referred to as a Transition, which can only be to another State.
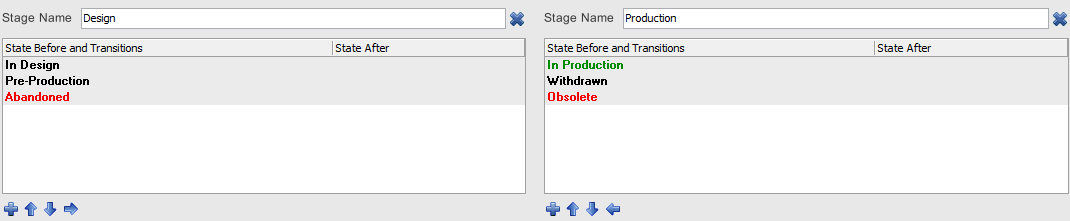
Lifecycle definitions based on the Advanced management style support States being clustered into Stages. Stages allow labels to be created that identify where an Item's revision is in its development. For example, it could be in Design, or in Prototype, or in Production.

An example lifecycle definition whose states are clustered into three stages.
The image below shows a snippet from the detailed Item view for an Item that employs a 3-level Revision Naming Scheme: Model, Prototype and Revision. Each Model is shown as a separate block. Within a Model, each Prototype is a sub-block. Below each Prototype are the Revisions of that Model/Prototype, then within each Revision are the different States that the revision existed in.

Example lifecycle states for various revisions of an Item.
Viewing and Editing Lifecycle Definitions
Lifecycle definitions can be viewed and edited from within the Edit Lifecycle Definitions dialog. To access this dialog, open the Data Management – Vaults page of the Preferences dialog and select the required vault. Then click the Properties button and, from the dropdown menu, select the Edit Lifecycle Definitions command.

Lifecycle Definitions for the selected vault are created and edited in the Edit Lifecycle Definitions dialog.
Default Definitions
The Altium Vault provides seven default lifecycle definitions, as well as the ability to define your own. You must choose a lifecycle definition when you create a new Item.
The default lifecycle definitions are as follows:
- Basic Lifecycle
- Component Lifecycle
- Extension Lifecycle
- Simple Lifecycle
- Simple Lifecycle With Approvals
- Structured Lifecycle
- Structured Lifecycle With Approvals
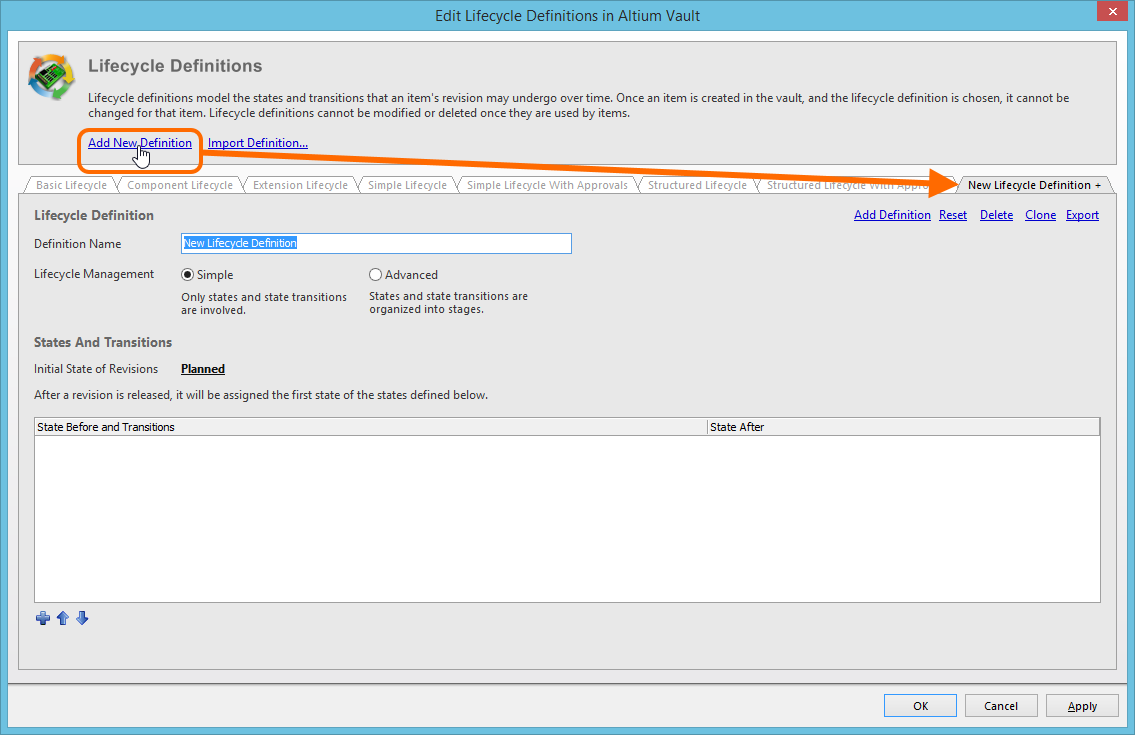
Adding a New Definition
To create a new Lifecycle Definition, click the Add New Definition link at the top of the Edit Lifecycle Definitions dialog. A new tab will appear in the dialog, ready to be configured
Create your own, custom lifecycle definition.
Configuring a Definition
Use the controls available within a lifecycle definition's tab to configure that definition as required.
First, enter a meaningful name for the definition in the Definition Name field. The tab will dynamically reflect the name entered.
Use the Lifecycle Management controls to select the style of lifecycle management – either Simple or Advanced. The simple style means there are only States and State Transitions involved. The advanced style allows definition of Stages, into which the states are clustered.

Specify name and style for the lifecycle definition.
Initial State
Use the Initial State of Revisions field to determine the starting state for an Item Revision, that is, the state for the revision in which it contains no released data – the 'pre-release state' as it were.
By default, this state is named Planned. To change it, simply click the link and use the State Properties dialog to determine its name and a description, as well as text and background colors.
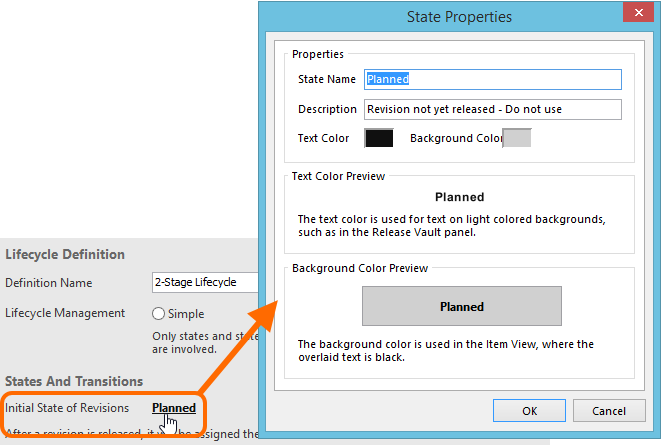
Configure the initial state for revisions.
Stages
If the Advanced style of lifecycle management is chosen, controls for adding and defining the required stages become available. A single stage – named Design – is provided by default, with the possibility to add a further two stages. To add an additional stage, simply click the Add Stage link.
Enter names for the stages as required by typing directly into the respective Stage Name field.
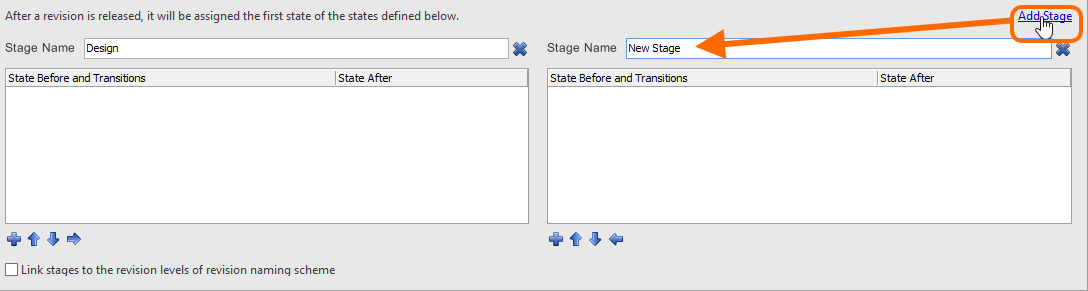
Add stages as required, which will be used to cluster states and create a more enriched, structured lifecycle definition.
States and Transitions
The next step is to add the required states for the lifecycle definition. For a lifecycle definition based on the simple style of management, this will be a flat listing. For the advanced style of management, this will require adding states to the various defined stages.
Click the ![]() control below a state listing to add a new state. Use the State Properties dialog that appears to define that state, in terms of its name, description and color attributes.
control below a state listing to add a new state. Use the State Properties dialog that appears to define that state, in terms of its name, description and color attributes.
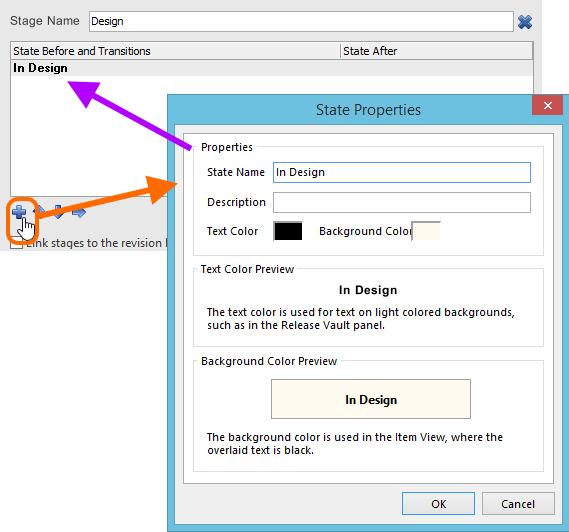
Adding a state to the lifecycle definition.
A new state is added to the bottom of the list. Click on a state to select it, then use the ![]() controls to move it to the required location in the list.
controls to move it to the required location in the list.
When defining states for an advanced-style lifecycle definition, addition controls are available to move a state between stages. Depending on the position of the stage, push the state to the stage on the right (![]() ), or left (
), or left (![]() ) as required.
) as required.
Example states defined across a two-stage lifecycle definition.
The last step is to define the State Transitions – the paths between the different states. Click to select a state, then click the ![]() control to the right of the state name to add a new state transition. Use the State Transition Properties dialog that appears to define the transition, in terms of its name, target (next) state, and menu text.
control to the right of the state name to add a new state transition. Use the State Transition Properties dialog that appears to define the transition, in terms of its name, target (next) state, and menu text.
![]()
Adding a state transition.
A new transition is added to the bottom of the list. Click on a transition to select it, then use the ![]() controls beneath the state listing to move it to the required location in the list.
controls beneath the state listing to move it to the required location in the list.
Where the next state for a transition resides in a different stage, an indication arrow – in the color of the target state – will be displayed to show this
![]()
Example of fully defined states and state transitions across a two-stage lifecycle definition. Arrows are used to indicate transitions across stages.
Linking Stages to Levels of the Revision Naming Scheme
Both the Revision and Lifecycle State for an Item can be incremented from the applicable right-click menu in the Item view, or the Vaults panel. While establishing a new Revision or Promoting the Lifecycle are completely separate tasks that are done for different reasons (a new revision when there is a design change, a new lifecycle state to reflect the enhanced usability of that Item Revision), they are inter-related.
For a lifecycle definition based on the advanced style of management, the defined stages can be linked to the revision levels of the employed revision naming scheme. Do this using the option at the bottom of the Edit Lifecycle Definitions dialog.
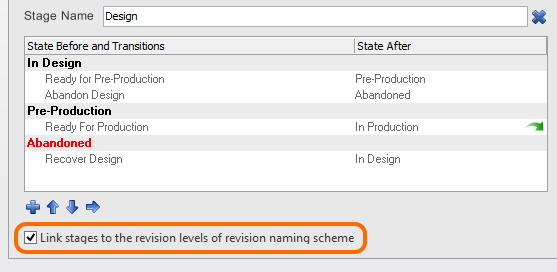
Option to link stages to revision levels.
This creates a relationship between the Lifecycle State and the Revision Level. What that means is when an Item Revision's Lifecycle is incremented so that it moves from a state in one stage to a state in another stage, then the available Revision modification type commands – on that right-click menu – will change too.
Consider the default lifecycle definition Structured Lifecycle With Approvals, and a 3-level Revision naming Scheme (with levels for Revision, Prototype and Model). If an Item Revision is in the state New From Design, in the first stage, then the Revision-type options on the right-click menu include: establish a new Revision; a new Prototype; or a new Model.
If the lifecycle is then incremented to the point where it is now In Prototype, it will have moved to the second stage. Right-clicking on it, the available Revision-type options now include: establish a new Prototype; or a new Model, that is, there is no option to start a new Revision. This behavior is intuitively expected – if the design has progressed to Prototype, then if a design change was needed, a new Prototype would be needed, or even a new Model, depending on the scope of that change.
Once the Item Revision reaches the In Production state, in the third stage, the Revision-type option to establish a new model is available only, again as expected.
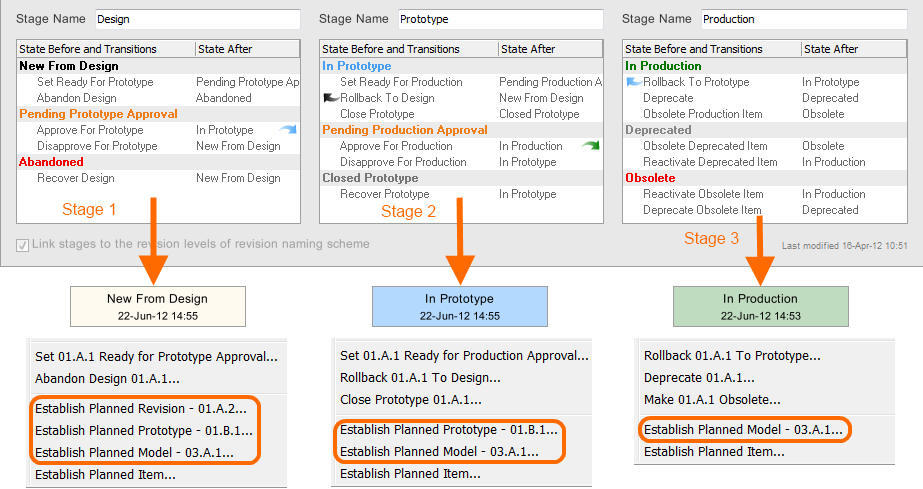
When linked, revision-type commands change as the Item Revision's lifecycle state progresses through the different stages defined.
Saving a Definition
Whether a new lifecycle definition has been added, or an existing lifecycle definition has been modified in some way, that lifecycle definition must be saved. Although there is no actual 'save' command, there are controls available to perform this.
- For a new lifecycle definition – distinguished by a '+' suffix – either use the Add Definition control (at the top-right of the definition's tab), or click the dialog's main Apply button.
- For an existing lifecycle definition that has been modified – distinguished by a '*' suffix – either use the Apply Changes control (at the top-right of the definition's tab), or click the dialog's main Apply button.
In either case the suffix will be removed and the definition will be added as part of the set of lifecycle definitions available to the vault.
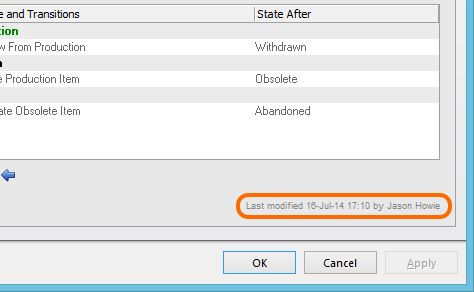
In the spirit of facilitating a clear and transparent audit trail – of who changed what, and when – details of when a lifecycle definition was last modified are provided at the bottom-right of its tab.
Identifying when a lifecycle definition was last modified, and by whom.
Cloning a Definition
New lifecycle definitions do not need to be created from scratch. The Edit Lifecycle Definitions dialog provides the ability to quickly clone any of the existing definitions. To do so, simply make the required lifecycle definition that is to be cloned, the active definition, then click the Clone control at the top-right of that definition's tab.
An exact copy of the definition will be taken, creating a new definition with initial default name of New Lifecycle Definition 1. Rename as required and click the Add Definition control (or the main Apply button) to effectively save the new definition.
Deleting a Definition
To delete an existing lifecycle definition, simply select it – making it the active definition in the Edit Lifecycle Definitions dialog – then click the Delete control, at the top-right of the definition's tab.
Permanent deletion of a lifecycle definition is effected upon clicking the dialog's main Apply button (or clicking OK). Prior to this, the delete operation can be undone by clicking the Undo control, at the top-right of the Edit Lifecycle Definitions dialog.
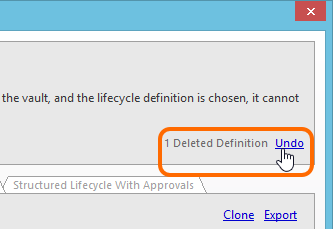
The operation to delete lifecycle definitions can be undone.
Exporting and Importing Definitions
User-defined lifecycle definitions are available for use only in the Altium Vault in which they are defined. Providing the ability to port definitions between vaults, the Edit Lifecycle Definitions dialog features Export and Import capabilities.
The lifecycle definition is stored in a Lifecycle Definition file (*.definition).
To export a lifecycle definition, simply click on the Export control, at the top-right of its tab. Use the subsequent Save Lifecycle Definition dialog to determine where, and under what name, the file is to be saved.
To import a lifecycle definition, simply click on the Import Definition control, at the top of the Edit Lifecycle Definitions dialog (above the tabbed definitions). Use the Open Lifecycle Definition dialog to browse to, and open, the required Lifecycle Definition file. The lifecycle definition will be added to the list of existing lifecycle definitions available to the vault.
Renaming a Lifecycle Definition
To rename an existing, used lifecycle definition:
- Access the Edit Lifecycle Definitions dialog for the required Altium Vault.
- Click the tab for the definition whose name you need to change.
- Modify the name in the Definition Name field.

Example of renaming a lifecycle definition, and verifying the change in the properties of an Item already using that definition.
Example Default Lifecycle States
The following table provides a listing of states and state transitions used in the default Structured Lifecycle With Approvals lifecycle definition.
| Current State | Possible Transitions | Transitions to State | Comment |
|---|---|---|---|
| Planned | Perform Release | New From Design | All new, unreleased Item Revisions start in the Planned state. An Item Revision in this state cannot have its lifecycle status manually changed, it can only be released, automatically transitioning to New from Design. |
| New from Design | Set Ready for Prototype | Pending Prototype Approval | Indicates that this Item Revision has been released so is now New from Design. |
|
| Abandon Design | Abandoned | A released Item Revision cannot be deleted, so if necessary this revision can be Abandoned. |
| Pending Prototype Approval | Approve for Prototype | In Prototype | Item Revision is ready to be approved for prototyping. Successful approval transitions the revision to the In Prototype state. |
|
| Disapprove for Prototype | New From Design | If an Item Revision fails to be approved for prototyping, it is transitioned back to New from Design. |
| Abandoned | Recover Design | New from Design | An abandoned Item Revision can be recovered, restoring it to New from Design. |
| In Prototype | Set Ready for Production | Pending Production Approval | The Item Revision is In Prototype, typically this is state when you are ready to assemble the first physical prototypes. If it passes prototype testing then it can be transitioned to Pending Production Approval. |
|
| Rollback to Design | New from Design | If the Item Revision fails testing, then it should be transitioned back to New from Design. |
|
| Closed Prototype | Closed Prototype | If the Item Revision cannot be developed any further (perhaps it needs design changes, requiring a new Revision), then transition it to Closed Prototype. |
| Pending Production Approval | Approve for Production | In Production | If the Item Revision has passed prototype testing and is ready to be released to production, then it is ready to be Approved for Production. Successful approval transitions the revision to the In Production state. |
|
| Disapprove for Production | In Prototype | If the Item Revision cannot be released to production, it can transitioned back to In Prototype. |
| Closed Prototype | Recover Prototype | In Prototype | A Closed Prototype is one that is considered unable to be further developed. If it is possible to continue with it, it can be transitioned back to In Prototype. |
| In Production | Rollback to Prototype | In Prototype | If an Item Revision is in Production but there is some reason it cannot be produced, it can be transitioned back to In Prototype. |
|
| Deprecate | Deprecated | If you are planning to stop making the Item at its current revision (perhaps a component used on the board is becoming difficult to buy), you transition it to be Deprecated. |
|
| Obsolete Production Item | Obsolete | If an Item Revision that is currently In Production is no longer able to be made, it can be immediately Obsoleted. |
| Deprecated | Obsolete Deprecated Item | Obsolete | Deprecated typically means production can continue from existing stock, but new components for that Item Revision should not be ordered. |
|
| Reactivate Deprecated Item | In Production | Restore a Deprecated Item to be In Production. |
| Obsolete | Reactivate Obsolete Item | In Production | Restore an Obsolete Item to be In Production. |
|
| Deprecate Obsolete Item | Deprecated | Restore an Obsolete Item to Deprecated. |