Improved Upload of 3D Models to Vault
Altium Vault 2.5 saw the arrival of support for 3D Models. However, only a single model could be uploaded to an existing 3D Model Item at a time, making the process quite cumbersome. Altium Vault 2.6, in conjunction with Altium Designer 16.0 delivers vast improvement in this area, with support for upload of multiple 3D Models through the Release Manager. Alternatively, upload through drag and drop functionality, similar to uploading any files into Binary File Items. The Release Manager also receives new migration tool functionality in this release, allowing you to quickly extract 3D models from their 2D footprint libraries.
Release Manager Support
Releasing single 3D Model files to a target vault can be a tedious task. This is also the case if changes have been made affecting an array of source 3D Model files, that need to be re-released into a new revision of each target 3D Model Item.
To facilitate the release of multiple 3D Model files to a target vault simultaneously, Altium Designer provides a Release Manager (File » Release Manager). Use it to batch-release 3D Model files in a nominated source folder location.
Remember that the following 3D model formats are supported:
- STEP File (*.step; *.stp) - 203 and 214 formats.
- Parasolid File (*.x_t; *.x_b) - up to V27.
- SolidWorks Part File (*.sldprt) - up to 2015 format.
Setting up for release couldn't be simpler:
- Set the Document Type to
3DModel. - Point to a top-level folder containing the 3D Model files you want to release. Files can be stored in sub-folders within this folder.
- Choose the target vault.
- Choose to create a top-level folder in the vault based on the nominated top-level Windows folder, or choose an existing vault folder. You can optionally create sub-folders in the nominated vault folder, for each Windows sub-folder. Additionally, you can opt to create a vault folder for each source 3D Model file.
- Use the Default Options for New Released 3D Models region of the Release Manager to control how required new Items are created as part of the release process – in terms of Lifecycle Definition, Item Naming (default is 3DModel-{00000}) and Item Revision Naming schemes, and starting index.
- Hit the Analyze Folders button.
Analysis of source folders and target vault folders (and Items) based on your chosen options will be performed and the source 3D Model files detected will be listed. For each entry, the target Item will be displayed, its current and/or next revision (as applicable) and the action that will be performed by the release process.
Enable the 3D Models that you want to release and then click the Prepare Items and Documents button to effectively commit the link information to the source 3D Model files involved in the release. Once saved, proceed with the release by clicking the Release Items button.

Batch-release 3D Model files using the Release Manager.
3D Model Extraction
Where 3D Models (e.g. STEP) have been embedded into the 2D footprint models within a PCB Library document (*.PcbLib), the Release Manager provides a neat little utility with which to extract those models. To do so:
- Launch the Release Manager (File » Release Manager).
- Set the Document Type to
PCBLIB. - Point to a top-level folder containing the PCB Library(ies) you want to extract 3D models from. Files can be stored in sub-folders within this folder.
- Leave the Default Options for New Released PCB Components at their defaults - you are not actually going to release the PCB Library component models.
- Hit the Analyze Folders button - this loads the PcbLibs.
- Click the Migration Tools button and choose Extract 3D Models from the menu.
- In the Generate 3D Model Files dialog that appears, use the Options region to determine file generation. Firstly, specify where the generated files are to be stored – either in a sub-folder of the location in which the source PCB Library resides, or in a specified folder elsewhere. By default, a sub-folder named
Models3Dwill be created. Change this naming to something more suitable as required. If the nominated folder exists, it will be used. If not, it will be created. - Optionally choose to Overwrite existing files – have existing 3D Model files with the same name overwritten when new files are generated.
- After defining options as required, click OK. Generation will proceed and a confirmation dialog will appear when the process is complete, stating how many 3D Model files were generated.
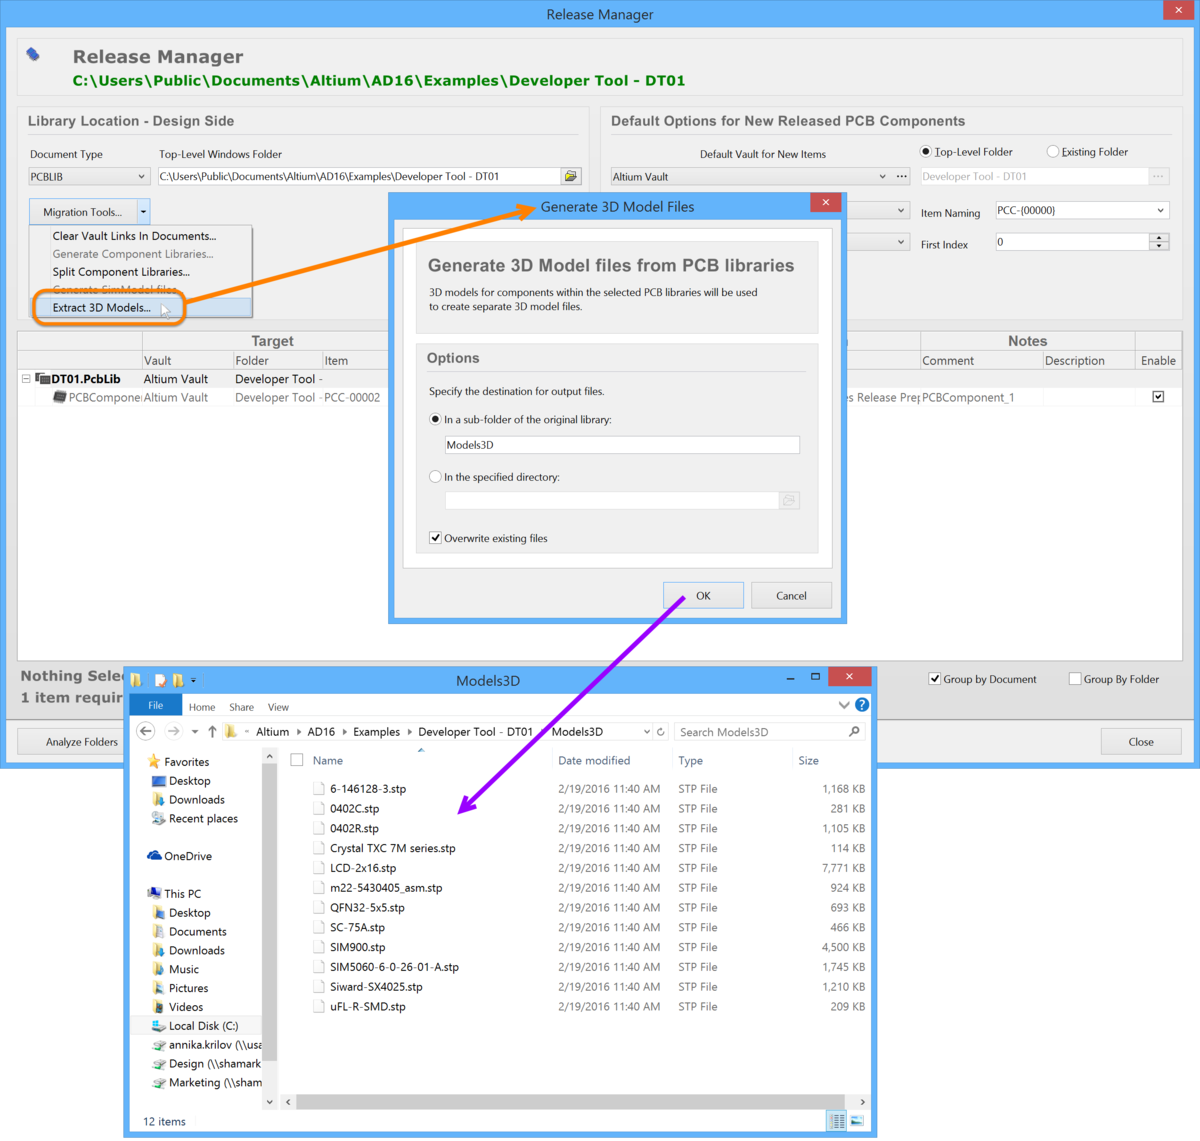
Example 3D Model files generated from a PCB Library by using the extraction tool.
Drag and Drop Upload
Upload of a 3D Model file can now be performed by dragging the selected file from a source folder in your Windows Explorer, and dropping it onto the required target 3D Model Item in the Vaults panel.
The Release File dialog will appear, with the dragged file listed in the Sources area. Add a Comment, Description, and any Release Notes as required, and then click the OK button.