Using the Software Platform Builder
Introduction to the Software Platform
Organization of the Software Platform
Using the Software Platform Builder
Glossary
The Software Platform Builder is the graphical interface that you can use to work with the modules in the Software Platform. The Software Platform Builder enables you to:
- Automatically import modules based on the peripherals devices on the hardware design
- Add or delete hardware wrappers
- Build and edit stacks that are build up hardware wrappers
- Configure modules
- Access help information and inspect public header files
To use the Software Platform Builder you need an Embedded Project. The Software Platform is all about making hardware devices available to application code so it makes sense to associate the Embedded Project with an FPGA design. The Software Platform Builder becomes available when you add the special Software Platform document. To do so:
Right-click on the name of the embedded project and select Add New to Project » SwPlatform file
A new Software Platform document is added to the Projects panel named "Software Platform1.SwPlatform". This new document is part of the Embedded project.
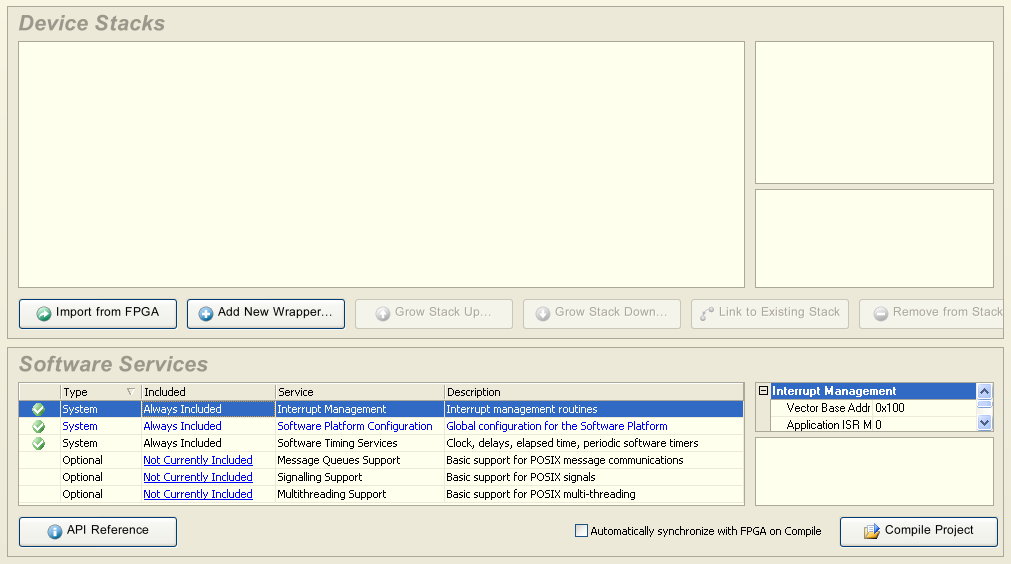
The Software Platform Builder consists of two main areas: the Device Stacks area and the Software Services area. The left part of each section shows which device stacks (wrappers, drivers and/or contexts) or which services are selected to be compiled with your project. The right part of each section shows the configuration of the selected wrapper, driver, context or service.
Working with Device Stacks
With the Device Stacks area you can build device stacks by adding and/or removing modules from the Software Platform. To build a device stack, you always start by adding wrappers. Once you have selected one or more wrappers, you can continue to stack other modules on top of it.
Adding wrappers
There are two ways to add wrappers to your document:
| This button synchronizes the hardware wrappers on the document with your hardware design. If wrappers are missing, they are added. Wrappers on the document that have no associated device on the schematic are removed. | This button synchronizes the hardware wrappers on the document with your hardware design. If wrappers are missing, they are added. Wrappers on the document that have no associated device on the schematic are removed. |
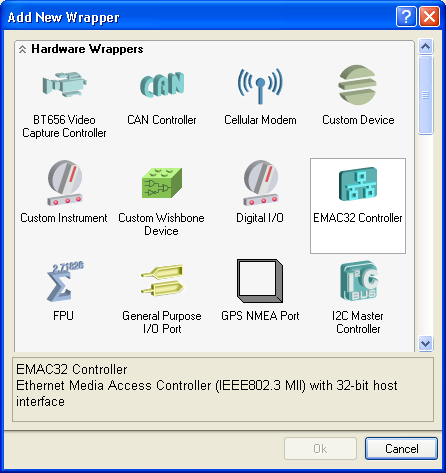
| Opens the Add New Wrapper dialog. The dialog shows a list of wrappers from which you can select.
| Opens the Add New Wrapper dialog. The dialog shows a list of wrappers from which you can select.
|
Growing Stacks
The Software Platform Builder is an intelligent tool that knows all possibilities for growing a stack. Therefore the Grow Stack Up... button and Grow Stack Down... button only become available if possibilities exist to extend the stack from the point of the selected module.Once you have partial device stacks on the document, you can extend them with other modules (drivers, contexts) to grow them to the abstraction level you wish to use in your application
- To grow a stack up, select the highest level plugin of the existing stack and click the Grow Stack Up... button. (When you start, this will be the hardware wrapper only, but as you proceed, other levels will become available.)
- To grow a stack down, select the lowest level plugin of the existing stack and click the Grow Stack Down... button. Growing a stack down is needed if you remove lower level modules of the stack. The higher level modules in the stack then lose their connection with their associated hardware wrapper.
| Opens the Grow Stack dialog. The dialog shows all possible combinations of sub-stacks that you can place on top of the selected module. In the Grow Stack dialog you can select any module in any of the possible sub-stacks to extend the selected stack upwards. | Opens the Grow Stack dialog. The dialog shows all possible combinations of sub-stacks that you can place on top of the selected module. In the Grow Stack dialog you can select any module in any of the possible sub-stacks to extend the selected stack upwards. |
| Opens the Grow Stack dialog. The dialog shows all possible combinations of sub-stacks that you can place below the selected module. In the Grow Stack dialog you can select any module in any of the possible sub-stacks to extend the selected stack downwards. | Opens the Grow Stack dialog. The dialog shows all possible combinations of sub-stacks that you can place below the selected module. In the Grow Stack dialog you can select any module in any of the possible sub-stacks to extend the selected stack downwards. |
| This button removes an item from the stack. | This button removes an item from the stack. |
Linking Partial Stacks Together
If your document contains partial stacks, you can link them together to form a complete stack. The Software Platform Builder does this in an intelligent way. If, for example, a wrapper and a context potentially can be combined in a single stack, the Link to Existing Stack button becomes active.
| If you click this button, all modules to which you can connect the reference module, light up. To link the reference stack, click on the module to which you want to link. | If you click this button, all modules to which you can connect the reference module, light up. To link the reference stack, click on the module to which you want to link. |
Get the API Reference
Right-click on a stack item and select API Reference or select the stack item and press F1.
Inspect the public header file(s) of a stack item
Right-click on a stack item and select Header Files » name.h
Software Services Configuration
A software service is a set of functionality - that is, types, defines, structures and functions. This functionality is accessible from your application. Different services are brought into the software platform in different ways:
- System Services are always present in the software platform.
- Automatic Services are brought into the software platform automatically, depending on what stacks you create.
- Optional Services are services that you can select manually to be part of your project.
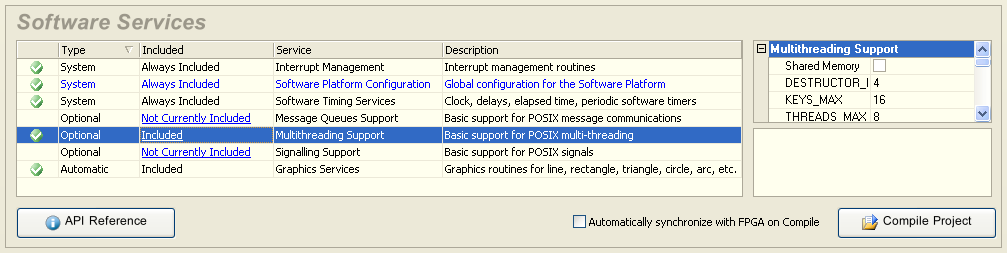
Enable Optional Services
Optional services are services that can be selected manually to be part of your project. Select the optional service and use the drop-down box of the include status to activate or deactivate a service.

Some optional services also depends on other services and will be enabled automatically.
Generating and Using Initialization Code
As part of the Software Platform Configuration service, there are three options relating to the creation and use of initialization code.
Use available configuration options to generate and use code by which to open and initialize all device stacks in the platform - all delivered as part of an encompassing wrapper
around your Software Platform.
- Generate Initialization Code – enable this option to create initialization code, by which to open all device stacks and to provide handles for subsequent use of the API. This option is enabled by default for all new Software Platform documents. If this option is disabled, the two options below will become unavailable, and no
swplatform.cfile will be generated.
- Top Level Only – enable this option to explicitly open top-level stack items only (all other items will be opened implicitly). If disabled, all stack items will be explicitly opened and handles provided. This option is enabled by default for all new Software Platform documents.
- Call Initialization Code – enable this option to automatically call generated initialization code before
main().
With the Generate Initialization Code option enabled, initialization code will be added to both swplatform.h and swplatform.c
(created as a result of enabling the option) generated files.
Accessing and Using Generated Files
Upon compilation of an Embedded project, the files generated by (and from) the Software Platform – swplatform.c and swplatform.h – can be found in the Generated»C Source Documents and Generated»Header Documents sub-folders respectively, in the Projects panel.
Example of Header and C files generated as a 'wrapper' around the active project's Software Platform upon compilation of that project.
The swplatform.c file is generated only when the option to Generate Initialization Code is enabled, as part of the Software Platform Configuration service. This option is enabled by default for all new Software Platform documents.
To use the generated files, you must ensure to add a #include statement into your top-level code source file (typically main.c), to 'bring in' the generated swplatform.h file:
#include "swplatform.h"
All other required header files needed to access the devices in the stack are brought in (made available) as a result of adding (pointing to) this file.