C Code Symbol
Parent page: Objects

C Code Symbol
Summary
A C Code Symbol is an electrical design primitive. Similar in nature to a standard Sheet Symbol, it is used to reference an underlying C source file. More specifically, it represents a single, top-level exported function within that file. Access to parameters in the exported function is made using C Code Entry primitives - placed on the C Code Symbol and functionally similar to Sheet Entries placed on a standard Sheet Symbol.
The exported C function is subsequently translated into a hardware function using Altium Designer's C-to-Hardware Compilation (CHC) technology. The end result is an independent module of FPGA logic which connects, through defined IO ports, to other areas of the circuit design.
Availability
C Code Symbols are available for placement in the Schematic Editor only. They can be placed on schematic sheets that are part of either an FPGA project (*.PrjFpg), or a Core project (*.PrjCor). Use one of the following methods to access the placement command:
- Choose Place » C Code Symbol [P, M] from the main menus
- Click the button on the Wiring toolbar.
Placement
After launching the command, the cursor will change to a cross-hair and you will enter C Code Symbol placement mode. Placement is made by performing the following sequence of actions:
- Click or press Enter to anchor the top-left corner of the C Code Symbol.
- Move the cursor to adjust the size of the C Code Symbol, then click or press Enter to anchor the diagonally-opposite corner and thereby complete placement.
Continue to place other C Code Symbols, or right-click or press Esc to exit placement mode.
Non-Graphical Editing...
The following methods of non-graphical editing are available:
...via an Associated Properties Dialog
This method of editing uses the following dialog to modify the properties of a C Code Symbol object:
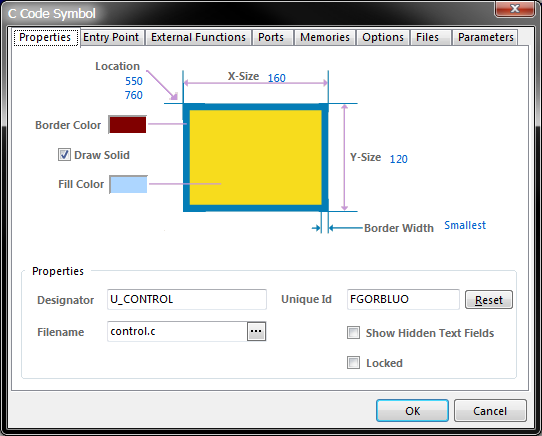
The C Code Symbol Dialog.
Entry Point Tab
It is worth taking a closer look at the Entry Point tab of the C Code Symbol dialog, as it is here that the interface between the C Code Symbol and the exported function in the referenced C source file is defined.
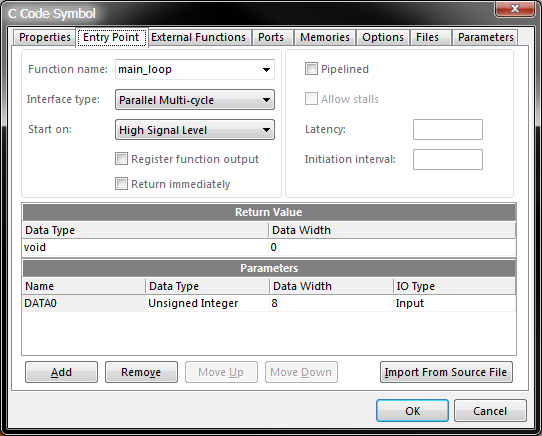
The Entry Point tab of C Code Symbol dialog.
The required C function is 'hooked-up' to the C Code Symbol using the Function Name field.
The Parameters region lists the parameters (and their properties) of the exported function. The entries here are made available on the C Code Symbol as C Code Entries - allowing for data transfer to/from other logic in the design.
The C-to-Hardware Compiler can generate four types of circuit from the C source code for an exported function: Parallel Combinatorial, Parallel Multi-cycle, Wishbone - Single Bus Cycle and Wishbone - Multiple Bus Cycles. This is specified using the Interface field, which is set to Combinatorial by default. It is worth looking more closely at the difference between the four:
Parallel Combinatorial - this type of circuit consists of logic gates whose outputs at any time are determined only by the values of the inputs. In this interface mode, only the parameters of the exported function appear as C Code Entries on the C Code Symbol, commonly referred to as 'Parameter' entries.
Combinatorial circuits can be generated for simple C functions which do not depend on stored state (memory, previous executions, etc). The C-to-Hardware Compiler will attempt to create a combinatorial circuit if requested but if this is not possible, an error will be issued during compilation and the interface mode must be changed to Multi-cycle. Note that if a function accesses global variables, this implies stored state and therefore a combinatorial circuit cannot be generated.
Parallel Multi-cycle - this type of circuit requires more than one clock cycle to complete. When this interface mode is selected, additional START, DONE and CLOCK C Code Entries will automatically be added to the C Code Symbol, commonly referred to as 'Control' entries. These entries are not part of the exported C function.
The circuit begins operating when the START signal is High and is clocked at the frequency arriving at the CLOCK line. The inputs are assumed to be valid. When the circuit finishes operating, the DONE signal will be driven High and the outputs will be valid for one clock cycle. Due to the short availability of the outputs, external latching of the outputs is common practice.
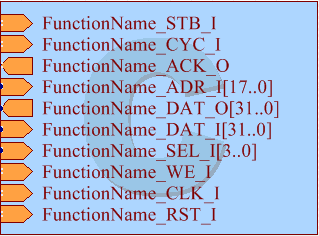
Wishbone - Single Bus Cycle - this type of circuit requires one clock cycle to complete. When this interface mode is selected, additional STB_I, CYC_I, ACK_O, ADR_I[17..0], DAT_O[31..0], DAT_I[31..0], SEL_I[3..0], WE_I, CLK_I, RST_I with prefix FunctionName_ C Code Entries will automatically be added to the C Code Symbol, commonly referred to as 'Control' entries. These entries are not part of the exported C function.
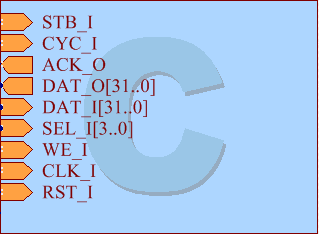
Wishbone - Multiple Bus Cycles - this type of circuit requires more than one clock cycle to complete. When this interface mode is selected, additional STB_I, CYC_I, ACK_O, DAT_O[31..0], DAT_I[31..0], SEL_I[3..0], WE_I, CLK_I, RST_I C Code Entries will automatically be added to the C Code Symbol, commonly referred to as 'Control' entries. These entries are not part of the exported C function.
Memories Tab
There're three options worth taking a look the Memory tab - Memory allocation / initialization:
- Resrve address zero - In C, address zero is reserved for null pointers. With this option disabled, address zero in memories will not be reserved, allowing optimization of memory usage.
- Init on reset - If this option is enabled, reset logic will be built into the C Code Symbol. Two additional Control-type C Code Entries will be added to the symbol - RESET and RESET_DONE. The RESET signal will typically be the same system reset used to reset other processor and peripheral devices within the design. When the RESET signal is asserted (active High), all initialized global and static variables (initialized when the FPGA device is programmed) will be reinitialized - set back to their initial values. When all variables have finished being reset, the RESET_DONE signal will be taken High.
- Clear uninitialized data - This option is only available provided the Enable reset logic option is enabled. When enabled, uninitialized global and static variables will be set to zero during a reset. This option essentially lets you skip the resetting of variables which do not need to be initialized to a predefined value (e.g. an array which is used as a buffer).
Dialog Access
The C Code Symbol dialog can be accessed prior to entering placement mode, from the Schematic - Default Primitives page of the Preferences dialog (Tools » Schematic Preferences). This allows you to change the default properties for the C Code Symbol object, which will be applied when placing subsequent C Code Symbols.
During placement, the C Code Symbol dialog can be accessed by pressing the Tab key.
After placement, the C Code Symbol dialog can be accessed in one of the following ways:
- Double-clicking on the placed C Code Symbol object.
- Selecting the C Code Symbol object and choosing Properties from the right-click pop-up menu.
- Choosing the Change command from the Edit menu and then clicking once over the placed C Code Symbol object.
The Designator and Filename text fields associated with a C Code Symbol can be formatted independently of the C Code Symbol itself. The corresponding properties dialogs for each the Sheet Symbol Designator and Sheet Symbol File Name dialogs respectively can be accessed using the three methods described above (replacing C Code Symbol with the relevant object whose properties you wish to view/modify).
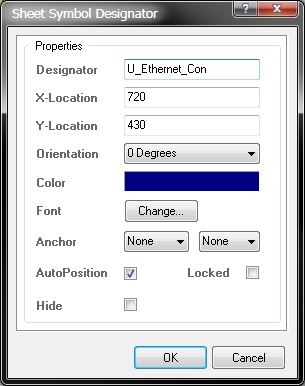
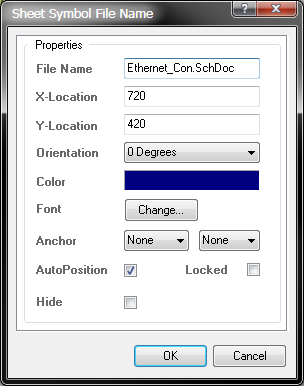
The Sheet Symbol Designator dialog and the Sheet Symbol File Name dialog.
...via an Inspector Panel
An Inspector panel enables the designer to interrogate and edit the properties of one or more design objects in the active document. Used in conjunction with appropriate filtering, the panel can be used to make changes to multiple objects of the same kind, from one convenient location.
...via a List Panel
A List panel allows the designer to display design objects from one or more documents in tabular format, enabling quick inspection and modification of object attributes. Used in conjunction with appropriate filtering, it enables the display of just those objects falling under the scope of the active filter – allowing the designer to target and edit multiple design objects with greater accuracy and efficiency.
Graphical Editing
This method of editing allows you to select a placed C Code Symbol object directly in the workspace and change its size, shape or location, graphically.
When a C Code Symbol object is selected, the following editing handles are available:
A selected C Code Symbol.
- Click and drag A to resize the C Code Symbol in the vertical and horizontal directions separately.
- Click and drag B to resize the C Code Symbol in the vertical and horizontal directions simultaneously.
- Resizing the C Code Symbol will not affect the absolute positions of any defined C Code Entries within.
- Click anywhere on the C Code Symbol - away from editing handles - and drag to reposition it.
The C Code Symbol's Designator and Filename text fields can only be adjusted with respect to their size by changing the size of the font used (accessed through the Sheet Symbol Designator and Sheet Symbol File Name dialogs, respectively). The same is true for any parameters that have been defined for the symbol, and which are visibly displayed in the workspace. In this case, the font size can be changed in the associated Parameter Properties dialog.
Editing handles are not available when any of these text objects are selected, as illustrated for Designator and Filename objects below:
Click anywhere inside the dashed box and drag to reposition the text object as required.
The C Code Symbol and any of its associated text objects can be rotated or flipped while dragging:
- Press the Spacebar to rotate. Rotation is anti-clockwise and in steps of 90°.
- Press the X or Y keys to flip along the X-axis or Y-axis respectively.
If the Enable In-Place Editing option is enabled on the Schematic - General page of the Preferences dialog (Tools » Schematic Preferences), you will be able to edit the name for an associated text object directly in the workspace. Select the text object and then click once to invoke the feature. Type the new name as required and then click away from the text object or press Enter to effect the change.
C Code Symbol Actions
Right-clicking over a placed C Code Symbol will pop-up a context-sensitive menu, from which a variety of commands are available that act on that C Code Symbol (or on all selected C Code Symbols where applicable). The following sections detail each of these commands.
Note: Many of the following commands are also available from the Schematic Editor's main menus. Commands on the main menus apply to the selected C Code Symbol(s) or allow you to choose the C Code Symbol on which the command will act, rather than just the C Code Symbol under the cursor. Where such commands exist, reference to their access is made.
Opening a Selected C Code Symbol's Source File
This command applies only to the C Code Symbol under the cursor and is accessed by right-clicking and choosing Code Symbol Actions » Open Source File "FileName.c" from the menu that appears.
The child C source file for the symbol will be opened (if not already) and made the active document in the main design window.
Creating a C Source File directly from a C Code Symbol
This command is used to create a new C source code document from a C Code Symbol. A shell function is created using the information specified on the Signature tab of the C Code Symbol dialog. In this way, you can define how you want an independent module of FPGA logic to 'plug-in' to the rest of your design, prior to writing the C-based functionality of that logic.
The command can be accessed either by:
- Choosing Design » Create C File From Code Symbol from the main menus. You will be prompted to choose a C Code Symbol.
- Right-clicking over the required C Code Symbol and choosing Code Symbol Actions » Create C File From Code Symbol from the menu that appears.
After launching the command (and choosing the C Code Symbol if applicable), the C source document will be created and opened as the active document. The file will contain a shell function, named using the entry in the Function Name field, on the Entry Point tab of the C Code Symbol dialog. Parameters for the function are taken from the Parameters region of the Entry Point tab, which are synchronized to the corresponding C Code Entries on the symbol.
The C source document that is created is named using the entry in the C Code Symbol's Filename field. You can either enter the intended name for the document in this field before launching the command, complete with extension (i.e. DocumentName.c), or leave the name blank and enter the name when saving the generated document at a later stage.
Care should be taken when creating a C source file from a C Code Symbol and a file with that filename already exists. A new C source file with the same filename will be created. The duplication can be resolved when saving, by either saving the new file with a different name, or overwriting the existing file if required.
Renaming a C Code Symbol's Source File
This command provides a quick and efficient facility for renaming the underlying C source file referenced by a selected C Code Symbol.
The command can be accessed by right-clicking over the required C Code Symbol and choosing Code Symbol Actions » Rename Source File from the menu that appears.
After launching the command, the Rename Child Sheet dialog will appear.
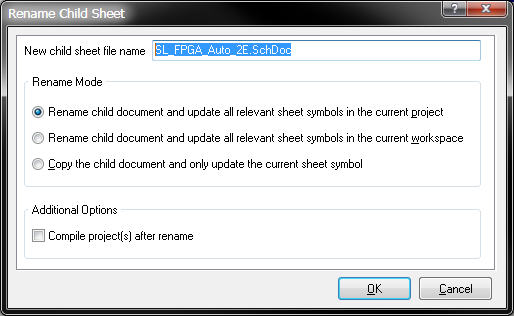
The Rename Child Sheet dialog.
Initially, the New child sheet file name field will contain the current name for the document. Type the new name for the document as required - ensuring that the .c extension remains.
The Rename Mode region of the dialog allows you to determine how the renaming should proceed. The first two options, as their names suggest, rename the source file. The options differ in the scope of the update with respect to the C Code Symbols that point to this sheet - either in the active project or across all projects in the active design workspace. In each case, the Filename field for the C Code Symbol will be updated to reflect the newly named source file.
The third option takes a copy of the source file before renaming the original. Only the current C Code Symbol is updated using this option. This is useful when the current source file is referenced by multiple C Code Symbols, and one C Code Symbol needs to reference a modified version of a function contained in that file. You still want to keep the original source file - you are creating a renamed copy of this file with which to point to from a single C Code Symbol. You can then modify the content of the file as required.
Enabling the Compile project(s) after rename option will ensure that the newly named source file is correctly inserted into the design hierarchy, which will be reflected on the Projects panel.
Synchronizing C Code Entries and Parameters
The Schematic Editor provides a facility for maintaining synchronization between the C Code Entries on a C Code Symbol and the corresponding parameters of the exported function, in the referenced C source file below. Two commands are used to implement this facility, differing only in their scope.
Synchronization for Current C Code Symbol
Allows you to synchronize the C Code Entries and sub-file function parameters for the C Code Symbol currently under the cursor. The command can be accessed by right-clicking over the required C Code Symbol and choosing Code Symbol Actions » Synchronize Code Entries and Parameters from the menu that appears.
After launching the command, the Synchronize Ports To Sheet Entries On [CCodeSymbolDesignator] dialog will appear, as shown in the image on the following page. This incarnation of the Synchronize dialog includes a single tab for the C Code Symbol under the cursor.
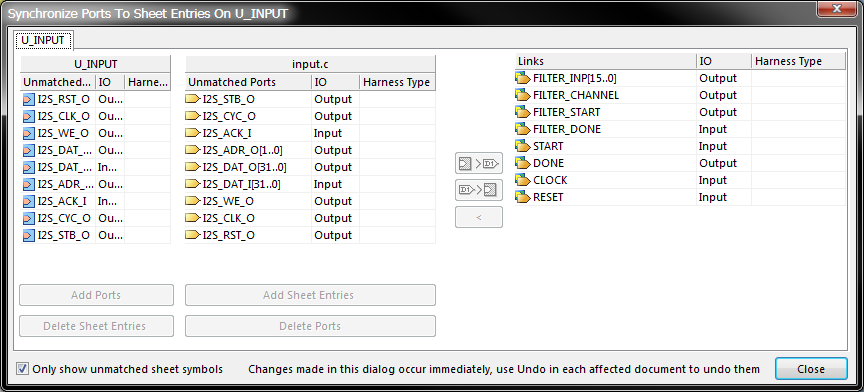
The Synchronize Ports To Sheet Entries dialog.
Synchronization for all C Code Symbols
Allows you to synchronize the C Code Entries and sub-file parameters for each C Code Symbol in the active design project. The command can be accessed by choosing Design » Synchronize Sheet Entries And Ports from the main menus.
After launching the command, the Synchronize Ports To Sheet Entries In [ActiveProjectName] dialog will appear:
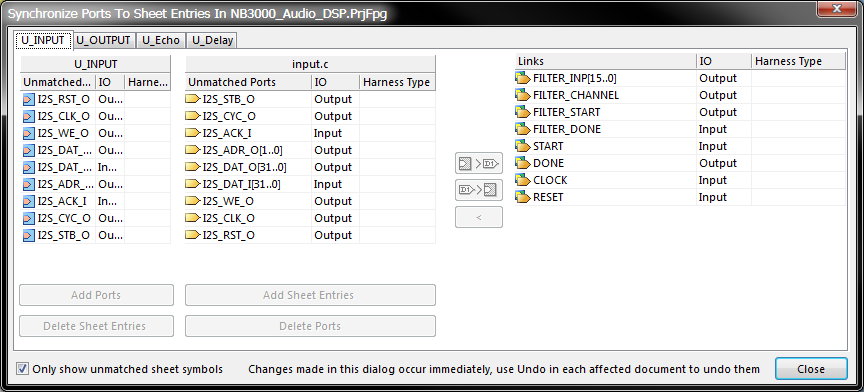
This incarnation of the Synchronize dialog includes a separate tab for each C Code Symbol found in the project.
Using the Dialog
The aim, when using the Synchronize dialog, is to ensure that all C Code Entries on a C Code Symbol are matched to parameters of the referenced function in the underlying C source file, both in terms of name and I/O Type.
The left-hand side of the dialog provides two regions:
- One listing all currently unmatched C Code Entries (Parameter-type) associated to the chosen C Code Symbol. The Designator of the C Code Symbol appears as the header for the region. Each C Code Entry in this region is listed in terms of its Parameter Name and I/O Type. The Parameter Name will have additional information appended (in brackets), reflecting the data type and width of the C Code Entry.
- One listing all currently unmatched parameters of the exported function in the C source file referenced by the C Code Symbol. The document name appears as the header for the region. Each parameter entry in this region is listed in terms of its Name and I/O Type. The Name will have additional information appended (in brackets), reflecting the data type of the parameter. If the parameter has I/O Type of Output, it will be a pointer parameter (denoted by an asterisk (*) after its data type).
The right-hand side of the dialog lists all currently linked (or matched) C Code Entry-parameter pairings. Each entry shows the common name used by both the C Code Entry as its Parameter Name and the parameter as its Name (again, information on the source function parameter's data type, width and direction is included in brackets). The IO column shows the current I/O Type set for each pairing.
The simplest way to explain the workings of the dialog, in terms of matching C Code Entries with parameters, is to use an example. Consider the C Code Symbol and corresponding exported function parameters in the following image.
The two Parameter-type C Code Entries (GO_I and GO_PULSE_O) in the symbol correspond, both in name and I/O Type, to a parameters in the exported function in the referenced C source file. Accessing the Synchronize dialog for this C Code Symbol, there are no unmatched entries (Remember that Control-type C Code Entries are automatically synchronized by default).
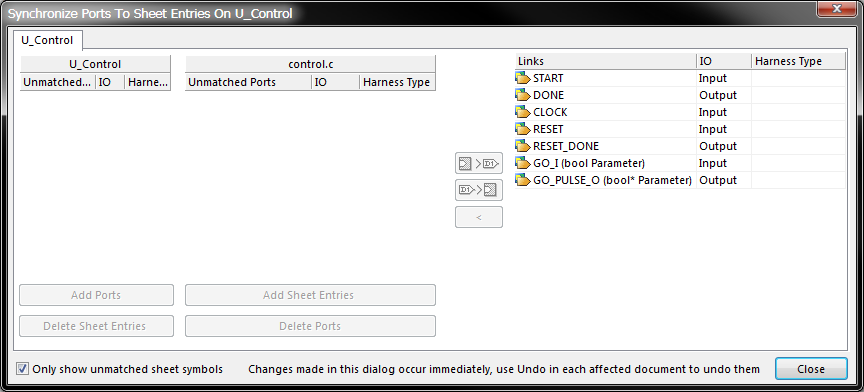
The Synchronize Ports To Sheet Entries dialog.
Now consider the same C Code Symbol, but with a few intentional changes made within the design, as listed below and summarized in the following image:
- Parameter Name for the C Code Entry GO_I changed to GO
- Name of parameter in C source function changed from GO_PULSE_O to PULSE_OUT
- Extra C Code Entry added, with Parameter Name PULSE_COUNT, Data Type set to Unsigned Integer, Integer Width set to 8 and I/O Type set to Output
This time when the Synchronize dialog is accessed, the changes introduced cause links between C Code Entries and parameters to be broken and the unmatched lists become populated.
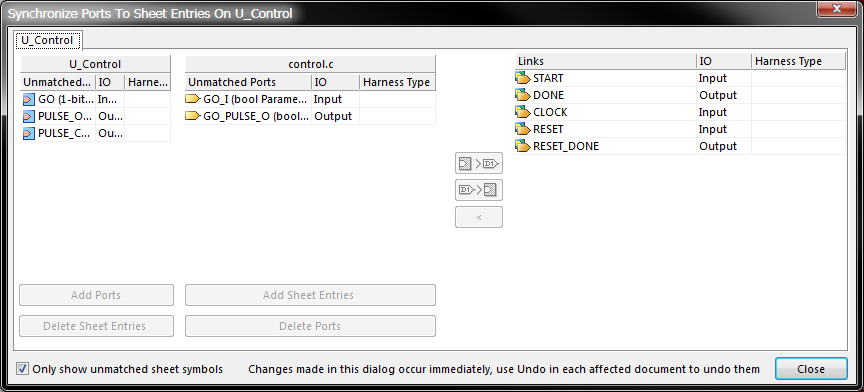
The Synchronize Ports To Sheet Entries dialog.
The two unmatched regions must now be used to resolve the current unsynchronized state that exists between the C Code Entries of the symbol and the parameters of the function in the underlying C source file. Below each region are two buttons, the use of which will involve making one or more of the following matching decisions:
- If there are C Code Entries that you no longer require, select each (use Ctrl+click, Shift+click or click-and-drag for multi-select) and click the Delete Sheet Entries button. Each C Code Entry in the selection will be removed from the C Code Symbol.
- If there are parameters in the exported function that you no longer require, select each and click the Delete Ports button. Each parameter in the selection will be removed from the C source function.
- If there are existing C Code Entries that you need to keep but no corresponding parameters exist for these entries, you can automatically create parameters with the same names and I/O Types (and applicable data types/widths) by selecting each C Code Entry and clicking the Add Ports button. The required parameter(s) will be added to the C functions parameter list. The Synchronize dialog will automatically update, with an entry for each C Code Entry-parameter pairing automatically entered into the Links region of the dialog.
- If there are existing parameters that you need to keep but no corresponding C Code Entries for these parameters, you can automatically create C Code Entries with the same names and I/O Types (and applicable data types/widths) by selecting each parameter and clicking the Add Sheet Entries button. You will be taken to the C Code Symbol, with the C Code Entry(ies) floating on the cursor ready for initial placement. Click or press Enter to place the C Code Entry(ies). The Synchronize dialog will reappear, with an entry for each C Code Entry-parameter pairing automatically entered into the Links region of the dialog.
All other residual unmatched entries will either be due to name or I/O Type mismatching. For these, manual matching can be carried out. This is done by selecting a C Code Entry in one region and a parameter in the other and then using one of the following two buttons to determine which name and I/O Type attributes are used when linking:
|
| Use this button to link the selected C Code Entry with the selected parameter, using the name and I/O Type defined for the C Code Entry. The parameter will be renamed and/or its I/O type changed, and the applicable data type/width set also. |
|
| Use this button to link the selected C Code Entry with the selected parameter, using the name and I/O Type defined for the parameter. The C Code Entry will be renamed and/or its I/O type changed, and the applicable data type/width set also. |
If you want to break up a linked entry, select it in the Links region of the dialog and click on the ![]() button.
button.
The actual process of matching will vary from C Code Symbol to C Code Symbol, depending on the discrepancies involved and your preferred matching techniques. Considering the point reached with the underlying example:
the C Code Entries and parameters could be quite easily matched and re-synchronized back to their original states by performing the following actions:
- Selecting the entry for C Code Entry PULSE_COUNT and clicking the Delete Sheet Entries button
- Selecting the entries for C Code Entry GO and parameter GO_I and clicking the button
- Selecting the entries for C Code Entry GO_PULSE_O and parameter PULSE_OUT and clicking the button.
The approach to matching is not set in stone - the tools are provided to allow you to match as quickly and as efficiently as possible.
Flipping C Code Symbols along the X-Axis
This command allows you to flip C Code Symbols along the X-axis.
The command can be accessed by right-clicking over the required C Code Symbol (or a symbol in a selected group of symbols) and choosing Code Symbol Actions » Flip Code Symbol Along X from the menu that appears.
After launching the command the C Code Symbol(s) will be flipped. The C Code Entries associated with a symbol will essentially be swapped to the opposite side of the symbol (in the horizontal plane) - those on the left will be repositioned on the right and vice-versa.
Flipping C Code Symbols along the Y-Axis
This command allows you to flip C Code Symbols along the Y-axis.
The command can be accessed by right-clicking over the required C Code Symbol (or a symbol in a selected group of symbols) and choosing Code Symbol Actions » Flip Code Symbol Along Y from the menu that appears.
After launching the command the C Code Symbol(s) will be flipped. The C Code Entries associated with a symbol will essentially be swapped to the opposite side of the symbol (in the vertical plane) - those at the top will be repositioned at the bottom and vice-versa.
Toggling C Code Entry IO Type in a C Code Symbol
This command allows you to toggle the I/O Type for C Code Entries in one or more C Code Symbols, simultaneously.
Note: This command only applies to Parameter-type C Code Entries, corresponding to actual parameters in the exported C function. The I/O type of Control-type C Code Entries will remain unchanged.
The command can be accessed by right-clicking over the required C Code Symbol (or a symbol in a selected group of symbols) and choosing Code Symbol Actions » Toggle All Parameters IO Type In Code Symbol from the menu that appears.
After launching the command, the I/O Type defined for each C Code Entry will be toggled.
Notes
- Each C Code Symbol is associated with one top-level exported function in a C source file. However, this exported function may call other functions, which themselves may be distributed among several source files.
- All required C source files and header files need to be added to the FPGA project. This allows Altium Designer's C-to-Hardware Compiler to find all source files needed to generate the FPGA logic.
- The C-to-Hardware Compiler can generate VHDL or Verilog from the C code. By default, VHDL will be generated. Change this as required using the corresponding options available in the Compiler Netlist region, on the FPGA - General page of the Preferences dialog (DXP » Preferences).
- Unlike code in an embedded software project, it is not possible to debug C code that is added to an FPGA or Core project through use of a C Code Symbol and C-to-Hardware Compilation technology. This is because the C code in the exported function is transformed into a hardware circuit, not a series of instructions to be carried out by a host processor. The only available avenue for test is use of a LAX configurable logic analyzer virtual instrument.
- If a group of C Code Entries is pasted into a selected C Code Symbol and those entries fall outside the current bounds of the symbol, it will automatically be resized to accommodate them.