C Code Entry
Parent page: Objects
C Code Symbol Entry
Summary
A C Code Entry is an electrical design primitive that belongs within a C Code Symbol. A C Code Symbol represents one top-level exported C function, resident in a referenced C source file. The C Code Entries provide the means by which to access the parameters of the exported function. The entries themselves can be wired to other areas of the circuit design, allowing for transfer of data.
Availability
There are two types of C Code Entry - Data and Control. Data-type C Code Entries correspond to the data of the exported C function. This type of entry can be placed by the user. Control-type C Code Entries (START, DONE, CLOCK, RESET, RESET_DONE) are not part of the exported C function, but are automatically added to the C Code Symbol when the Multi-cycle interface mode for that symbol is chosen.
Data-type C Code Entries are available for placement in the Schematic Editor only. They can be placed within C Code Symbols that in turn reside on schematic sheets that are part of either an FPGA project (*.PrjFpg), or a Core project (*.PrjCor). Use one of the following methods to access the placement command:
- Choose Place » Add C Code Entry [P, Y] from the main menus
- Click the
 button on the Wiring toolbar.
Placement
After launching the command, the cursor will change to a cross-hair and you will enter C Code Entry placement mode. Placement is made by performing the following sequence of actions:
- The C Code Symbol is implicitly chosen by the position of the new C Code Entry floating on the cursor. The entry will change from being grayed-out to colored when it passes within the borders of a C Code Symbol.
- Move the cursor to adjust the position of the C Code Entry in relation to any edge of the C Code Symbol, then click or press Enter to anchor the entry and complete placement.
Continue placing further C Code Entries, or right-click or press Esc to exit placement mode.
Non-Graphical Editing...
The following methods of non-graphical editing are available:
...via an Associated Properties Dialog
This method of editing uses the following dialog to modify the properties of a C Code Entry object. Editing itself falls into two categories - Data-type C Code Entry object, or a Control-type C Code Entry object
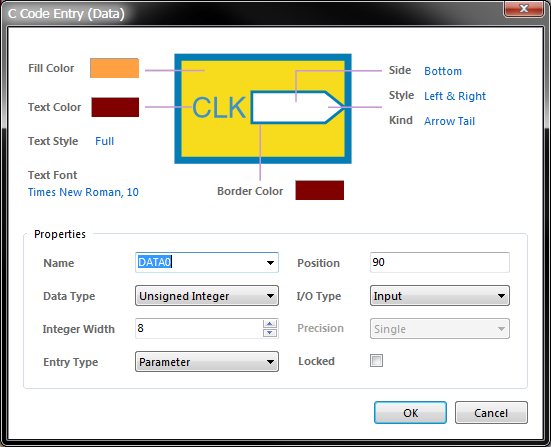
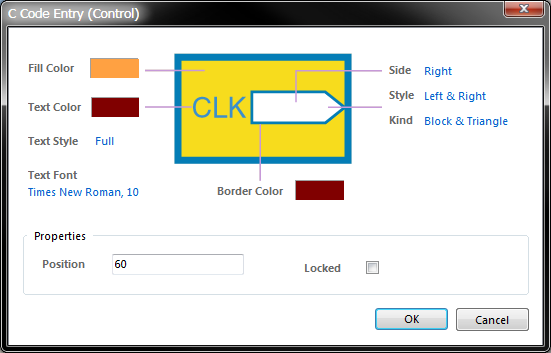
C Code Symbol Entry(Data) and C Code Symbol Entry(Control)
The C Code Entry (Data) dialog can be accessed prior to entering placement mode, from the Schematic - Default Primitives page of the Preferences dialog (Tools » Schematic Preferences). This allows you to change the default properties for the C Code Entry object, which will be applied when placing subsequent C Code Entries.
During placement, the C Code Entry (Data) dialog can be accessed by pressing the Tab key.
After placement, the C Code Entry (Data) dialog (or C Code Entry (Control) dialog) can be accessed in one of the following ways:
- Double-clicking on the placed C Code Entry object
- Selecting the C Code Entry object and choosing Properties from the right-click pop-up menu
- Choosing the Change command from the Edit menu and then clicking once over the placed C Code Entry object.
Data Type
It is worth taking a closer look at the data types that can be specified for a Parameter-type C Code Entry, and how these map to data types used in the C source code. A C Code Entry can be classed as one of the following data types:
- Boolean
- Floating Point
- Unsigned Integer
- Signed Integer.
The Boolean data type corresponds to the bool data type in C, as defined in stdbool.h.
For the Floating Point data type, the associated Precision property can be set to Single or Double. These correspond to 32-bit float and 64-bit double C data types respectively.
For integer data types, the associated Integer Width property can be defined in the range 1 to 64. You are not limited to the widths of C data types. The following table shows the mapping of variable integer widths (defined for the C Code Entry) to C data types.
| Integer Width range specified for a C Code Entry with an integer data type... | is mapped to the following C unsigned integer types... | is mapped to the following C signed integer types... |
| 1-8 | unsigned char, uint8_t | char, int8_t |
| 9-16 | unsigned short, uint16_t | short, int16_t |
| 17-32 | unsigned int, unsigned long, uint32_t | int, long, int32_t |
| 33-64 | unsigned long long, uint64_t | long long, int64_t |
This mapping becomes especially relevant during synchronization of C Code Entries with corresponding parameters in the exported C function.
...via an Inspector Panel
An Inspector panel enables the designer to interrogate and edit the properties of one or more design objects in the active document. Used in conjunction with appropriate filtering, the panel can be used to make changes to multiple objects of the same kind, from one convenient location.
...via a List Panel
A List panel allows the designer to display design objects from one or more documents in tabular format, enabling quick inspection and modification of object attributes. Used in conjunction with appropriate filtering, it enables the display of just those objects falling under the scope of the active filter – allowing the designer to target and edit multiple design objects with greater accuracy and efficiency.
Graphical Editing
This method of editing allows you to select a placed C Code Entry object directly in the workspace and change its location graphically.
C Code Entries can only be adjusted with respect to their size by changing the size of the font used (accessed through the respective properties dialog). As such, editing handles are not available when the C Code Entry object is selected:
Click anywhere inside the dashed box and drag to reposition the C Code Entry within the C Code Symbol as required. The C Code Symbol will be resized automatically if you attempt to move the C Code Entry beyond the current extents of the symbol.
If the Enable In-Place Editing option is enabled on the Schematic - General page of the Preferences dialog (Tools » Schematic Preferences), you will be able to edit the Name for the C Code Entry (Data-type only) directly in the workspace. Select the C Code Entry object and then click once to invoke the feature. Type the new name as required and then click away from the C Code Entry object or press Enter to effect the change.
Sheet Entry Actions
Right-clicking over a placed C Code Entry will pop-up a context-sensitive menu, from which a variety of commands are available that act on that C Code Entry (or on all selected C Code Entries where applicable). The following sections detail each of these commands.
Jumping to the Corresponding Parameter (Data-type only)
This command is used to jump to the chosen C Code Entry's corresponding parameter in the exported function, in the C source file referenced by that entry's parent C Code Symbol. The command is accessed by right-clicking over the required C Code Entry and choosing Code Entry Actions » Jump to Parameter [ParameterName] from the menu that appears.
Toggling C Code Entry I/O Type (Data-type only)
This command is used to toggle the I/O Type for a C Code Entry.
The command can be accessed by right -clicking over the required C Code Entry (or one C Code Entry in a selection of C Code Entries) and choosing Code Entry Actions » Toggle Code Entry IO Type from the menu that appears.
After launching the command, the I/O Type defined for each C Code Entry will be toggled.
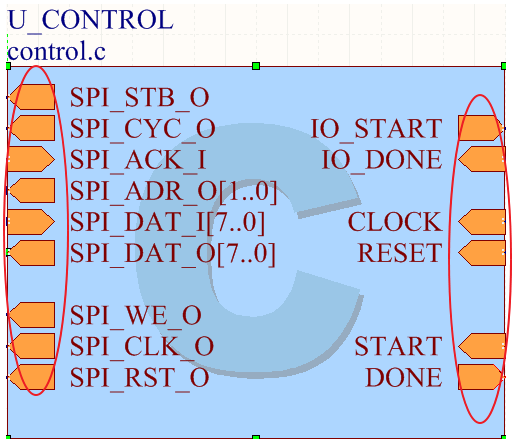
Swapping C Code Entry Side
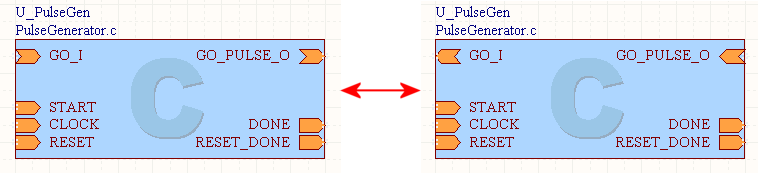
This command is used to relocate a C Code Entry to the side of its parent C Code Symbol that is directly opposite to its current position. The C Code Entry's I/O Type is not changed by the swap.
The command can be accessed by right-clicking over the required C Code Entry (or one C Code Entry in a selection of C Code Entries) and choosing Code Entry Actions » Swap Code Entry Side from the menu that appears.
After launching the command, each C Code Entry will be swapped to the opposite side of its C Code Symbol.
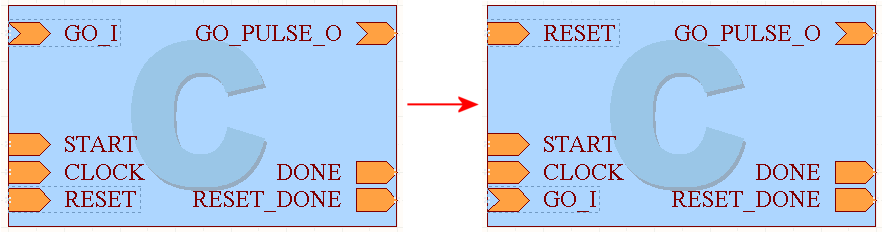
Reversing C Code Entry Order
This command allows you to reverse the order that selected C Code Entries appear along a side of a parent C Code Symbol. The I/O Type of a C Code Entry is not changed by the reordering.
The command can be accessed by choosing Edit » Move » Reverse Selected Sheet Entries Order from the Schematic Editor's main menus.
Ensure that all C Code Entries that you wish to reorder are selected prior to launching the command. Two or more C Code Entries must be selected for a particular side of a C Code Symbol in order for the command to have effect. You can simultaneously reorder C Code Entries along different sides of the same parent C Code Symbol and across different C Code Symbols on the active schematic sheet.
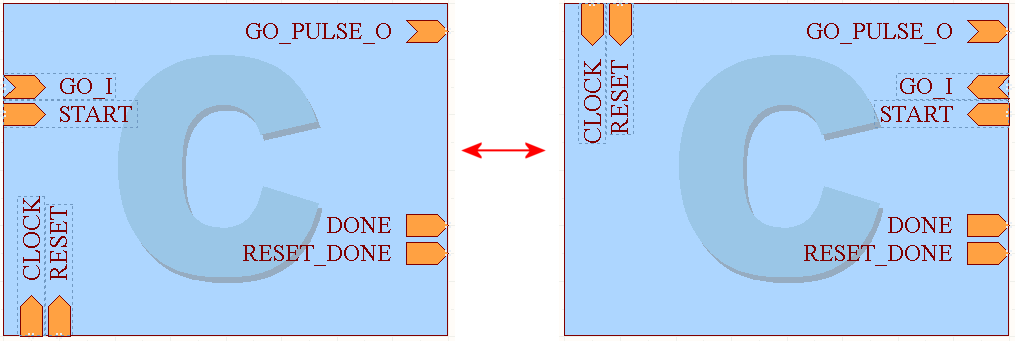
After launching the command, the reordering will take place. The reordering is achieved by mirroring the positions of the selected C Code Entries along a particular C Code Symbol side about an imaginary line at the mid point of the distance between the extents of the two most-outer selected C Code Entries.
The following image shows reordering for two selected C Code Entries, whereby they exchange positions.