Tutorial - Getting Started with the Innovation Station
Contents
- What a you need?
- What is an Innovation Station?
- Why the Desktop NanoBoard?
- Capturing the FPGA Design
- Creating the FPGA Project
- Adding the Schematic and OpenBus Source Documents
- Defining the OpenBus System
- Placing OpenBus Components
- Connecting the OpenBus Components
- Interconnect Components
- Completing the OpenBus System
- Configuring OpenBus Components
- Configuring the Port I/O Component
- Configuring the Terminal Instrument
- Configuring the Audio Streaming Controller (Audio CODEC)
- Configuring the SPI (Audio CODEC Control)
- Configuring the Memory Controller
- Configuring the Processor
- Managing the Memory Map
- Configuring the Memory Using Interconnect Components
- Automating Memory Configuration from within the Processor
- Managing the Lower Level Signals
- Using the OpenBus Signal Manager
- Specifying Interrupts in the OpenBus Signal Manager
- Linking the OpenBus Document to its Parent Schematic
- Creating a Sheet Symbol from the OpenBus Document
- Placing the Final Components in Schematic
- Configuring the Digital IO Instrument
- Completing the Schematic Wiring
- Configuring projects to run on the Desktop NanoBoard
- Auto-configuring projects running on the Desktop NanoBoard
- Creating User Constraints
- Building the FPGA Design
- Developing the Embedded Code
- Linking an Embedded Project to its Target Processor
- Adding the Source Code to the Embedded Project
- Building the Software Platform
- Adding main.C
- Writing some C Source Code
- Developing the Complete Application
- Considering your Deployment Options
- Level 1: Development of pure 'Device Intelligence'
- Level 2: OTS Hardware Platform, OTS Enclosure
- Level 3: OTS Hardware Platform, Custom Enclosure
- Level 4: Mixture of OTS and Custom Hardware Platform, OTS or Custom Enclosure
- Level 5: Custom Hardware Platform, OTS or Custom Enclosure
- Transferring the Design to a Deployment Platform
The term Innovation Station represents the powerful combination of the Altium Designer software and the Desktop NanoBoard reconfigurable hardware platform.
This combination gives you all of the tools and technology necessary to capture, implement, test and debug your embedded / FPGA designs, in real-time. With Altium's Innovation Station, the low level detail is managed for you, leaving you free to focus on device intelligence and functionality - the source of true and sustainable product differentiation.
In this tutorial, we will first define the Innovation Station, then implement a simple processor-based FPGA design, getting it running on a physical FPGA device plugged into the Desktop NanoBoard, showing just how these two component systems work in concert with one another.
During the course of this tutorial, you will gain knowledge of the basics of FPGA design the Altium way, introducing you to:
- An overview of the Desktop NanoBoard
- FPGA project creation within Altium Designer
- Use of design hierarchy within an FPGA project
- Implementing an OpenBus-based FPGA design, including sourcing and placing components, connecting them together, and interfacing them to peripherals on the Desktop NanoBoard.
- Creating and linking an embedded project to a soft processor on the target FPGA
- Targeting a design to a daughter board FPGA on the Desktop NanoBoard using the auto-configuration feature
- Processing of a design - compiling, synthesizing and building the design to obtain the programming file used to program the target device
- Using Virtual Instrumentation to control your system
For the example design featured in this tutorial, we will create a basic, reverb-like audio effect, in software, executing on a processor on the target FPGA device. Reverb, like any echo effect, repeats the incoming audio signal, however the echo is decayed to produce an effect that sounds closer to audio echoing in a large area. The decayed signal is then fed back into the input and summed with the current incoming audio, producing a fuller sound that gives us audible clues as to the size of an area.
Our focus for this tutorial is to create the delay and decay components of the reverb effect. A more complete reverb might include options to control the delay and dampening for specific frequency bands.
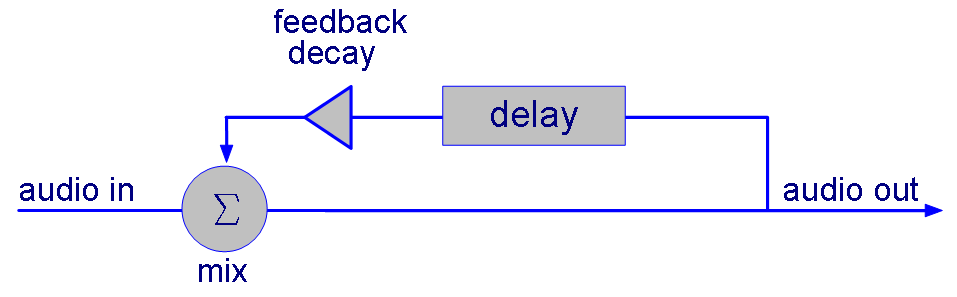
Overview of the audio system.
The source files can be found in the \Examples\Tutorials\Audio Effects tutorial folder of your Altium Designer installation. Refer to this example at any time to get further insight, or to skip some of the steps.
What a you need?
In order to complete this tutorial, you will need:
- Altium Designer Summer 08 (or later) installed
- A Desktop NanoBoard with PB01 peripheral board and DB30 Spartan3 daughter board (or similar) installed
- An audio source (could be a PC headphone output, MP3 player, etc)
- The loopback audio cable included with your Desktop NanoBoard (or similar cable to connect your audio source to the audio input on the Desktop NanoBoard)
- Vendor build tools. The free version of Xilinx's ISE (8.2.03i or later) will be sufficient if you are using the DB30 daughter board.
What is an Innovation Station?
The term Innovation Station represents the combination of Altium's Desktop NanoBoard and the award-winning Altium Designer software. As a concept, the Innovation Station was conceived to provide the full range of tools required to design new and innovative electronic products in ways never before possible; truly unlocking the creative potential of every engineer.
The hardware implementation platform, that's the Desktop NanoBoard, has been specifically designed to work with Altium Designer and makes the process of developing and testing complete systems on real hardware, faster and easier than ever before. Included on the Desktop NanoBoard are the complete range of physical-layer peripherals required to exercise the array of FPGA-based soft IP cores included with Altium Designer. Packaged on removable peripheral boards, these peripherals can be swapped at any time and user designed systems can even be substituted, connecting into the NanoBoard subsystem via one of the 3 high-density peripheral board connectors available.
Altium Designer, the software workhorse that comprises the second half of this powerful pairing, is the first and only fully unified electronics design software tool, spanning Schematic Capture, PCB Layout, FPGA Development, Embedded Software Development, and even CAM. The fundamental difference between Altium Designer and other software tools continues to be Altium's holistic approach to design, looking at electronics design not as a series of individual tasks to be addressed in isolation, but rather as a singular task comprised of many component parts each of which needs to feed off of- and work in concert with- one another. Altium Designer includes a complete range of reusable IP, packaged as a part of your Innovation Station. This includes soft IP cores for use in FPGA development, the low level software drivers to support the IP from the processor-side, and complete schematics of each of the subsystems, to make implementing your design in the target system a snap.
Why the Desktop NanoBoard?
The Desktop NanoBoard is a completely reconfigurable hardware development platform that includes a wide range of hardware peripherals, intended to make it easy to leverage the range of soft IP cores supplied with Altium Designer. The peripherals are organized on a series of removable peripheral boards, each connected to the main board by way of a 100 pin connector.
By pairing the hardware with Altium Designer and supplying the complete schematics for the Desktop NanoBoard; Altium has made it possible to leverage the NanoBoard design, in your design. So when you select an IP core from the libraries supplied with Altium Designer, you know that not only do you have access to that piece of IP, but you also have a completed physical system to reference in your target board.
Furthermore, each of the NanoBoard subsystems has been captured using Device Sheets which are reusable documents that can be instantiated in your target system using hierarchical symbols. This means that as quickly as you can add and wire-in a sheet symbol into your hierarchical schematics, you can include the physical layer components used to create the Desktop NanoBoard in your board.
Capturing the FPGA Design
The first thing we need to do is capture our FPGA design within the Altium Designer environment. Altium Designer provides a range of capture modes including OpenBus, Schematic, VHDL, Verilog, and even C. Deciding on the best method depends on the project and the level of control and customization you are looking for. All of Altium's IP cores are supplied both as OpenBus symbols and schematic components so if you intend to use only the IP supplied with Altium Designer, then either of these two capture methods is preferred.
Of the two, schematic and OpenBus, OpenBus is the fastest to implement, eliminating virtually all of the complicated wiring required in schematic. Because of the required top level schematic, if there is a need to add additional components not included in the OpenBus palette, these components can be added at the top level and wired into the sheet symbol as required. The fact that these capture modes, OpenBus and schematic, can be mixed and matched makes it possible to develop any range of complex systems with the perfect complement of ease and low-level detail. For example, a design created with Altium IP using OpenBus can be extended using VHDL or Verilog by writing your source code and linking the two documents together at another layer in the project hierarchy.
No matter what method you choose, every FPGA project must contain a top level schematic sheet. This top level sheet will include ports, or port plug-in components (from one of Altium's port plug-in libraries discussed later) as these ports / components represent the pins of the target FPGA device. The top level schematic sheet can also include soft-core IP components and/or the interfaces to lower level source documents, represented by sheet symbols. FPGA designs must be hierarchical and the same rules of hierarchy apply to FPGA design as to any other design in Altium Designer (for complete details on hierarchical design in Altium Designer, refer to Connectivity and Multi-Sheet Design).
Since our design uses only Altium IP, the simplest capture method will be OpenBus. This will involve adding the required components to an OpenBus document and connecting them accordingly. However, before we can address the OpenBus document and its contents, we must create a project. The following sections take you through the steps required to capture our design.
Creating the FPGA Project
The basis for every design created in the Altium Designer environment is a project file. For an FPGA design, we need to create a new FPGA project (*.PrjFpg). The project document itself is an ASCII file that stores the project information such as the documents that belong to the project, output settings, compilation settings, error checking settings, and so on.
Let's go ahead and create the FPGA project.
- Create a new FPGA project using the File»New»Project»FPGA Project command.
- Right-click on the name for this new project (FPGA_Project1.PrjFpg) in the Projects panel and choose the Save Project command. Save the project at a location of your choice with the name
Audio_Effects.PrjFpg, and in a new folder calledAudio Effects Tutorial. Note that spaces and/or dashes must not be used in FPGA project or document filenames. Doing so will result in synthesis errors during design processing. Underscores (_) can be used instead to provide readability.
Adding the Schematic and OpenBus Source Documents
The next step is to add the source documents required by our FPGA design. Though the design will be captured in OpenBus, recall that every FPGA project requires a top level schematic document. Thus, we will be adding both a new schematic and new OpenBus document to our project.
- Add a new schematic document by right-clicking on the FPGA project entry in the Projects panel and choosing the Add New to Project»Schematic command. A blank schematic sheet will open as the active document in the main design window.
- Save this document (File»Save) with the name
Effects_Sch.SchDoc, in the same folder as the parent project. - Add a new OpenBus document by right-clicking on the FPGA project entry in the Projects panel and choosing the Add New to Project»OpenBus System Document command. A blank OpenBus document will open as the active document in the main design window.
- Save this document with the name
Effects_OB.OpenBus, in the same folder as the parent project. - The project itself will appear as modified in the Projects panel. Save the project too (right-click on its name and choose Save Project).
Defining the OpenBus System
OpenBus is a new way of doing system-level FPGA design. Offering a much lighter interface than schematic based implementations, OpenBus is hardly lightweight in its capabilities. By automatically taking care of much of the low-level detail, OpenBus lets you focus on the high-level system and interconnection of major components. You'll find all of the components you need in the OpenBus Palette. You can display the Palette by clicking on the OpenBus panel control in the lower right portion of the main editor and then selecting OpenBus Palette from the popup menu.

Click OpenBus button down the bottom right of the workspace to open the Palette.
Placing OpenBus Components
Now that we have our blank OpenBus canvas, it's time to add-in the required components that comprise our design circuitry. The OpenBus Palette panel contains all OpenBus components that can be used in an OpenBus document. They have been categorized in the palette into groups of Connectors, Processors, Memories and Peripherals. The table below identifies the components required by our design.
Required OpenBus components.
| Symbol | Component Name | Description | Quantity Required |
|---|---|---|---|
|
| TSK3000A | TSK3000A 32-Bit, Wishbone-compatible RISC processor | 1 |
|
| Audio Streaming Controller | Audio streaming controller is used to facilitate data transfers over the inter-IC sound (I2S) bus. | 1 |
|
| SPI | Provides an SPI master interface, enabling a host processor to communicate with a slave SPI peripheral device which resides outside of the physical FPGA device to which it is targeted, such as the Audio CODEC located on the PB01. | 1 |
|
| Port IO | Wishbone-compliant configurable parallel port unit, providing a simple register interface for storing data to be transferred to/from another device. | 1 |
|
| Terminal Instrument | Wishbone-compliant instrument allows for effective processor debugging by providing an IO console. | 1 |
|
| SRAM Controller | Provides a simple interface between a 32-bit processor and Asynchronous Static SRAM. | 1 |
|
| Interconnect | Provides a means of accessing one or more slave devices over a single Wishbone interface. | 2 |
To place an OpenBus component onto an OpenBus document:
- Select the OpenBus component that you want to place by left-clicking on its icon in the OpenBus Palette panel.
- The component will be locked to the mouse cursor. At this point you can use the Spacebar to rotate the component or the X or Y keys to flip the component along the X or Y axis respectively.
- Move the mouse to where you want the component, and left-click to place it.
- Continue placing the components listed in the Table, as per the OpenBus diagram shown in the figure below.
OpenBus components required by the design.
To edit the names of the OpenBus components that you have placed:
- Left-click once on the text associated with the OpenBus components that you want to rename. This selects the text.
- Click a second time on the text or press the F2 key to enter the edit text mode.
- Edit the names of the components to match the names shown in the figure above.
- Press the Enter key or click somewhere else in the editor window to leave the editing mode and accept your changes.
- Once you have placed and named all of the OpenBus components save your work by selecting File»Save All from the main menu.
Connecting the OpenBus Components
In order to control the flow of data between the components on your OpenBus document, you will need to place connection links between them. These links indicate bus connections between master ports ![]() and slave ports
and slave ports ![]() . The arrow on the connection link indicates the direction of control.
. The arrow on the connection link indicates the direction of control.
To place a connection link between a master and slave port:
- Select Place»Link OpenBus Ports or click on the Link OpenBus Ports icon in the OpenBus toolbar.
- Click the master port that you want to create the link from
- Click the slave port that you want to connect to
- Repeat steps 2 and 3 for any additional links that you wish to create. To exit the link placement mode, press the Esc key or right-click the mouse.
- To remove a connection link between the master and slave port, left-click to select the link and press Delete.
- To change position of the ports on an OpenBus component, left-click and drag the port, repositioning it around the body of the component.
Interconnect Components
Since connection links can only be made between a single master and a single slave, OpenBus Interconnect components are required to allow you to connect multiple components together.
OpenBus Interconnect components have a single slave port and one or more master ports. This allows a master device (connected to the OpenBus Interconnect's slave port) to control multiple other slave devices (connected to the OpenBus Interconnect's master ports). To add an additional port to an OpenBus Interconnect:
- Select Place»Add OpenBus Port or click on the Add OpenBus Port icon in the OpenBus toolbar.
- Hover the mouse over the outer edge of the component you wish to add a new port to. Ports are added at 4 points around the component, the top, bottom, left, and right. Clicking on either side of the component will add the port to the respective side.
- Click to add the new port.
- Repeat steps 2 & 3 for any additional links that you wish to create. To exit port placement mode press the Esc key or right-click the mouse.
To remove a port from an OpenBus Interconnect left-click to select the port and press Delete.
To change the position of ports on an OpenBus Interconnect simply left-click and drag the port, repositioning it around the body of the component.
Completing the OpenBus System
- Complete the creation of the OpenBus system using the techniques outlined above. The completed system can be seen in the figure below.
- Save your work.
Completed OpenBus connectivity.
Configuring OpenBus Components
The vast majority of components found in the OpenBus Palette translate directly to similarly named components found within the FPGA Peripherals and FPGA Processor libraries used for schematic-based FPGA design. In the same way that several of the components in the schematic-based libraries are configurable, so too are their OpenBus counterparts. In this tutorial, we are using several configurable components that will need to be adjusted.
Configuring the Port I/O Component
The Port I/O component, GPIO will be used to create a simple interface to the processor, for use by an instrument we will connect later in this tutorial. For now, we need to configure the port IO and specify the number of ports, their direction, and their width. To configure the Port I/O component for this tutorial:
- Double-click the GPIO component to open the Configure OpenBus Port I/O dialog.
- In the dialog:
- Set the Component Designator to GPIO
- Set the Kind to Input/Output
- Set the Port Count to 2
- Set the Bus Width to 8
- Set the Interface Type to Signal Harness
- Click OK to save your changes.
Configuring the Terminal Instrument
The terminal instrument provides a simple way of outputting data in an FPGA design.
- Double-click the GPIO component to open the Configure OpenBus Terminal Instrument dialog.
- In the dialog:
- Set the Component Designator to TERM
- Set the Interface Type to Signal Harness
- Click OK to save your changes.
Configuring the Audio Streaming Controller (Audio CODEC)
As part of its high-quality audio sub-system, the NanoBoard includes a CS4270 24-bit, 192kHz stereo audio CODEC (from Cirrus Logic). The CODEC caters for both analog and digital audio I/O. The Audio Streaming Controller transfers audio data over the inter-IC sound (I2S) bus.
- Double-click the TERM component to open the Configure OpenBus Audio Streaming Controller dialog.
- In the dialog:
- Set the I2S Channels to Receive and Transmit
- Set the I2S Hardware Buffer to Include Hardware Buffer, 1K samples
- Set the Component Designator to AUDIO
- Set the Interface Type to Signal Harness
- Click OK to save your changes.
Configuring the SPI (Audio CODEC Control)
Internal registers for the audio codec, which are used to determine the required functionality of the device, are accessed over the SPI bus.
- Double-click the GPIO component to open the Configure OpenBus SPI dialog.
- In the dialog:
- Set the Component Designator to SPI
- Set the Interface Type to Signal Harness
- Click OK to save your changes.
Configuring the Memory Controller
The SRAM Controller provides a simple, generic interface to Asynchronous Static RAM. As such, it requires that we configure the component for the amount and type of external memory we intend to use.
- Right-click the SRAM component and select Configure SRAM (SRAM Controller) from the right-click menu.
- In the Configure (Memory Controller)dialog box:
- Set the Memory Type to Asynchronous SRAM
- Set the Size of Static RAM array to 1MB (256K x 32-bit)
- Set the Memory Layout to 2 x 16-bit Wide Devices
- Click OK to save your changes.
Configuring the Processor
The TSK3000A is a configurable soft processor core and as such requires you specify a few key parameters prior to using it. This includes the size of the internal processor memory, whether or not to use a hardware multiply/divide unit, whether to include an on-chip debugging system and how to manage breakpoints on reset. To configure the processor for this tutorial:
- Right-click the MCU component and select Configure MCU (TSK3000A) from the right-click menu.
- In the Configure (32-bit Processors)dialog box:
- Set the Internal Processor Memory to 32 K Bytes (8K x 32-Bit Words)
- Set the Multiply/Divide Unit (MDU) to Hardware MDU
- Set the On-Chip Debug System to Include JTAG-Based On-Chip Debug System
- Set the final option to Disable Breakpoints on Hard Reset
- Click OK to save the changes.
You may receive an error message indicating that there are "2 Nexus JTAG Parts Found but no NEXUS_JTAG_CONNECTOR was found on the top sheet". This message can be safely ignored as we have not yet completed the top level schematic.
Managing the Memory Map
One of the key benefits of developing our system with OpenBus is the level of automation that OpenBus brings to the management of the system memory map. Ultimately, all peripherals and memory devices sit within a 32-bit memory space that spans 4GBytes. To make the management of this memory space easier, OpenBus intelligently interprets the design and automatically allocates memory spaces for each of the peripherals and memory controllers. In most situations these memory allocations will be sufficient but in some rare cases you may wish to manually edit the memory allocations yourself. You can still do this with OpenBus.
Configuring the Memory Using Interconnect Components
Under normal circumstances, the interconnect component will probe the settings and memory requirements of each of its connected devices and will update the memory map automatically. You can see (and edit) the memory mapping of the interconnect component from the Configure OpenBus Interconnect dialog which can be accessed from the component's right-click menu.
OpenBus interconnect configuration.
The Interconnect configuration information is automatically propagated to the memory map of the processor. Do not be concerned if your Configure OpenBus Interconnect dialog does not appear exactly as it does in the figure above. This memory map will be handled automatically and may appear slightly different.
Automating Memory Configuration from within the Processor
In addition to the memory that is managed by each of the interconnect components within the OpenBus document; you can also centrally manage memory from the Processor's memory and peripheral configuration dialog boxes. These can be accessed by right-clicking the processor. The Configure Processor Memory dialog provides a pictorial representation of where the peripherals and memory controllers will be positioned within the processor's memory. Checking the hardware.h (C Header File) option will cause a hardware.h header file to be created when the project is compiled. This file contains #defines that specify the addresses and sizes of any peripherals and the details of any interrupts used. This will ensure that all OpenBus memory settings are incorporated and synchronized in the design each time it is compiled.
By ensuring this box is checked, any changes you make to the OpenBus document will be propagated through to the embedded project we will create later in this tutorial.
Enabling the hardware.h option automates how the peripherals are mapped into the processor memory space.
To set the project to automatically import the settings from the OpenBus document:
- Right-click the MCU component and select Configure Processor Peripheral from the right-click menu.
- In the Configure Peripherals dialog box, check the hardware.h (C Header File) checkbox.
- Click OK to exit.
Managing the Lower Level Signals
Though OpenBus makes strides in simplifying the complex interconnections between components that use a standard bus interface, it is sometimes necessary to have a view into- and control over- the lower level signals in the design. This is useful if for nothing else, to understand how the underlying signals in the OpenBus document get exposed to the top level schematic. All of the signals used for the bus interconnects (links) are visible from the OpenBus Signal Manager.
Using the OpenBus Signal Manager
The OpenBus Signal Manager (shown in the figure below, accessed from the Tools menu), allows you to take finer control over which signals are to be exposed externally to the OpenBus document.
The Clocks and Resets tabs will rarely need your attention as the default settings for these are usually adequate. The Interrupts tab will need your attention if you are planning on using any peripherals as interrupt sources. From this dialog you can allocate interrupts to the available interrupt channels on the main processor. Since we will be using several interrupts in this design, we will need to specify those connections here.
The list of signals in the External connection summary cannot be edited directly however this dialog serves as an excellent reference. All of the signals listed in this dialog will be exported to the parent schematic. The signals are grouped according to the component that controls them, making it easier to identify and locate the source of the different signals. For instance, when you link an OpenBus document to a parent schematic, it may not be immediately apparent where certain signals on the sheet symbol have come from. It is in this dialog box that you will find your answers.
Specifying Interrupts in the OpenBus Signal Manager
The TSK3000A supports a total of 32 interrupt inputs, each of which can be configured to be either level sensitive (active High) or edge triggered (active on a rising edge).
To configure interrupts for the design:
- Select Tools»OpenBus Signal Manager.
- From the OpenBus Signal Manager dialog, select the Interrupts tab.
- Locate the Audio Streaming Controller(AUDIO) in the list of OpenBus peripherals at the top of the dialog and click once in the Interrupt column to the right of the signal INT_O to expose the drop down.
- Assign this signal to the interrupt pin INT_I1 by selecting this item in the list of available interrupts. Notice that the Kind and Polarity column is populated automatically. The OpenBus system is aware of the interrupt requirements of each of the OpenBus peripherals and thus there's no reason to manually configure the pin kind or polarity.
- Locate SPI(SPI) in the list of OpenBus peripherals at the top of the dialog and assign the signal INT_O the interrupt pin INT_I2.
- Locate Terminal instrument(TERM) in the list of OpenBus peripherals at the top of the dialog and assign the signal INT_O0 to the interrupt pin INT_I3.
- Finally, assign the terminal's INT_O1 signal to the interrupt pin INT_I4. The table of interrupts should now appear as they do in the figure below.
- Click OK to exit.
Specifying interrupts from the OpenBus Signal Manager.
Linking the OpenBus Document to its Parent Schematic
As mentioned earlier in this tutorial, the top level document in an FPGA project needs to be a schematic. Now that we have created an OpenBus document, we must now link that document back to the top level schematic sheet that we have previously created.
Creating a Sheet Symbol from the OpenBus Document
To link the OpenBus document to a parent schematic, you need to create a sheet symbol from the OpenBus document and place it on the parent schematic.
- Open
Effects_Sch.SchDoc. - Select Design»Create Sheet Symbol From Sheet or HDL.
- When the Choose Document to Place dialog box appears, select the
Effects_OB.OpenBusdocument and click OK. - A sheet symbol will be attached to the cursor. Position it where you want to place it on the schematic page and click once to commit the placement.
- Resize the sheet symbol and reposition the sheet entries with inputs and bidirectional signals on the left and outputs on the right, as shown in the figure below.
Organize the sheet entries into logical positions.
Placing the Final Components in Schematic
To complete the placement process and finalize the top level schematic, you'll need to first place a number of components. The relevant integrated libraries in which these components can be found are located in the \Libraries\FPGA folder of your Altium Designer installation. These libraries are installed in Altium Designer by default, so will all be available in the Libraries panel. Position the components approximately as shown in the schematic below.
- From the FPGA NB2DSK01 Port-Plugin.IntLib library:
- CLOCK_BOARD #
- TEST_BUTTON #
- From the FPGA PB01 Port-Plugin.IntLib library:
- AUDIO_CODEC #
- AUDIO_CODEC_CTRL #
- From the FPGA DB Common Port-Plugin.IntLib library:
- SRAM_DAUGHTER0 #
- SRAM_DAUGHTER1 #
- From the FPGA Instruments.IntLib library:
- DIGITAL_IO
- From the FPGA Generic.IntLib library:
- OR2N1S
- FPGA_STARTUP8
Position the components approximately as shown
The Audio Codec components and wiring for the NB2 (left) and NB3000 (right).
Configuring the Digital IO Instrument
With the components placed the next step is to configure the Digital IO Instrument. This instrument is a configurable device that provides an efficient and uncomplicated means by which to monitor/generate digital signals in your design. Once programmed, interaction with this device is done live from within the Altium Designer software, allowing you to read and manipulate signal values of FPGA signals as they execute on the FPGA, in system and in real time.
In this design, the digital IO instrument will be used to mimic the user interface to the system. Instead of building a complete implementation platform, we will use the digital IO instrument to trigger events in the processor, ensuring we can continue on with development though we don't yet have a PCB prototype. For details on the Digital IO instrument refer to the article Configurable Digital IO Module.
To configure the Configurable Digital IO Instrument:
- Right click the DIGITAL_IO component and select Configure U? (DIGITAL IO) to launch the Digital I/O Configuration dialog.
- Press the Add button to the right of the Input Signals section at the top of the dialog to add a second group of signals named
BIN[7..0]. - Click once in the Style column to the right of the signal
AIN[7..0]to expose the arrow and select the Bar style. - Click once in the Color column to the right of the signal
AIN[7..0]to expose the arrow and select the color Orange. - Press the Add button to the right of the Output Signals section at the bottom of the dialog to add a second group of signals named
BOUT[7..0]. - Click once in the Style column to the right of the signal
AOUT[7..0]to expose the arrow and select the Slider style. - Click once in the Style column to the right of the signal
BOUT[7..0]to expose the arrow and select the LED Digits style. The dialog should now appear as it does in the figure below. - Click OK.
Configuring the Digital IO instrument.
Completing the Schematic Wiring
With the components configured, the next step is to complete the final placement and wiring of the top level schematic.
To complete the wiring of the design:
- A completed version of the
Effects_Sch.SchDocschematic is shown in the figure below. Use this as a guide to position the port-plugin components around the sheet symbol, then reorder the sheet entries so they will line up nicely with them. - Using the figure below as a guide, complete the wiring of the components in your design.
- Once you have completed wiring up the schematic, select Tools»Annotate Schematics Quietly to annotate the design, giving each component a unique designator.
- Compile the design by selecting Project»Compile FPGA Project Audio_Effects.PrjFpg. Fix any compilation or wiring errors as necessary.
- Save your work.
Finalizing the schematic wiring.
Configuring projects to run on the Desktop NanoBoard
At this point, we have completed the bulk of the FPGA design but there is one additional step required before we can run it on the Desktop NanoBoard. Constraining an FPGA design is the process of defining the specific FPGA pins that you want each of the signals in your design to appear on. This is an important step as it will ensure that the FPGA design is able to interact with NanoBoard resources that have been hardwired to the FPGA daughter board.
When defining constraints, it is possible to hardcode them into the top-level schematic sheet but this is not advisable. The reason for this is because it binds the design to a specific device and limits your ability to retarget a different FPGA should the need arise. Best practice is to store constraint information in a separate location to the schematic. Altium Designer implements this approach using a set of pre-built and user-definable constraint files which can be added to the FPGA project.
Auto-configuring projects running on the Desktop NanoBoard
Auto configure the FPGA project.
In order to make the process of targeting your design to the Desktop NanoBoard easier, Altium Designer includes a handy auto configuration feature. By utilizing some smarts that have been built into the NanoBoard's firmware, Altium Designer is able to probe the Desktop NanoBoard and determine exactly what daughter and peripheral boards are connected. A set of pre-defined constraint files will then be loaded and grouped together into a configuration that targets your specific hardware setup.
To auto-configure your FPGA design to run on a Desktop NanoBoard:
- Make sure your Desktop NanoBoard is connected to your PC and powered on.
- Select View»Devices or click on the Devices View icon in the toolbar.
- In the Devices View, ensure that the Live checkbox is checked. You should see a picture of the Desktop NanoBoard in the upper region of the display.
- Right-click the Desktop NanoBoard icon and select Configure FPGA Project»Audio_Effects.PrjFpg.
- Altium Designer will take just a few moments to probe the Desktop NanoBoard and create a new configuration. Click OK to accept the new configuration.
You may notice that a new Settings folder has been added to the project, as shown in the figure below. In this folder you will find a Constraint Files folder, with all of the newly added constraint files.
Note the Settings folder that has been added to the Project.
Several of the constraint files will have a 'shortcut' ![]() symbol. Altium Designer uses this notation to indicate files which are not stored in the main project folder. These particular files are all pre-defined constraint files that are shipped with Altium Designer. They are specific to the various peripheral and daughter boards that they represent and should NOT be edited as changes made to these files will affect all other projects that you build for the Desktop NanoBoard.
symbol. Altium Designer uses this notation to indicate files which are not stored in the main project folder. These particular files are all pre-defined constraint files that are shipped with Altium Designer. They are specific to the various peripheral and daughter boards that they represent and should NOT be edited as changes made to these files will affect all other projects that you build for the Desktop NanoBoard.
The constraint file that has been highlighted in the figure above was automatically created by the auto-configure process and is stored with the project. This file defines where the peripheral boards are located on the Desktop NanoBoard.
Creating User Constraints
The auto-configuration process deals with the mapping of ports defined on the top-level FPGA schematic and their target FPGA pins. There are, however, additional constraints (such as the clock frequency) that are important for the design but which can not be handled automatically. In order to capture this information, it is best to create another constraint file that is reserved for this information and add it to the configuration.
To create a new user constraint file and add it to the configuration:
- Right click the
Audio_Effects.PrjFpgproject in the Projects panel and select Add New to Project»Constraint File. - Select File»Save As to save the file. Give it a meaningful name such as
MyConstraints.Constraintand click OK. - Go to Project»Configuration Manager or right click the project in the Projects panel and select Configuration Manager, the Configuration Manager dialog will open.
- Locate
MyConstraint.Constraintin the Constraint Files column and check the box in the Configurations column to add the constraint to the existing configuration. - Click OK to close the Configuration Manager and save your changes.
Adding a new constraint file to the configuration.
To add a clock constraint to the CLK_BRD signal:
- Open
MyConstraints.Constraint. - Select Design»Add Modify Constraint»Port.
- In the Add/Modify Port Constraintdialog:
- Set the Target to CLK_BRD
- Set the Constraint Kind to FPGA_CLOCK_FREQUENCY
- Set the Constraint Value to 50MHz
- Click OK to close the Add/Modify Port Constraint dialog.
- Observe that a new constraint record has been added to
MyConstraints.Constraint, as shown below. Save your work.
![]()
Building the FPGA Design
Once the FPGA design has been defined along with its constraints, you are now ready to build it. Building an FPGA design is the process of compiling and synthesizing your entire FPGA design into a configuration bit file that can be downloaded and run on the target FPGA device. Altium Designer standardizes the way you build an FPGA design so that it is vendor independent. You'll recall that a copy of the Vendor tools for the specific device you are targeting was listed in the What you will need section of this tutorial. Altium Designer needs these vendor tools in order to place and route the design but the interaction with these back end tools will be largely transparent to the user.
To build an FPGA design:
- Make sure your Desktop NanoBoard is connected to your PC and powered up.
- Select View»Devices View or click on the Devices View icon in the toolbar.
- Ensure the Live checkbox is checked. You should see a picture of the Desktop NanoBoard in the upper region of the display and an icon of the Spartan 3 FPGA in the middle region.
- In the drop down list just below the Spartan 3 icon, be sure that the Audio_Effects / NB2DSK01_08_DB30_04 project / configuration pair is selected.
- Locate the Compile, Synthesize, Build, Program FPGA buttons running left to right just below the Desktop NanoBoard icon. As this is the first time you have built your design, the colored indicators on each of the buttons will appear RED. Click once on the words Program FPGA to begin the build process.
-
As the build process progresses, the colored indicator from each stage will turn yellow while it is processing and then green when completed successfully. The process of building the design may take several minutes to complete. You can observe the progress of the build from the Messages and Output panels which can be accessed from the System panel tab in the lower right section of the main workspace.
FPGA Build process in the Devices View.
- If any errors occur you will need to rectify them before you can proceed. Try to locate the source of the error by retracing your steps through the instructions of the tutorial.
- A summary dialog will be displayed once the design has been built and downloaded successfully. Click OK to close this dialog.
- Once the FPGA design has been downloaded to the Desktop NanoBoard, you should notice that the status of the TSK3000A processor has changed from Missing to Running. We can now begin work on the embedded code that this processor will run.
Developing the Embedded Code
Altium Designer uses an Embedded Project as the container for all of the source code intended to execute on a given target. To create a new embedded project:
- Select File»New»Project»Embedded Project from the menus, or click Blank Project (Embedded) in the New section of the Files panel.
- The Projects panel will display a new Embedded project with the default name Embedded_Project1.PrjEmb. Select File»Save Project or right-click the project in the Projects panel and select Save Project. Save the file as
Audio_Effects_Emb.PrjEmb. If you want to keep your embedded project documents separate from your FPGA project documents, you may wish to save the Embedded Project in a sub folder called Embedded under your FPGA project folder.
Linking an Embedded Project to its Target Processor
An Embedded Project can be developed in isolation but pretty soon you're going to want to run it on a target processor. Altium Designer gives you the ability to link your embedded project to an FPGA project containing an embedded processor.
The embedded project is linked to the target processor in the Structure Editor.
To link an Embedded Project to its target processor:
- Make sure both the Embedded Project and the FPGA Project that contains the target processor are loaded in the Projects panel.
- Enable the Structure Editor option at the top of the Projects panel to switch to the Structure Editor mode.
- Left-click and drag the Embedded Project over the top of the FPGA project. Any valid processor targets will be highlighted in light blue. Drop the project on the MCU (TSK3000A) processor.
- Switch the Projects panel back to File View. Observe that the hierarchy of the projects have been updated placing
Audio_Effects_Emb.PrjEmbas a child ofAudio_Effects.PrjFpg.
Adding the Source Code to the Embedded Project
When a new embedded project is first created, it will be created as an empty container. You must then add or create the relevant source files to the project. Altium Designer can compile C source files, C header files, or Assembly files as part of your project. Altium Designer also includes a powerful productivity aid when developing an embedded application, namely the Software Platform Builder, which is used to build a Software Platform for your application.
Building the Software Platform
The Software Platform is a software framework that facilitates writing software to access peripheral devices on the NanoBoard that are part of your FPGA design. It also facilitates the implementation of software protocols, and provides extra functionality that you can use in your application, such as multithreading. In essence, it is a collection of software modules, delivered as source code. These modules are automatically added to your embedded project to take care of various low level routines that are required to control or access peripherals. The modules also provide an interface to the application, offering specific functionality (for example, set_baudrate(), a function to dynamically change the baud rate).
The Software Platform Builder is the graphical user interface that you use to configure and add modules to your project, building up the Software Platform. The Software Platform Builder becomes available when you add a special document to your embedded project: a Software Platform file with extension .SwPlatform. This document both represents the Software Platform for your project and provides you with a graphical interface to select and configure the modules you need. What you need, of course, depends on the peripheral devices on your FPGA design that you wish to access in your application.
The Software Platform Builder can read your FPGA design and import the appropriate low-level modules for the peripherals on your FPGA design. You can use this import as a starting point and add more (higher-level) modules to the Software Platform file.
To add a Software Platform and build it:
- Right-click the embedded project in the Projects panel and select Add New to Project»SwPlatform File. A blank Software Platform document named
Software Platform1.SwPlatformwill be added to the Embedded Project and displayed in the main editor window. - Rename the newly created file by selecting File»Save As. Navigate to the same folder as your embedded project and type the name
Audio_Effects_Emb.SwPlatformand click on Save. - The next step is to build up the device stacks in the Software Platform. To start this, click the Import from FPGA button. This will add a low-level hardware wrapper for each of the hardware modules detected in the OpenBus document, as shown by the green icons in the figure below.
- Next you must grow each device stack up, one by one. To do this:
- Click once on the green General Purpose IO Port wrapper, then click the Grow Stack Up button. The Grow Stack dialog will open, click once on the orange GPIO Port Driver and click OK to add it to the stack.
- Click once on the green I2S Master Controller wrapper, click the Grow Stack Up button, adding the I2S Driver.
- Click once on the green SPI Master Controller wrapper, click the Grow Stack Up button, adding the CS4270 Audio Codec Driver. After closing the Grow Stack dialog you will notice that both the SPI Driver and the CS4270 Audio Codec Driver have been added to the SPI stack.
- Click once on the green Virtual Terminal Instrument driver, click the Grow Stack Up button, adding the Serial Device IO Services context.
That's it, the low-level hardware wrappers, device drivers and context code have been added to your embedded project - you can now focus on the high level code in the application. To learn more about the Software Platform, read the Introduction to the Software Platform.
The completed Software Platform.
Adding main.C
To create a new C file and add it to the project:
- Right-click the embedded project in the Projects panel and select Add New to Project»C File. A blank text document named
Source1.Cwill be added to the Embedded Project and displayed in the main editor window. - Rename the newly created file (with a .C extension) by selecting File»Save As. Navigate to the same folder as your embedded project and type the name
main.Cand click on Save.
Writing some C Source Code
Now that our Embedded Project has been linked to a hardware platform that it can execute from, we are ready to start writing some C code. We'll take things slowly and using this small section of code, write the value 0x55 to the input at Port A of the Digital IO Instrument.
To add some simple code to the Embedded Project:
-
Open the auto generated
hardware.hfile that is now part of theAudio_Effects_Emb.PrjEmbproject. Observe that an entry for the Port IO component's base address has already been made. The base address Base_GPIO may be slightly different in your design.//.............................................................................. #define Base_GPIO 0xFF000000 #define Size_GPIO 0x00000002 //.............................................................................. -
Open main.C and enter the following source code:
#include "hardware.h" #define DIGIO_PORTA (*(unsigned char*)Base_GPIO) void main (void) { DIGIO_PORTA = 0x55; } - Switch to the Devices view by selecting View»Devices View or clicking on the Devices View button in the toolbar.
- Click the arrow to the left of the words Program FPGA on the Program FPGA button to rerun the FPGA build process.
- From the Devices view, locate the digital IO instrument in the soft JTAG chain. Right-click the instrument and select Instrument to bring up the device's Instrument Rack.
-
The value for the signal
AIN[7..0]should display 0x55 as shown in the figure below.
Digital IO instrument rack. - If nothing appears on the
AIN[7..0]input of the Digital IO instrument, be sure that the OR2N1S component is correctly positioned on the schematic (changing it will require a re-build of the design from the Devices View). The TEST_BUTTON port plugin must be connected to the inverted input or the device will remain in a reset state.
Developing the Complete Application
At the beginning of this tutorial, we indicated that we would be developing a complete application capable of accepting an incoming audio signal and producing an audio output with a reverb-style effect added in software. So far we have laid the foundations for this application and only a few steps remain.
The final step is to complete the software required to create the reverb effect. The box below contains the complete listing of main.C.
#include <drv_cs4270.h> #include <drv_i2s.h> #include <drv_ioport.h> #include "devices.h" #include <string.h> #include <stdint.h> #include <stdio.h> #define PORT_A 0 #define PORT_B 1 #define I2S_BUF_SIZE 512 #define AUDIO_BUF_SIZE 65536 //this number MUST be a power of 2 #define I2S_SAMPLERATE 48000 #define MS_SAMPLES (I2S_SAMPLERATE / 1000) //millisecond samples int32_t i2s_inbuf[I2S_BUF_SIZE] = {0}; int16_t in_temp_buf[I2S_BUF_SIZE / 2] = {0}; int16_t process_buf[AUDIO_BUF_SIZE] = {0}; cs4270_t * cs4270_drv; i2s_t * i2s_drv; ioport_t* ioport_drv; void init_audio(void); void get_audio(void); void process_audio_echo(uint8_t delay); void passthrough(void); void put_audio(void); void main(void) { uint8_t effect_enable; uint8_t delay_coefficient = 0; //initialize the audio init_audio(); ioport_drv = ioport_open(DRV_IOPORT_1); //output a list of instructions on how to use the digital IO example to control audio on the terminal printf("\n\nAudio Reverb Example:\n"); printf("\n1. Set Bit 0 of BOUT[7..0] on the digital IO instrument for audio pass\n through.\n"); printf("\n2. Set Bits 1 - 7 to initiate the audio Reverb Effect.\n"); printf(" The Slider AOUT[7..0] will control the delay used by the reverb effect.\n"); printf("3. Clear all bits on BOUT[7..0] to stop audio.\n"); while (1) { effect_enable = ioport_get_value(ioport_drv, PORT_B); //read the value from the digital IO connected into GPIO port B ioport_set_value(ioport_drv, PORT_B, effect_enable); //loop value of 'b' to the output of the GPIO port B (display to user) //create a coefficient to control the delay from value of digital IO slider at port A of GPIO (aka Port 0 or OUTA[7..0]) delay_coefficient = ioport_get_value(ioport_drv, PORT_A); //loop value of delay_coefficient to A input of digital IO to display on the digital IO input channel A ioport_set_value(ioport_drv, PORT_A, delay_coefficient); //function to go and get the audio -- always gets audio when available and tries to fill input buffer get_audio(); //test for the IO port A status to indicate what type of effect to create if (effect_enable == 1) { //simple fetch and put audio function passthrough(); //function to put the audio in the output buffer put_audio(); } else if (effect_enable > 1) { //function to process the audio and create the echo process_audio_echo(delay_coefficient); //function to put the audio in the output buffer put_audio(); } } } /* *get audio and place into audio buffer */ void get_audio(void) { uint32_t rx_size; while (i2s_rx_avail(i2s_drv) < I2S_BUF_SIZE / 2) // if the incoming buffer is < 256 samples (1/2 buffer size), get more samples { i2s_rx_start(i2s_drv); // if no samples available, make sure the receiver is running } rx_size = i2s_rx_avail(i2s_drv) & ~1; // make even, the same number of samples for both channels rx_size = rx_size > I2S_BUF_SIZE ? I2S_BUF_SIZE : rx_size; i2s_read16(i2s_drv, in_temp_buf, rx_size); // read samples into the incoming buffer } /* *accept incoming audio and create a reverb effect */ void process_audio_echo(uint8_t delay) { static int16_t * prcs_insert_ptr = process_buf; //creating 2 pointers, slightly offset from one another to read data at different times in the history of the data acquisition process. //the delta between the two corresponds to the length of delay int16_t * prcs_echo_ptr = prcs_insert_ptr - ((MS_SAMPLES * ((delay) * 5)) + 1); int16_t * curr_ptr = in_temp_buf; if (prcs_echo_ptr <= process_buf) prcs_echo_ptr += AUDIO_BUF_SIZE; for (int i = 0; i < I2S_BUF_SIZE / 2; i++) { * prcs_insert_ptr = (* prcs_echo_ptr >> 1) + * curr_ptr; prcs_insert_ptr++; if (prcs_insert_ptr == & process_buf[AUDIO_BUF_SIZE]) prcs_insert_ptr = process_buf; curr_ptr++; prcs_echo_ptr++; if (prcs_echo_ptr == & process_buf[AUDIO_BUF_SIZE]) prcs_echo_ptr = process_buf; } } /* *passthrough audio triggered from the digital IO */ void passthrough(void) { static int16_t * prcs_insert_ptr = process_buf; int16_t * curr_ptr = in_temp_buf; for (int i = 0; i < I2S_BUF_SIZE / 2; i++) { * prcs_insert_ptr = * curr_ptr; prcs_insert_ptr++; if (prcs_insert_ptr == & process_buf[AUDIO_BUF_SIZE]) prcs_insert_ptr = process_buf; curr_ptr++; } } /* * write audio to the I2S output buffer */ void put_audio(void) { static int16_t * prcs_extract_ptr = process_buf; while (i2s_tx_avail(i2s_drv) < I2S_BUF_SIZE / 2) // wait till there is space for the received samples to store in the transmit buffer { i2s_tx_start(i2s_drv); // if no space available, make sure the transmitter is running } i2s_write16(i2s_drv, prcs_extract_ptr, I2S_BUF_SIZE / 2); prcs_extract_ptr += I2S_BUF_SIZE / 2; while (prcs_extract_ptr >= & process_buf[AUDIO_BUF_SIZE]) prcs_extract_ptr -= AUDIO_BUF_SIZE; } /* * initialize the audio peripherals */ void init_audio(void) { while (cs4270_drv == NULL) { cs4270_drv = cs4270_open(DRV_CS4270_1); } i2s_drv = i2s_open(DRV_I2S_1); i2s_rx_start(i2s_drv); i2s_tx_start(i2s_drv); } Listing of main.C.
To complete the embedded project and download the software to the target:
- Copy the contents of the listing in the box above to the clipboard.
- Return to main.C and use Edit»Select All or Ctrl+A to select the existing C code and press Delete.
- Select Edit»Paste or Ctrl+V to paste the clipboard contents into main.C.
- Save your work.
- Recompile and download the updated program by pressing the Compile and Download button in the toolbar.
- Connect an audio source to the black Line In port on the back of the Desktop NanoBoard (or the front of the NB3000).
- Switch to the Devices view by selecting View»Devices View.
- Right click the Terminal Instrument and select Instrument to launch the device's Instrument Rack. The Terminal Instrument should display a list of instructions as they appear in the figure below. (These instructions are created using printf commands in the main.C source file).
- Launch the instrument rack for the Digital IO instrument and set bit 0 of
BOUT[7..0]by clicking on the right most bit in the instrument rack. This will enable the audio pass-through and audio should now be heard through the speakers on the Desktop NanoBoard. Use the volume knob on the front of the Desktop NanoBoard to adjust the volume. - Set bit 1of
BOUT[7..0]from within the Digital IO instrument to enable the reverb effect. Use the sliderAOUT[7..0]to hear the difference in audio output.
Instrument Rack - Soft Devices.
Considering your Deployment Options
Now that we've arrived at a functional design, let's examine how you might deploy your product in the field. Altium provides a range of deployment NanoBoards that you can either use entirely as an off-the-shelf solution or that you can customize with your own peripheral boards. Alternatively you can go for a fully custom PCB solution that makes selective use of existing NanoBoard circuit blocks and combines them together into a single design. The choice of deployment options will be influenced by a range of factors including cost, time to market, logistics, and form and fit constraints. While we can't tell you which solution will be best for your specific situation, we can present the range of options so that you can get a fair indication of their pros and cons.
Level 1: Development of pure 'Device Intelligence'
Almost all designs will begin at this level. The focus of development is around the application software and programmable hardware using one of the Development NanoBoards such as the Desktop NanoBoard. Very little regard is given to the hardware platform to be used in the final implementation and work can rapidly proceed on proving out and cementing the features of the design. The decision of how (or if) to deploy the newly created system is independent of this level of design.
Assuming you intend to deploy your design beyond one of the Desktop NanoBoard products, you have two degrees of freedom.
- Hardware Platform - Will you use off-the-shelf (OTS) hardware, create your own, or use a mixture of the two?
- Enclosure - Will you use an OTS enclosure, create your own from scratch, or modify an existing one?
The following sections discuss how you might work within these degrees of freedom to varying levels.
Level 2: OTS Hardware Platform, OTS Enclosure
This level is the simplest deployment option as it makes use of both an off-the-shelf hardware platform and enclosure. By using one of Altium's deployment NanoBoards, you can mix and match different daughter boards and peripheral boards to produce a customized hardware platform that is tailored to your application. In addition, enclosing the complete NanoBoard in one of Altium's supplied cases will ensure a professional appearance of your product and avoids the logistical headaches associated with manufacturing. Design compatibility ensures you can seamlessly migrate your design from the Desktop NanoBoard to a complete deployment solution.
Deploying your designs in this fashion allows you to focus primarily on the device intelligence without being bogged down by hardware implementation issues. The unique identification system that has been built into the NanoBoard enables it to probe all connected daughter and peripheral boards and quickly reconfigure the entire design. You can be up and running on your deployment platform in little more than the time it takes to rerun the FPGA build flow.
Level 3: OTS Hardware Platform, Custom Enclosure
Deploying your design using an OTS deployment NanoBoard inside an enclosure of your own design is an incremental step from level 2 that can have a dramatic impact on the level of professionalism that you are able to portray to your customers. Use one of Altium's mechanical STEP models as the basis for customization or construct a completely new enclosure of your own design. Either way, you'll have the ability to tailor the form and fit of your end product to ensure it fits snuggly into its final environment.
Altium Designer's 3D bodies allow you to quickly visualize your end product and trap any interference issues that may crop up between the ECAD and MCAD environments.
Level 4: Mixture of OTS and Custom Hardware Platform, OTS or Custom Enclosure
While Altium is continuously developing more peripheral boards, there still might be occasions when you need to include your own custom hardware as part of the design. The expandability of the NanoBoards ensures that this is a relatively simple task and it gives you the best of both worlds. You can selectively customize the hardware platform while still leveraging off the existing infrastructure that has been designed into the NanoBoard architecture.
As with the previous level, the extent to which you use an existing enclosure or create/customize your own is completely up to you.
Level 5: Custom Hardware Platform, OTS or Custom Enclosure
This final level requires the greatest amount of hardware development but gives you the greatest flexibility in terms of form and fit. In particularly cost-conscious applications it may be necessary to rationalize NanoBoard circuitry to only those subsystems that are absolutely necessary to the design. The design reuse capabilities of Altium Designer makes this process a very quick and easy task. Because all of the NanoBoard circuits are included as design reuse blocks and installed as part of Altium Designer, you can link those blocks into your custom hardware design and avoid having to reinvent the wheel. Altium Designer even includes the part numbers and supplier information of all parts used in the NanoBoards. This makes the process of procuring parts an absolute breeze.
Transferring the Design to a Deployment Platform
The deployment level you choose will have some bearing on how simply you can retarget your design. The NanoBoard infrastructure includes intelligence that allows it to probe connected daughter boards and peripheral boards and automatically create a new configuration based on the connected hardware. All hardware supplied by Altium conforms to this standard but if you are using hardware from a third party or your own custom hardware that does not include this feature then you may need to perform some configuration steps manually to arrive at the same destination.
There is plenty of help available in Altium Designer, through the Knowledge Centre, to assist with the creation of new constraint files and configurations and so I won't repeat that content here. It is sufficient to say that once the new configuration has been defined, you can be up and running on your deployment platform in little more than the time it takes to rerun the FPGA build flow.