QuickGuide - Upgrading to Version 1.1 of the Altium Vault Server
Related article: Altium Vault Server - Centralized Supply Chain Management
The following changes have been implemented in version 1.1 of the Altium Vault Server:
- For access security reasons, the default data location has changed from
\Users\<ProfileName>\AppData\Roaming\Altium\VaultServerData(in version 1.0) to\ProgramData\Altium\VaultServerData(in version 1.1). - Changes have been made to provide central, server based control of an approved Suppliers list, and access to internal supply chain intelligence through ODBC.
The nature of these changes requires a slightly different procedure to be followed when upgrading from version 1.0, to that typically followed when upgrading the vault installation. This QuickGuide outlines the steps to successfully upgrade your installation of the Altium Vault Server from version 1.0 (Altium Vault Server 1.0.0.27573) – the initial public release of the vault – to version 1.1 (Altium Vault Server 1.1.28346).
Changing Data Location
- Disconnect Altium Designer from the Altium Vault Server (on the Data Management – Vaults page of the Preferences dialog).
- Stop all IIS application pools associated to the Altium Vault Server.
- Take a copy of the Firebird database (
DXPServer.dat) and data files folder (theRevisionsfolder and all its content) from the default install locations (\andProgramData\) – so simply copy the rootProgramDataVaultServerDatafolder. - Copy the data to the new default location (
\ProgramData\Altium\VaultServerData).
Upgrading the Vault Installation
- Uninstall Altium Vault Server 1.0. This is performed from the standard Programs and Features page (accessed from the Control panel) in Windows 7. Simply right-click on the entry for the
Altium Vault Server 1.0.0.27573and use the Uninstall command from the context menu – to keep existing vault data, be sure to click No when asked if you want to delete all data. - Install Altium Vault Server 1.1 (run
Altium Vault Server 1.1.28346.exe). Point to where the vault data is stored – either the new default location (\ProgramData\Altium\VaultServerData) or your existing custom location.
Updating Supply Chain Information
After upgrading your previous version of the vault, existing supply chain data in the vault database must be updated to make it compatible with this later version. This is achieved by using the Vault Migration Tool.
- Right-click on the
VaultMigrationTool.exefile and elect to Run as administrator. The Vault Migration Tool dialog will appear. - Enable the fourth option – Update supply chain information in Altium Vault Server 1.1.
- In the Vault Path field, enter the path to the target vault executable folder (
\Program Files (x86)\Altium\DXP Apps Server\Vault, for a default installation). - In the AltiumLive User field, enter the username (Email) element of your AltiumLive login credentials.
- In the AltiumLive Password field, enter the password element of your AltiumLive login credentials.
- Click the Run button.
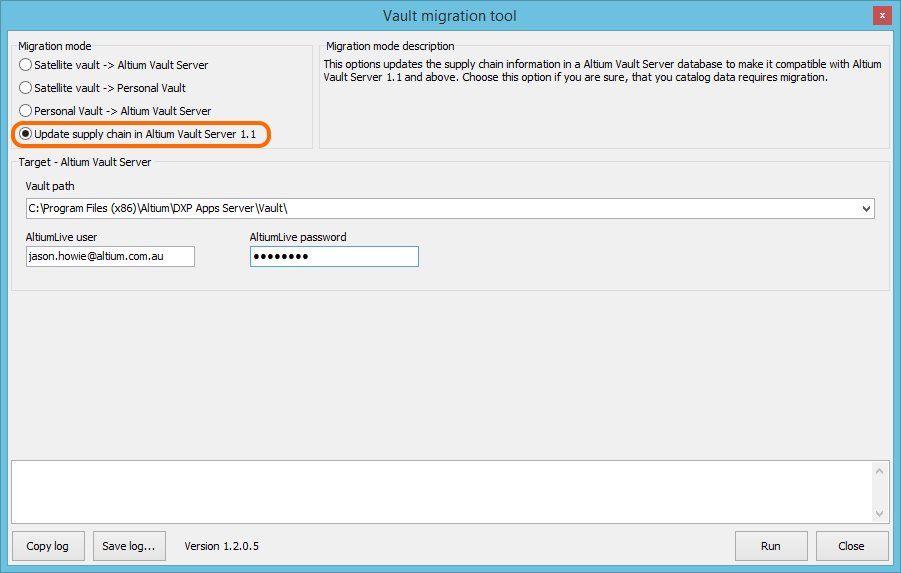
Setup the Vault Migration Tool to update supply chain information in your vault database to make it compatible with the
newly-upgraded version 1.1 of the Altium Vault Server.